Homemade Sour Cherry Pie: A Slice of Nostalgia and Flavor
Ah, sour cherry pie—it’s like a hug in dessert form. There’s something magical about sinking into a cozy corner with a slice of this vibrant, tangy treat after a long day. The moment the fork slices through the tender crust, revealing that ruby-red filling, I’m instantly transported to my grandmother’s kitchen. It’s the kind of recipe that sparks joy, creates memories, and brings people together. Today, I’m excited to share my favorite homemade sour cherry pie recipe, brimming with nostalgia and bursting with flavor.
Picture this: warm summers spent picking sour cherries at my grandmother’s quaint orchard. The trees danced in the gentle breeze, their branches weighed down with the promise of sweet-sour treasures. I remember being a kid, my hands stained a bright red from the cherries, giggling with my cousins as we tried to snatch the ripest ones from the highest branches. Once we had our bounty, it was time for the grand event—my grandmother would roll up her sleeves and whip up her famous sour cherry pie. The air would fill with the sweet aroma of baked cherries, sugar, and spices, creating an experience far richer than just a dessert.
It was about more than just the pie; it was a gathering of family. We would gather around the table, sometimes fighting over the last slice, sometimes sharing secrets and laughs, all while savoring every heavenly bite. Those memories shaped my love for cooking and my belief that food should be shared and enjoyed together. So, whether you’re revisiting cherished moments or creating new ones, this sour cherry pie will surely make your kitchen feel like home. Let’s roll up our sleeves and create some culinary magic together!
Ingredients
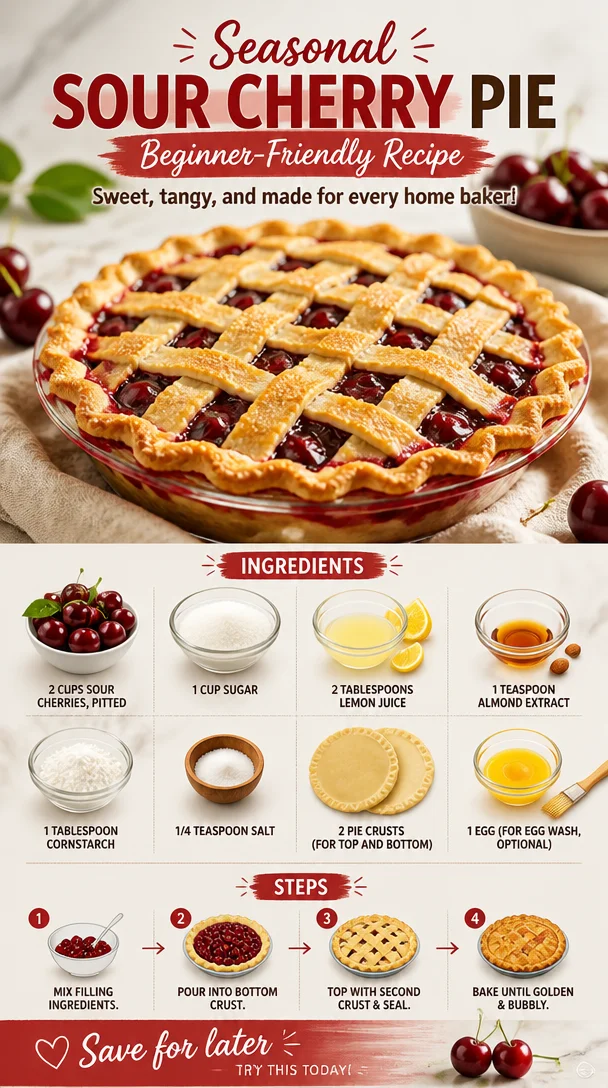
Now, let’s dive into the goodies you’ll need to make this spectacular sour cherry pie. Here’s the rundown:
-
2 cups sour cherries, pitted
Fresh cherries are ideal, but if you’re short on time, you can use frozen ones. Just make sure to thaw and drain them thoroughly to prevent a soggy crust. -
1 cup sugar
Regular granulated sugar works wonders, but if you’re feeling adventurous, try a mix of white and brown sugars for a deeper flavor. Adjust based on the tartness of your cherries; you might need a bit more or less sugar. -
2 tablespoons lemon juice
This brightens up the filling and balances the sweetness. Feel free to substitute with lime juice for a different zing! -
1 teaspoon almond extract
It adds a nutty flavor that complements the cherries beautifully. If you’re not a fan of almond, vanilla extract is a great alternative. -
1 tablespoon cornstarch
This thickens the filling so it doesn’t ooze everywhere once baked. You can substitute with arrowroot powder or tapioca flour if you prefer. -
1/4 teaspoon salt
Just a pinch enhances all the flavors, but be mindful of the saltiness if your pie crust is pre-seasoned. -
2 pie crusts (for the top and bottom)
You can use homemade or store-bought. If you’re feeling brave, I highly recommend making your own; the flaky texture is unbeatable! -
1 egg (for egg wash, optional)
Gives the crust that glorious golden finish. If you want to keep it vegan, a simple brush of almond milk works wonders too!
Step-by-Step Instructions
Ready to get your bake on? Let’s break down the process, step by step.
-
Preheat the Oven
Preheat your oven to 425°F (220°C). This hot environment is essential for that perfectly flaky crust! -
Prepare the Pie Crust
If you’re using homemade crust, roll it out to fit your pie dish—about 1/8 inch thick. Transfer it carefully to a greased pie dish, pressing it gently against the bottom and sides. Make sure to leave some overhang for crimping later. If using store-bought, unroll it and fit it nicely in the dish. -
Make the Cherry Filling
In a large bowl, combine the pitted sour cherries, sugar, lemon juice, almond extract, cornstarch, and salt. Toss everything together gently to ensure the cherries are well-coated. Let it sit for about 10-15 minutes; this allows the cherries to release their juices and create a luscious filling. -
Fill the Pie Crust
Pour the cherry mixture into the prepared pie crust, spreading it evenly with a spatula. Don’t worry if it looks a bit overflowing—that’s the juicy goodness coming through! -
Top It Off
Roll out your second pie crust, and carefully place it over the cherry filling. You can either cut slits for a lattice design or simply cover it with the entire crust. If using a full crust, cut a few slits to allow steam to escape. Remember to crimp the edges together with your fingers or a fork to seal in all that deliciousness. -
Add the Finishing Touches
If you’re opting for that lovely golden finish, brush the top crust with the beaten egg for an egg wash. This gives it a beautiful shine that’ll make your friends and family swoon! -
Bake the Pie
Place your pie in the preheated oven on a baking sheet to catch any drips. Bake for about 45-50 minutes or until the crust is golden brown and the filling is bubbling. If the crust browns too quickly, you can cover the edges with aluminum foil while it continues to bake. -
Cool and Serve
Once out of the oven, let your pie cool on a wire rack for at least an hour. This cooling period allows the filling to set up properly. When you cut into it too soon, expect a delightful mess—and while delicious, it’s aesthetically pleasing to slice into a well-set pie!
Serving Suggestions
To serve your beautifully baked sour cherry pie, slice it into generous wedges and enjoy it warm or at room temperature. A scoop of vanilla ice cream or a dollop of freshly whipped cream makes an excellent companion, balancing the tartness of the cherries with a creamy contrast. For a fun presentation, dust the top with powdered sugar or place a sprig of mint on each slice for that added pop of color!
Recipe Variations
-
Sour Cherry Almond Crumble: Instead of a top crust, sprinkle a mixture of oats, brown sugar, and sliced almonds over the pie for a delicious crumble topping.
-
Chocolate Cherry Pie: Incorporate a handful of chocolate chips into the cherry filling for a rich twist.
-
Vegan Cherry Pie: Use a plant-based butter substitute for the crust and replace the egg wash with almond milk or aquafaba.
-
Spiced Sour Cherry Pie: Add a pinch of cinnamon or nutmeg to the filling for an aromatic kick.
Chef’s Notes
This sour cherry pie recipe is incredibly nostalgic for me. I’ve tinkered with it over the years, tweaking spices and proportions to get just the right balance. I once tried adding a splash of bourbon to the filling, and let me tell you, it transformed the flavor profile from delightful to unforgettable! From my grandmother’s kitchen to mine, each pie becomes a personal journey. I hope it becomes yours, too.
FAQs and Troubleshooting
1. My pie crust is soggy. What did I do wrong?
A soggy crust can result from wet filling or under-baking. Ensure your cherries are well-drained if you’re using frozen, and if in doubt, bake the pie a bit longer.
2. How do I know when my pie is done?
Look for a bubbly filling and a golden crust. You can also use a toothpick to check if the crust is firm.
3. Can I make the pie ahead of time?
Absolutely! You can prepare the filling and refrigerate it ahead of time or even freeze the entire pie before baking. Just increase the baking time if baking from frozen.
4. How should I store leftovers?
Store the pie covered in the refrigerator for up to 3-5 days. You can also freeze slices—just wrap them tightly in plastic wrap and then in foil!
Nutritional Info
(For a standard slice of sour cherry pie, values may vary depending on specific ingredients used)
- Calories: Approximately 300
- Total Fat: 15g
- Saturated Fat: 6g
- Carbohydrates: 40g
- Fiber: 3g
- Sugar: 15g
- Protein: 3g
So there you have it—a beautiful, delicious, and nostalgic homemade sour cherry pie that’s sure to impress! Get ready to create some lovely memories in the kitchen and indulge in a slice (or two) of this delightful dessert. Happy baking, and may your cherries always be perfectly sour!
PrintHomemade Sour Cherry Pie
A nostalgic dessert bursting with flavor, this homemade sour cherry pie is perfect for any occasion. Enjoy the tangy filling and flaky crust alongside cherished memories.
- Prep Time: 20 minutes
- Cook Time: 50 minutes
- Total Time: 70 minutes
- Yield: 8 servings 1x
- Category: Dessert
- Method: Baking
- Cuisine: American
- Diet: Vegetarian
Ingredients
- 2 cups sour cherries, pitted
- 1 cup sugar
- 2 tablespoons lemon juice
- 1 teaspoon almond extract
- 1 tablespoon cornstarch
- 1/4 teaspoon salt
- 2 pie crusts (for top and bottom)
- 1 egg (for egg wash, optional)
Instructions
- Preheat your oven to 425°F (220°C).
- Prepare the pie crust by rolling it out to fit your pie dish and pressing it gently into the dish.
- Make the cherry filling by combining pitted sour cherries, sugar, lemon juice, almond extract, cornstarch, and salt in a bowl.
- Fill the pie crust with the cherry mixture, spreading it evenly.
- Top the pie with the second crust, cutting slits if desired.
- Add the egg wash to the top crust for a golden finish.
- Bake the pie for 45-50 minutes or until golden brown and bubbling.
- Cool the pie on a wire rack for at least an hour before serving.
Notes
Serve warm or at room temperature with vanilla ice cream or whipped cream. For a fun presentation, dust with powdered sugar or add a sprig of mint.
Nutrition
- Serving Size: 1 slice
- Calories: 300
- Sugar: 15g
- Sodium: 100mg
- Fat: 15g
- Saturated Fat: 6g
- Unsaturated Fat: 7g
- Trans Fat: 0g
- Carbohydrates: 40g
- Fiber: 3g
- Protein: 3g
- Cholesterol: 30mg
Keywords: sour cherry pie, dessert, baking, nostalgic dessert, cherry recipes