Cherry Pie Bars: Delightfully Easy and Delicious
Ah, cherry pie bars—just the mention of them might make your mouth water! These treats are the perfect balance of sweet and tart, nestled in a buttery, flaky crust that practically crumbles in your fingers. Imagine biting down into one of these delicious bars, the vibrant cherry filling oozing out as you savor every morsel. It’s like a comforting hug from Grandma on a hot summer day, with a hint of nostalgia that brings back fond memories of family gatherings, lazy afternoons, and laughter.
My Cherry Pie Bar Adventure
Let me take you back to my childhood, a time when kitchen escapades were in full swing and every family get-together felt like a mini festival. I remember one summer day vividly—we were visiting my grandparents, and as usual, Grandma was in the kitchen, creating magic from simple ingredients. It was cherry season, and she had just returned from the local farmer’s market, her apron dusted with flour and a smile brightening the room.
“Clara, we’re making cherry pie bars today!” she announced, her eyes lighting up with excitement.
We spent the afternoon pitting cherries, measuring ingredients, and giggling as flour clouds danced in the air. The smell of warm cherries and buttery crust filled the house, wrapping around us like a warm blanket.
When they finally came out of the oven, the anticipation was palpable. These bars became a staple at our summer picnics—there wasn’t a gathering without them! The joy of sharing those bars with family and friends has inspired me to develop my own version that everyone can enjoy, any time of the year. Let’s dive into this delightful treat full of delicious memories!
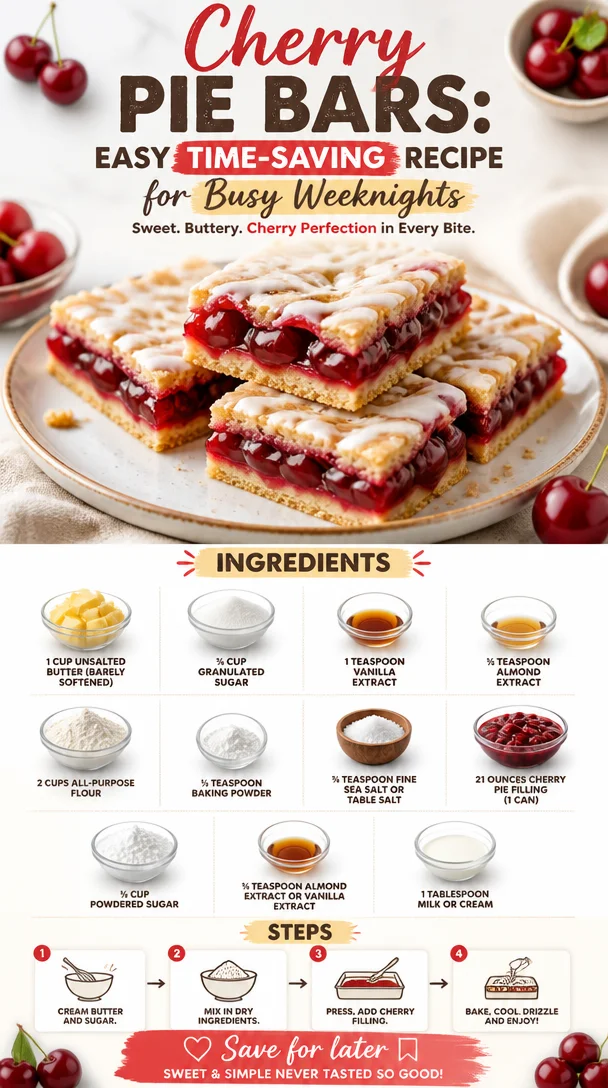
Ingredients
Before we roll up our sleeves, let’s gather everything we need for these luscious cherry pie bars:
-
1 cup unsalted butter (barely softened)
The star of our crust! Look for high-quality butter for a rich flavor. If you’re in a pinch, stick margarine can be a substitute, though the taste will vary slightly. -
¾ cup granulated sugar
This provides the sweetness that balances the tartness of the cherries. You can use coconut sugar for a more caramel-like flavor if you’re looking for an alternative. -
1 teaspoon vanilla extract
A must-have for elevating flavors! Pure vanilla is always preferred, but imitation vanilla will work in a bind. -
½ teaspoon almond extract
This addition gives a lovely nutty undertone that complements the cherries incredibly well. Feel free to leave it out if you aren’t a fan or allergic to nuts! -
2 cups all-purpose flour
This is the backbone of our crust. For a gluten-free option, try a cup-for-cup gluten-free flour blend. -
½ teaspoon baking powder
Essential for a light and airy texture! -
¾ teaspoon fine sea salt or table salt
Salt enhances flavors! Use the salt you have, but fine sea salt mixes in better. -
21 ounces cherry pie filling (1 can)
You can use store-bought for convenience or make your own filling from fresh or frozen cherries. If you’re feeling adventurous, try mixing in a little sour cherry filling for an exciting tart twist! -
½ cup powdered sugar
This is for our delightful glaze. You can substitute it for a sugar alternative if you prefer, keeping in mind that the texture may vary. -
¼ teaspoon almond extract or vanilla extract (for glaze)
Just a touch to enhance the sweetness of our glaze! -
1 Tablespoon milk or cream
This is necessary for the glaze—dairy milk works best, but any plant milk can be used for a dairy-free version.
Step-by-Step Instructions
Alright, my fellow foodies! Let’s get cooking because the sooner we start, the sooner we can dive into these delightful cherry pie bars.
-
Preheat your oven
First things first! Preheat your oven to 350°F (175°C). -
Prepare your baking dish
Grease a 9×13-inch baking dish with some butter or line it with parchment paper for easy removal later. A little oil will go a long way here! -
Make the crust
In a large mixing bowl, cream together the butter and granulated sugar until it’s light and fluffy—this usually takes about 2-3 minutes. It’s a good arm workout, I promise! Stir in the vanilla extract and almond extract until well combined. -
Mix dry ingredients
In another bowl, whisk together the all-purpose flour, baking powder, and fine sea salt. Gradually add this dry mixture into the butter-sugar mixture, mixing until it forms a crumbly dough. It should hold together when pressed, but still, be crumbly. -
Press the dough into the pan
Take about two-thirds of your dough and press it firmly into the bottom of the prepared baking dish—be sure to spread it evenly all the way to the edges! This will form our fabulous crust. -
Add the cherry filling
Now, it’s time for the cherry pie filling! Spread your cherry pie filling evenly over the crust. If you’re feeling a bit daring, sprinkle a little extra almond extract over the top of the cherries for an enhanced flavor profile! -
Crumble the remaining dough on top
Take the remaining dough and crumble it over the cherry filling. This doesn’t need to be perfect; the rustic look adds to the charm. It should cover most of the cherries but let a bit peek through. -
Bake
Bake in the preheated oven for about 30-35 minutes or until the top is golden brown and the filling is bubbling. Keep an eye on it toward the end—every oven behaves a little differently! -
Cool
Once baked, remove the bars from the oven and allow them to cool completely before cutting. This cooling step is crucial for neat slices! Trust me, the bars will hold together better if they are cooled down. -
Prepare the glaze
While the bars cool, mix together the powdered sugar, milk, and extra almond or vanilla extract in a small bowl until smooth. You want a drizzle-able consistency—add a touch more milk if it’s too thick. -
Drizzle and serve
Once the bars are cool, drizzle the glaze across the top. Now, it’s time to cut them into squares and serve! Don’t forget to snag a piece for yourself first!
Serving Suggestions
These cherry pie bars are great for any occasion! Serve them warm and fresh with a scoop of vanilla ice cream on the side, or enjoy them chilled. You can also top them with a dollop of whipped cream or a sprinkle of chopped nuts for added texture. They are perfect for potlucks, birthday parties, or just because!
Recipe Variations
Feeling adventurous? Here are a few fun ideas to mix things up:
- Berry Medley: Swap out the cherry pie filling for a blend of blueberries and raspberries for a delightful summer twist.
- Chocolate Cherry Bars: Drizzle some melted dark chocolate on top of your cherry filling before adding your crumb layer for a rich flavor combo.
- Nutty Crunch: Mix in some finely chopped pecans or walnuts into the crumble topping for some extra crunch.
- Spiced Delights: Add a pinch of cinnamon or nutmeg to the crust for a cozy, spiced flavor.
- Vegan Cherry Pie Bars: Replace the butter with coconut oil or vegan butter and use a flax egg in place of regular eggs for a vegan-friendly treat.
Chef’s Notes
Oh, how this recipe has evolved over time! I started with my grandma’s classic cherry pie filling recipe, but I love adding my own twist with the almond extract. It’s a game-changer! And speaking of game-changers, never underestimate the power of a good drizzle—a little glaze can elevate even the simplest of desserts.
Also, I remember my first attempt at this recipe; I was so excited to bake them that I forgot to grease my pan. Let’s just say those bars had a bit of a dramatic exit! But that mishap taught me the importance of preparation—now I’m the queen of parchment paper!
FAQs and Troubleshooting
Q: What can I substitute for cherry pie filling?
You can use any pie filling you like! Blueberry, apple, or even a combination of berries can be delicious alternatives. Or make a fresh filling with your favorite fruits mixed with a bit of sugar and cornstarch for thickening.
Q: Why is my crust crumbling apart?
If your crust is too crumbly, you might need a little more moisture. Try adding a tablespoon of water or an extra teaspoon of melted butter until it holds together better.
Q: Can I freeze these bars?
Absolutely! Once they are completely cool, wrap them tightly in plastic wrap and then place them in an airtight container. They can last up to three months in the freezer. Just thaw them overnight in the refrigerator when you’re ready to enjoy.
Q: How do I know when the bars are done baking?
Look for a golden-top and bubbling filling. If you insert a toothpick, it should come out mostly clean with a few crumbs attached—this is a good sign!
Nutritional Info
This cherry pie bar recipe serves about 12 and contains:
- Calories: 200 per bar
- Total fats: 10g
- Saturated fat: 6g
- Carbohydrates: 27g
- Sugars: 10g
- Protein: 2g
(Note that nutritional values may vary depending on specific brands and measurements.)
Whether you’re enjoying these bars at a picnic, a cozy night in, or sharing them with friends on a lovely afternoon, remember that the best recipes are the ones that bring people together. So grab your apron, let the cherry juice drip, and create some delicious memories! Happy baking!
PrintCherry Pie Bars
Delightfully easy and delicious cherry pie bars with a buttery, flaky crust and a sweet-tart cherry filling.
- Prep Time: 15 minutes
- Cook Time: 35 minutes
- Total Time: 50 minutes
- Yield: 12 servings 1x
- Category: Dessert
- Method: Baking
- Cuisine: American
- Diet: Vegetarian
Ingredients
- 1 cup unsalted butter (barely softened)
- ¾ cup granulated sugar
- 1 teaspoon vanilla extract
- ½ teaspoon almond extract
- 2 cups all-purpose flour
- ½ teaspoon baking powder
- ¾ teaspoon fine sea salt
- 21 ounces cherry pie filling (1 can)
- ½ cup powdered sugar
- ¼ teaspoon almond extract or vanilla extract (for glaze)
- 1 tablespoon milk or cream
Instructions
- Preheat your oven to 350°F (175°C).
- Prepare a 9×13-inch baking dish by greasing with butter or lining with parchment paper.
- Make the crust by creaming together the butter and granulated sugar until light and fluffy. Stir in vanilla and almond extract.
- Mix dry ingredients by whisking together flour, baking powder, and salt. Gradually add this to the butter-sugar mixture until a crumbly dough forms.
- Press about two-thirds of the dough into the bottom of the prepared baking dish.
- Add the cherry pie filling evenly over the crust.
- Crumble the remaining dough over the cherry filling.
- Bake for 30-35 minutes until golden brown and bubbling.
- Cool completely before cutting.
- Prepare the glaze by mixing powdered sugar, milk, and extract until smooth.
- Drizzle the glaze over cooled bars and cut into squares to serve.
Notes
Serve warm with vanilla ice cream or chilled. These bars freeze well for up to three months.
Nutrition
- Serving Size: 1 bar
- Calories: 200
- Sugar: 10g
- Sodium: 200mg
- Fat: 10g
- Saturated Fat: 6g
- Unsaturated Fat: 4g
- Trans Fat: 0g
- Carbohydrates: 27g
- Fiber: 1g
- Protein: 2g
- Cholesterol: 30mg
Keywords: cherry pie, dessert bars, summer dessert, easy baking, nostalgic recipes