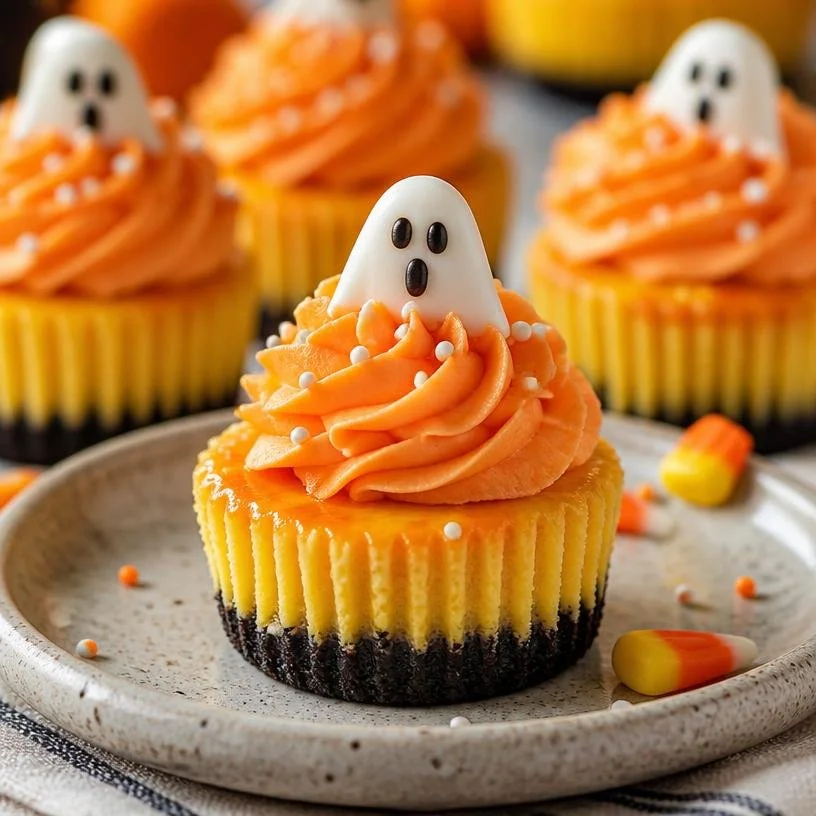
Spooktacular Mini Candy Corn Cheesecakes: A Sweet Halloween Treat
Ah, Halloween—the air is crisp, leaves are painting the ground in vibrant colors, and there’s an unmistakable excitement in the air. As the costumes come out and the jack-o’-lanterns light up, my mind turns to one of the season’s sweetest signatures: candy corn! Now, let me take you on a delicious journey as we whip up a batch of Mini Candy Corn Cheesecakes that are not only cute as a pumpkin but also bursting with flavor. Trust me, these little beauties will steal the spotlight at any gathering and make your taste buds dance!
Picture this: a gathering of friends, laughter echoing around the kitchen, and the tantalizing scent of fall wafting through the air. As the cheesecakes bake, you can’t help but think of the many Halloween parties you’ve celebrated, the costumes you’ve donned, and the memories that were created around a table filled with delightful treats. Whether it’s the chill in the air or the costumes that bring out our inner kids, there’s something so magical about this time of year that prompts nostalgia.
I remember one particular Halloween night when my friends and I decided to have a cozy gathering, complete with spooky snacks and a horror movie marathon. The highlight? A batch of mini cheesecakes I had whipped up while wearing my favorite witch’s hat. The sounds of laughter grew each time someone went back for seconds, and I felt a swell of joy knowing I’d created something everyone loved. That’s the magic of cooking—it’s not just about the food; it’s about the connections and the memories made around it. Now, it’s your turn to ignite that magic in your kitchen with these Mini Candy Corn Cheesecakes!
Ingredients
Let’s gather our ingredients. Here’s what you’ll need for these delightful mini cheesecakes, along with some tips and tricks to make your bake a breeze:
-
1 1/2 cups (201g) Oreo crumbs
Perfect for a chocolatey crust! You can substitute with chocolate graham crackers for a slightly different flavor. -
2 tbsp (41g) butter, melted
This helps bind the crust. Coconut oil is a great buttery alternative if you’re looking for a dairy-free option! -
12 ounces (339g) cream cheese, room temperature
Smooth cream cheese is key for that luscious texture. If you’re looking for a lighter option, Neufchâtel cheese works wonderfully, too. -
1/2 cup (104g) sugar
Sweetness is essential! You can use agave syrup or honey for a natural sweetening option, but be aware it may alter the texture slightly. -
2 tbsp (16g) all-purpose flour
This helps stabilize the cheesecake. For a gluten-free twist, almond flour or gluten-free flour works well. -
1/2 cup (115g) sour cream
Adds richness and flavor. Greek yogurt can be a fantastic substitute, adding a tangy twist! -
1 1/2 tsp vanilla extract
A staple for flavor! Ensure it’s pure vanilla extract for the best taste—or use almond extract for a fun alternative. -
2 large eggs
They bind everything together. If you need an egg substitute, try using 1/4 cup of unsweetened applesauce or a flax egg. -
Yellow gel icing color
For that vibrant candy corn color. If you don’t have gel food coloring, you can use natural food coloring, but the shades may vary. -
Orange gel icing color
Essential for that autumnal hue. Again, opt for natural color if you prefer, just keep in mind the intensity might differ. -
1/2 cup (120ml) heavy whipping cream, cold
This creates a rich, fluffy topping. For a lightened-up version, you can use whipped coconut cream. -
5 tbsp (36g) powdered sugar
Sweetens the whipped cream. You can omit this for a less sweet option or substitute with agave powder for a natural alternative. -
1/2 tsp vanilla extract
Adds depth to the whipped cream. Pure vanilla extract is best for a rich flavor! -
Ghost toppers
These are just for fun and can be found at any baking supply store. You can also get creative and use chocolate ghosts or edible candy eyes!
Now that we have everything ready, let’s dive into the wonderful world of cheesecakes!
Step-by-Step Instructions
Step 1: Preheat the Oven
Start by preheating your oven to 325°F (163°C). This ensures that your cheesecakes bake evenly and develop that beautiful, creamy texture.
Step 2: Prepare the Oreo Crust
In a medium bowl, combine your Oreo crumbs and melted butter. Stir until it’s all moistened—think of it as wet sand ready for a sandcastle! Once mixed, divide the mixture evenly among a lined mini muffin tin, pressing it down firmly to form a solid crust. Pro tip: use the bottom of a shot glass to press it down nicely and keep things tidy.
Step 3: Whip the Cream Cheese Mixture
In a separate large bowl, beat the room-temperature cream cheese until it’s silky smooth. Then, gradually add the sugar and flour, mixing until fully incorporated. This step is crucial; you want to avoid any lumps for that dreamy cheesecake texture! After that, fold in the sour cream and vanilla extract.
Step 4: Add the Eggs
Crack those eggs into the mix, one at a time, beating just until incorporated. Be careful not to over-mix—think gentle waves rather than a whirlwind! This helps maintain the perfect fluffy consistency.
Step 5: Divide and Color
Now it’s time to be artsy! Divide the batter into two bowls. In one bowl, add yellow gel icing color, and in the other, mix in both yellow and orange until you reach that gorgeous candy corn hue! The layering will give a beautiful gradient effect.
Step 6: Layer the Batters
Spoon the yellow batter into each mini crust until it’s about halfway full. Next, layer the orange batter on top. This is where you can get creative with swirls or just keep it simple and straight! Be gentle while pouring to avoid mixing the two colors.
Step 7: Bake
Pop your mini cheesecakes into the preheated oven for about 20-25 minutes, or until the edges are set and the center has a slight jiggle. Don’t worry if they puff up; they will settle as they cool!
Step 8: Cool and Chill
Once baked, allow your mini cheesecakes to cool in the pan for about 10 minutes, then transfer them to a wire rack to cool down completely. Pop them in the fridge for at least two hours (or overnight, if you can resist!).
Step 9: Whip the Cream Topping
While you’re waiting for the cheesecakes to chill, let’s make this airy whipped cream! In a chilled mixing bowl, beat the cold heavy whipping cream on medium speed until soft peaks form. Gradually add the powdered sugar and vanilla, beating until stiff peaks develop. Keep this in the fridge until you’re ready to serve.
Step 10: Decorate and Serve
Once your cheesecakes are chilled, dollop or pipe the whipped cream on top. For that extra Halloween flair, top with ghost toppers for a fun surprise! And don’t forget to snap a few pictures for Instagram while you’re at it—these mini treats deserve their moment in the spotlight!
Serving Suggestions
Place these adorable mini cheesecakes on a spooky platter, surrounded by candy corn and other Halloween treats for an eye-catching centerpiece. Add a sprinkle of edible glitter for an extra festive touch! These cheesecakes are perfect for Halloween parties, potlucks, or cozy family dinners. Just be ready for the "Oooohs" and "Aaaahs" when you unveil them!
Recipe Variations
Feel free to get creative with these mini cheesecakes! Here are some fun variations to consider:
- Chocolate Swirl: Add in some melted chocolate to the cream cheese mixture for a decadent chocolate base before layering with the candy corn colors!
- Pumpkin Spice: Add 1 teaspoon of pumpkin pie spice to the cream cheese mixture for a delightful fall twist.
- Mini Crust Options: Try using graham crackers or a nut-based crust for different textures and flavors that still hold up beautifully.
- Vegan Version: Substitute cream cheese with a vegan cream cheese alternative, replace eggs with flax eggs, and use coconut cream for the topping.
Chef’s Notes
I can’t help but smile when I think back to the first time I made these Mini Candy Corn Cheesecakes. It was a bit of an experiment, and let’s be honest, there was a slight mishap involving too much color gel (who knew a little goes such a long way?). But isn’t that the beauty of cooking? Messing up or adjusting on the fly often leads to the best kitchen stories and, ultimately, delightful discoveries.
These cheesecakes are versatile, and they’ve evolved to become a staple in my household during Halloween. Each year, it’s become a tradition to whip them up with friends while reminiscing about past Halloweens. Whether it’s laughing over burnt cookies or sharing ghost stories, every bite tells a story!
FAQs and Troubleshooting
-
Why did my cheesecake crack?
Cracks often happen if the cheesecake bakes too quickly or if it’s overbaked. Keep that oven temperature steady and avoid opening the door too frequently! -
How can I store leftover cheesecakes?
Store them covered in the refrigerator for up to three days. They are even more delicious the next day as the flavors develop! -
Can I freeze these cheesecakes?
Yes! They freeze beautifully. Just wrap them tightly in plastic wrap, then foil, and they’ll keep for a couple of months. Thaw in the fridge before serving. -
What do I do if my batter is lumpy?
Ensure your cream cheese is at room temperature before mixing. If it’s still lumpy, a quick spin with an immersion blender can smooth things out!
Nutritional Info
Note: Nutritional values are approximate and can vary based on specific ingredients used.
- Serving Size: 1 mini cheesecake
- Calories: 200
- Fat: 14g
- Carbohydrates: 19g
- Protein: 3g
- Sugar: 9g
Now, it’s your turn to bring a little Halloween magic into your kitchen with these Mini Candy Corn Cheesecakes! Trust me, the people closest to you will cherish the moments you create together, one delicious bite at a time. Happy cooking! 🍬
PrintSpooktacular Mini Candy Corn Cheesecakes

Cute and delicious Mini Candy Corn Cheesecakes that are perfect for Halloween gatherings.
- Prep Time: 15 minutes
- Cook Time: 25 minutes
- Total Time: 40 minutes
- Yield: 12 servings 1x
- Category: Dessert
- Method: Baking
- Cuisine: American
- Diet: Vegetarian
Ingredients
- 1 1/2 cups (201g) Oreo crumbs
- 2 tbsp (41g) butter, melted
- 12 ounces (339g) cream cheese, room temperature
- 1/2 cup (104g) sugar
- 2 tbsp (16g) all-purpose flour
- 1/2 cup (115g) sour cream
- 1 1/2 tsp vanilla extract
- 2 large eggs
- Yellow gel icing color
- Orange gel icing color
- 1/2 cup (120ml) heavy whipping cream, cold
- 5 tbsp (36g) powdered sugar
- 1/2 tsp vanilla extract
- Ghost toppers
Instructions
- Preheat the oven to 325°F (163°C).
- Combine Oreo crumbs and melted butter in a medium bowl, then press into the mini muffin tin.
- Beat the cream cheese until smooth, then add sugar and flour.
- Fold in sour cream and vanilla extract until combined.
- Add the eggs one at a time, mixing gently.
- Divide the batter into two bowls and color one yellow and the other yellow and orange.
- Spoon the yellow batter into each crust, then layer with the orange batter.
- Bake for 20-25 minutes until the edges are set.
- Cool for 10 minutes in the pan, then refrigerate for at least 2 hours.
- Beat the cold heavy cream until soft peaks form, then add powdered sugar and vanilla.
- Top cheesecakes with whipped cream and ghost toppers before serving.
Notes
These mini cheesecakes are perfect for Halloween parties and can be stored in the refrigerator for up to three days.
Nutrition
- Serving Size: 1 cheesecake
- Calories: 200
- Sugar: 9g
- Sodium: 200mg
- Fat: 14g
- Saturated Fat: 8g
- Unsaturated Fat: 5g
- Trans Fat: 0g
- Carbohydrates: 19g
- Fiber: 1g
- Protein: 3g
- Cholesterol: 70mg
Keywords: Halloween, cheesecake, mini desserts, candy corn, party treats