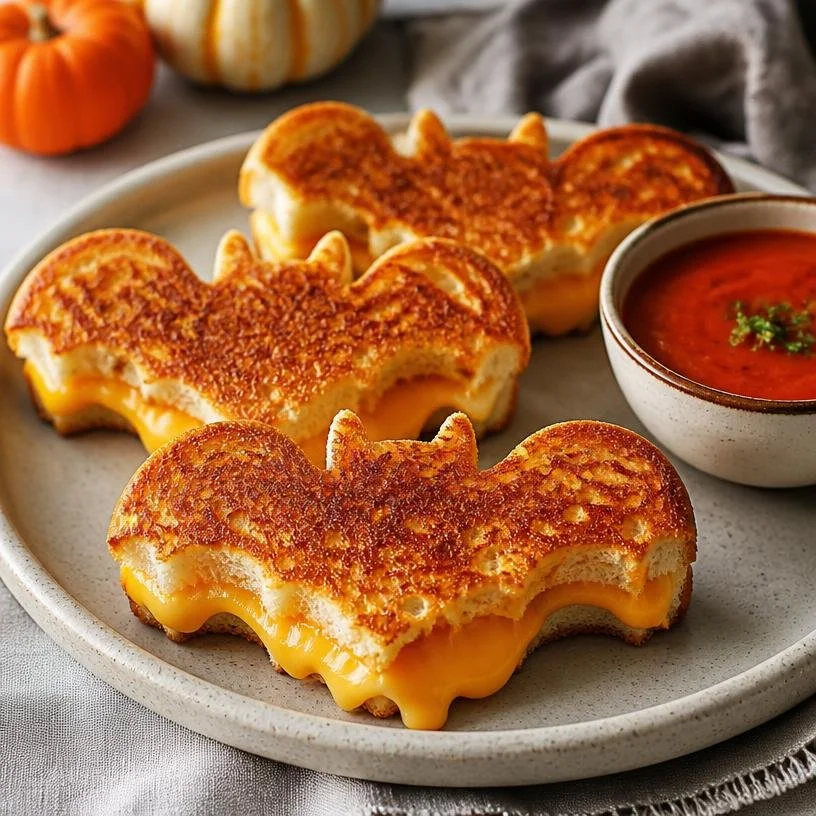
Mini Bat Grilled Cheese Sandwiches: A Comfort Food Delight
Hey there, fellow foodies! Clara here, your enthusiastic kitchen companion, and I am beyond excited to share one of my favorite comfort food recipes with you today: Mini Bat Grilled Cheese Sandwiches paired with a warm, comforting bowl of tomato soup. Because let’s face it—there’s just something about a gooey, cheesy bite alongside a rich, flavorful dip that feels like home.
Now, before we dive into the deliciousness that awaits, I want to talk about the importance of comfort food in our lives. These mini sandwiches aren’t just about taste; they’re about the warmth of family gatherings, cozy nights in, and those simple moments that make us smile. Imagine this: you come in from a long day, and the scent of melting cheese fills the air as you toast these little beauties to perfection. It’s pure bliss!
As someone who loves to create dishes that bring people together, I can assure you that these mini bat grilled cheese sandwiches are best enjoyed with loved ones (or all to yourself—no judgment here!). So, let’s get those aprons on and embark on this delicious journey!
A Cheesy Memory
Growing up, my family had a tradition of “grilled cheese and movie night” every Friday. My dad would whip up these classic sandwiches, using whatever bread and cheese we had on hand. As the cheese melted and dripped over the edges, we’d gather around the living room with bowls of tomato soup and our favorite flick of the week. There’s something so nostalgic about those evenings—the laughter, the gooeyness, and the satisfaction of a good meal as we curled up on the couch. It was during those cozy nights that I truly discovered the joy of cooking and sharing simple, heartfelt meals with the people I love.
Now, I’ve taken that beloved memory and transformed it into bite-sized perfection with these mini bat grilled cheese sandwiches! Perfectly suited for gatherings, snacks, or anytime when you simply crave a taste of nostalgia.
Ingredients
To whip up these delightful mini sandwiches, you’ll need just a few simple ingredients. Here’s what you’ll need:
-
King’s Hawaiian Rolls: These soft, slightly sweet rolls are perfect for our mini grilled cheese creation. They add a unique flavor that complements the cheese wonderfully. If you can’t find Hawaiian rolls, feel free to use any soft dinner rolls or even slider buns!
-
Cheese: Classic choices like cheddar or mozzarella work beautifully! I love a good sharp cheddar for that rich flavor, but feel free to mix it up with your favorite cheeses—fontina, gouda, or even some pepper jack for a kick!
-
Butter: A must for achieving that perfect golden crust! You can use regular unsalted butter, or if you’re feeling adventurous, try flavored butters like garlic or herb butter for added depth. For a healthier option, avocado oil or a plant-based spread can work too!
-
Tomato Soup: This is the ultimate dipping companion for your mini sandwiches! I recommend a store-bought brand that you love, or you can make a quick homemade version. If you’d like a lighter option, consider a roasted red pepper or a basil soup instead!
Step-by-Step Instructions
Ready to make magic in the kitchen? Let’s get started on these mini bat grilled cheese sandwiches! Follow these step-by-step instructions for cheesy perfection.
Step 1: Prep Your Ingredients
Gather all your ingredients and set up your work area. This helps streamline your cooking process and makes everything feel a little less chaotic. Slice the King’s Hawaiian rolls in half, and set them aside. Grate or slice your cheese, so it’s ready to go—no one likes a cheese delay when you’re hungry!
Step 2: Butter It Up
Take a high-quality unsalted butter and spread a generous layer on the outside of each roll half. This is where the magic truly begins! Don’t skimp on the butter; it helps achieve that golden, crispy exterior. If you’re experimenting with flavored butter, now’s the time to shine!
Step 3: Assemble Your Sandwiches
Place a slice of cheese on the bottom half of each buttered roll, then add a second slice on top. Feel free to get creative and layer different cheese types for unique flavors. Top it off with the other half of the roll, and feel free to press them down a tad to keep everything nice and compact.
Step 4: Heat Your Pan
Preheat a skillet or griddle over medium heat. You want it hot enough to toast the bread but not so hot that it burns! A non-stick surface works wonders here. If you like a bit of extra flavor, add a small pat of butter to the pan to enhance that delicious buttery scent.
Step 5: Grill to Perfection
Once the pan is warmed up, place your mini sandwiches in the skillet. You may need to do this in batches depending on your pan’s size. Grill for about 3–4 minutes on each side or until they’re beautifully golden brown and the cheese is melting. Don’t forget to check on them—rotate to get an even toast!
Step 6: Keep ‘Em Warm
As you finish grilling the sandwiches, keep them warm in a low oven (around 200°F) while you finish up the batch. This ensures that they stay gooey while you tackle all those hungry guests.
Step 7: Serve it Up
Serve your mini bat grilled cheese sandwiches fresh off the griddle alongside a warm bowl of tomato soup for dipping! Arrange them on a cute platter for that Instagram-worthy touch. Trust me, every bite will take you back to those cozy nostalgic movie nights.
Serving Suggestions
For serving, stack the mini sandwiches high on a platter, and don’t forget to include individual bowls of tomato soup for dipping. You can garnish the soup with a sprinkle of fresh herbs or a drizzle of olive oil to elevate the presentation. Perfect for a casual gathering, these sandwiches are sure to be a hit!
Recipe Variations
Feeling adventurous? Here are some creative twists you can try with your mini bat grilled cheese sandwiches:
- Pesto and Mozzarella: Swap out the traditional cheese for fresh mozzarella and add a layer of pesto for a burst of flavor.
- Spicy Kick: Add sliced jalapeños or a spread of sriracha to give your sandwiches that spicy flair!
- Sweet and Savory: Incorporate thin apple slices or a drizzle of honey between the cheese for a delicious contrast.
- Herbed Cream Cheese: Spread a layer of herbed cream cheese on the inside of the rolls for a tangy twist.
- Vegan Style: Use vegan cheese and plant-based butter to create a deliciously cheesy, dairy-free option!
Chef’s Notes
I’ve played around with this recipe over the years, always finding new ways to add my personal touch. One time, I decided to line a baking dish with parchment paper and put a big batch in the oven to toast. It was a game changer! I could make a ton at once, and it saved time during family gatherings. So if you’re feeding a crowd or just want to indulge, bake them for about 15 minutes at 375°F for a no-fuss, easily shareable option!
And remember, cooking should be fun and often a little messy. Don’t be afraid to test out your own flavor combinations—you never know when you’ll discover a new favorite!
FAQs and Troubleshooting
Q: What if my cheese doesn’t melt?
A: The heat might be too low. Make sure your skillet is properly preheated and consider covering the pan briefly to trap heat, which helps melt the cheese faster.
Q: Can I make these sandwiches ahead of time?
A: Absolutely! Prepare the sandwiches and refrigerate them. When you’re ready to enjoy, simply grill them off as directed. They’ll still be delicious!
Q: How can I keep the sandwiches warm?
A: As mentioned, a low oven works wonders. Just keep them at around 200°F until you’re ready to serve.
Q: I don’t like tomato soup; what else can I dip in?
A: No problem! Try serving them with a roasted red pepper dip, avocado hummus, or a creamy ranch for a fun twist.
Nutritional Info
While I believe in indulging in the good stuff, here’s a quick glance at the nutrition side of things:
- Calories: Approximately 250-300 per sandwich (with cheese and butter).
- Protein: 10-12g (dependent on cheese type).
- Carbohydrates: 30g.
Remember to adjust the numbers based on your ingredient choices!
There you have it—mini bat grilled cheese sandwiches, ready to be enjoyed! I hope you embrace the warmth and love that comes with cooking. So grab some friends, dig in, and savor every cheesy bite! Happy cooking, everyone!
PrintMini Bat Grilled Cheese Sandwiches

Delight in these bite-sized grilled cheese sandwiches, perfectly paired with a warm bowl of tomato soup—an ideal comfort food for any occasion.
- Prep Time: 15 minutes
- Cook Time: 15 minutes
- Total Time: 30 minutes
- Yield: 12 servings 1x
- Category: Snack
- Method: Grilling
- Cuisine: American
- Diet: Vegetarian
Ingredients
- 12 King’s Hawaiian Rolls
- 8 oz sharp Cheddar cheese or mozzarella
- 4 tbsp unsalted butter
- 2 cups tomato soup
Instructions
- Prep your ingredients by slicing the King’s Hawaiian rolls in half and grating or slicing the cheese.
- Butter the outside of each roll half with unsalted butter.
- Assemble your sandwiches by placing cheese slices on the bottom half of each buttered roll and topping with the other half.
- Heat a skillet over medium heat to toast the bread.
- Grill the sandwiches for 3–4 minutes per side until golden brown and cheese is melted.
- Keep the grilled sandwiches warm in a low oven while finishing grilling the batch.
- Serve with tomato soup for dipping.
Notes
Feel free to experiment with different cheese types or add flavorings like garlic butter.
Nutrition
- Serving Size: 1 sandwich
- Calories: 300
- Sugar: 2g
- Sodium: 480mg
- Fat: 20g
- Saturated Fat: 10g
- Unsaturated Fat: 8g
- Trans Fat: 0g
- Carbohydrates: 30g
- Fiber: 1g
- Protein: 12g
- Cholesterol: 30mg
Keywords: grilled cheese, comfort food, snacks, easy recipes, vegetarian recipes