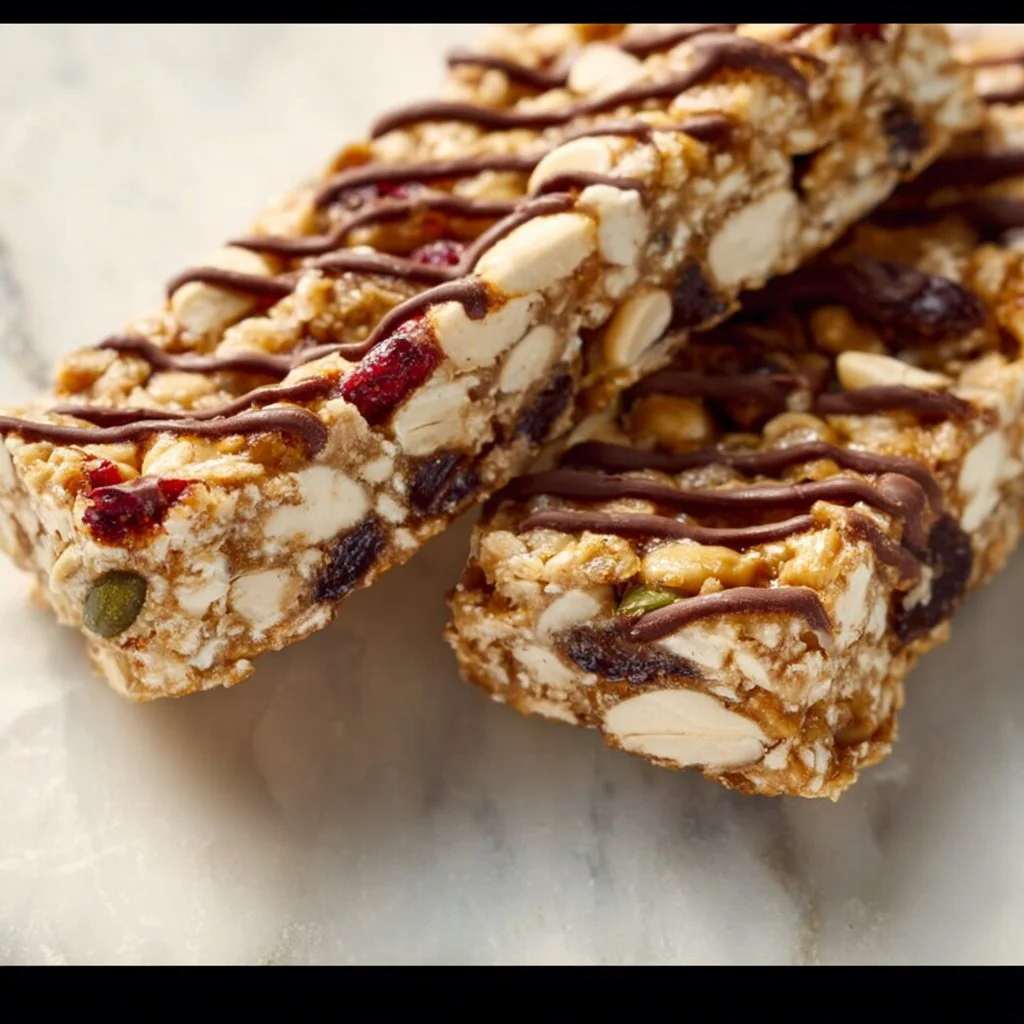
Nut-Free Protein Bars: Your New Favorite Snack
Hey there, food lovers! It’s Clara here, and today I’m excited to share a recipe that’s been a game-changer in my kitchen: Nut-Free Protein Bars. Whether you’re rushing out the door in the morning, hitting the gym, or just need a quick afternoon pick-me-up, these delicious bars are not only packed with protein but also super simple to whip up. Ready to take your snacking experience to the next level? Let’s dive in!
A Little Kitchen Memory
I can’t help but smile when I think of the first time I tried making my own protein bars. I was living in a tiny apartment with my roommates, and our snack game was, well, less than stellar. With a few friends asking for healthier options but not wanting to compromise on taste, I decided it was time to tackle the art of protein bars.
One evening, armed with a blender and a bag of rolled oats, we embarked on our culinary adventure. We had some giggles, plenty of messes—as you do in a cramped kitchen—and a few mishaps that resulted in crumbly, not-so-edible prototypes. But we persevered, and after a few rounds of trial and error, we created something magical: nut-free protein bars that tasted divine and gave us the energy we needed to conquer our days!
Now, these bars have become a regular feature in my kitchen, and I love sharing them with family and friends. They’re not just food; they’re memories wrapped in oats and sweetness!
Ingredients
Here’s what you’ll need to create these delightful nut-free protein bars:
-
1 ½ cups old-fashioned rolled oats
A fantastic base for these bars. They add heartiness and texture! Opt for gluten-free certified oats if you need to avoid gluten. -
¼ cup oat flour
You can easily make your own by blending rolled oats into a fine powder. It holds the bars together nicely without the use of nuts. -
⅓ cup protein powder
I recommend unflavored whey for a smooth taste that blends beautifully. If you’re vegan or dairy-free, there are fantastic plant-based options too! -
½ tsp salt
Just a pinch brings out the sweetness and balances the flavors. It’s like adding a secret ingredient! -
¼ cup melted coconut oil
This adds a rich flavor while keeping the bars moist. If you prefer, you could swap this for unsweetened applesauce for a lighter option. -
¼ cup maple syrup or honey
A natural sweetener that binds the ingredients. Maple syrup gives a lovely depth, while honey adds a different flavor note. Just remember not to use honey if you’re making these for a vegan diet! -
1 tbsp brown sugar or coconut sugar
For an extra hint of sweetness and caramel notes. Coconut sugar is a fantastic low-glycemic alternative. -
1 tsp vanilla extract
This enhances all the flavors and makes your kitchen smell fantastic as they bake! -
2 – 4 tbsp mini chocolate chips
Optional, but they add a lovely touch of indulgence. Feel free to use dairy-free chocolate chips if you like! -
Flaky salt (optional)
A sprinkle on top before they cool gives a gourmet touch, balancing the sweetness.
Step-by-Step Instructions
-
Preheat Your Oven
Let’s get that oven preheating to 350°F (175°C). This step is crucial—your bars will bake evenly and become nice and chewy! -
Prepare Your Baking Dish
Line an 8×8 inch (or similar-sized) baking dish with parchment paper. This will make it super easy to lift out the bars once they’re cooled. Pro tip: letting the parchment hang over the edges helps a lot when it’s time to cut! -
Mix the Dry Ingredients
In a mixing bowl, combine the rolled oats, oat flour, protein powder, and salt. Give it a good stir to ensure everything is evenly distributed. -
In Another Bowl, Mix the Wet Ingredients
In a separate bowl, whisk together the melted coconut oil, maple syrup (or honey), brown sugar (or coconut sugar), and vanilla extract. Don’t be afraid to mix it well; we’re aiming for a luscious liquid here, and it helps the sugar dissolve. -
Combine Wet and Dry
Pour your wet mixture into the dry ingredients. Stir everything together, and don’t be shy! You want to ensure that every oat is coated and enjoying the party. If it’s a tad crumbly, add a splash of water to help it stick together. -
Incorporate the Chocolate Chips
Gently fold in the mini chocolate chips. This part is where you can feel like a kid in a candy store! If you love chocolate, don’t hesitate to increase the quantity. -
Press into Baking Dish
Transfer your mixture to the prepared baking dish, spreading it out evenly. Use a spatula to press it down firmly—this is vital for your bars to hold together once they’re baked! -
Bake Time
Slide the dish into the oven and let it bake for about 20-25 minutes. You’ll know they’re ready when the edges are lightly golden. -
Cool and Cut
Once they’re baked to perfection, remove them from the oven and let them cool in the dish for about 10 minutes. Use the parchment overhang to lift the entire batch out and place them on a wire rack to cool completely before cutting into bars. -
Optional: Melt More Chocolate
If you’d like an extra chocolate drizzle on top (and who wouldn’t?), gently melt additional chocolate chips and drizzle it over the cooled bars. Then sprinkle a little flaky salt, and voilà!
Serving Suggestions
These nut-free protein bars are perfect for on-the-go snacking! Slice them into bars and serve them as-is, or pair them with a refreshing smoothie or a cup of yogurt for a delightful breakfast. They also make an excellent treat to share at gatherings. Just cut them into bite-sized squares for a crowd-pleasing dessert!
Recipe Variations
- Dried Fruits: Add some chopped dried cherries, cranberries, or raisins for a chewy, sweet boost of flavor!
- Coconut Bliss: Toss in some shredded unsweetened coconut to enhance the tropical vibe.
- Protein Boost: Experiment with different protein powders (like plant-based blends) to customize the flavor.
- Spiritual Spice: Add 1/2 teaspoon of cinnamon or nutmeg for a warm, cozy flavor profile.
- Seed Power: Incorporate chia or flax seeds for extra nutrition and a nutty, earthy taste.
Chef’s Notes
Creating these bars has become a staple in my life. After countless iterations, I’ve discovered what works best for flavor and texture. One of my favorite moments was when a friend confessed they had made their own version for a hiking trip, and everyone raved about them! It’s little moments like these that remind me how food connects us. Plus, can I just mention how fun it is to experiment with different mix-ins? I see a new flavor combination waiting to happen every time I open my pantry!
FAQs and Troubleshooting
Q: Why are my protein bars too crumbly?
A: This can happen if there’s too much dry ingredient or not enough moisture. Next time, try adding a little more honey or coconut oil to bind everything together.
Q: Can I freeze these bars?
A: Absolutely! These bars freeze beautifully. Just wrap them tightly in plastic wrap and store in an airtight container. When you’re ready to enjoy, let them sit at room temperature for a bit, or pop them in the microwave for a few seconds!
Q: How long do these bars last?
A: In an airtight container, they should be good for about a week at room temperature, or up to a month in the fridge.
Q: Can I replace the protein powder?
A: Yes! If you prefer no protein powder, you can increase the total oats and oat flour. Just keep in mind they will have a different texture and flavor.
Q: Is it okay to skip the chocolate chips?
A: Definitely! You can leave them out entirely or substitute with chopped dried fruits or seeds for different flavors.
Nutritional Info (Optional)
Each bar is packed with energy and approximately includes:
- Calories: 150
- Protein: 5g
- Carbohydrates: 18g
- Fats: 6g
And there you have it, my friends—nut-free protein bars that are simple to make and delicious to eat! I hope this recipe finds its way into your kitchen, and more importantly, into your hearts. Happy cooking, and remember, every dish is a chance to create a little more joy in your day!
PrintNut-Free Protein Bars
Delicious and energizing nut-free protein bars, perfect for a quick snack or on-the-go breakfast.
- Prep Time: 10 minutes
- Cook Time: 25 minutes
- Total Time: 35 minutes
- Yield: 12 servings 1x
- Category: Snack
- Method: Baking
- Cuisine: Healthy
- Diet: Nut-Free
Ingredients
- 1 ½ cups old-fashioned rolled oats
- ¼ cup oat flour
- ⅓ cup protein powder
- ½ tsp salt
- ¼ cup melted coconut oil
- ¼ cup maple syrup or honey
- 1 tbsp brown sugar or coconut sugar
- 1 tsp vanilla extract
- 2 – 4 tbsp mini chocolate chips (optional)
- Flaky salt (optional)
Instructions
- Preheat your oven to 350°F (175°C).
- Prepare an 8×8 inch baking dish by lining it with parchment paper.
- Mix the rolled oats, oat flour, protein powder, and salt in a mixing bowl.
- In a separate bowl, whisk together melted coconut oil, maple syrup (or honey), brown sugar (or coconut sugar), and vanilla extract.
- Combine the wet mixture into the dry ingredients and stir well.
- Incorporate the mini chocolate chips by gently folding them in.
- Press the mixture into the prepared baking dish evenly.
- Bake for 20-25 minutes until the edges are lightly golden.
- Cool in the dish for about 10 minutes and then transfer to a wire rack to cool completely before cutting into bars.
- Optional: Melt additional chocolate chips and drizzle on top, sprinkle with flaky salt.
Notes
These bars are perfect for snacking and can be customized with your favorite add-ins like dried fruits or different protein powders.
Nutrition
- Serving Size: 1 bar
- Calories: 150
- Sugar: 7g
- Sodium: 50mg
- Fat: 6g
- Saturated Fat: 4g
- Unsaturated Fat: 2g
- Trans Fat: 0g
- Carbohydrates: 18g
- Fiber: 2g
- Protein: 5g
- Cholesterol: 0mg
Keywords: protein bars, nut-free snacks, healthy snacks, energy bars