The Ultimate Pumpkin Crisp: A Delightful Dessert for Thanksgiving
Ah, Thanksgiving—the time of year when the air is crisp, the leaves are vibrant, and the scent of pumpkin spice wafts through every home. It’s a time filled with gratitude, laughter, and, of course, unforgettable meals shared around the dining table. When I think about this holiday, one dish stands out as a quintessential crowd-pleaser: Pumpkin Crisp. This easy traditional pumpkin dessert is not just a treat; it’s a comforting embrace that we all need as the weather cools down.
Picture this: a slightly spiced pumpkin filling that balances the sweetness with a touch of salt, all topped with a buttery, crunchy crisp. It’s not just a dessert; it’s an experience that brings everyone together. I created this recipe to remind us that cooking doesn’t have to be complex to be delicious. Gather your family and friends, grab your aprons, and let’s whip up something spectacular!
A Slice of Nostalgia
Growing up, my family always made it a point to celebrate Thanksgiving with a feast that could rival any restaurant. My grandmother had a special knack for creating desserts that beckoned you closer, and the pumpkin pie was always at the center of attention. I remember the warm, inviting aroma of her baking that would grab me like a hug every time I walked into the kitchen.
But one year, just as we finished our savory turkey feast, my grandpa made a proclamation: “Why not switch things up this year?” He excitedly shared his wife’s secret recipe for Pumpkin Crisp—a dish he had been raving about for ages but never brought out for the occasion. That year, we dove into a pumpkin dessert that offered a delightful twist on the classic pie we all knew and loved. The crisp topping contrasted beautifully with the smooth filling, and I remember the unexpected joy as everyone went for seconds. It was a dish that turned a meal into a memories—sounds magical, right?
Ingredients You’ll Need
Here’s what you’ll need to create this phenomenal Pumpkin Crisp that’s sure to become a part of your Thanksgiving tradition:
-
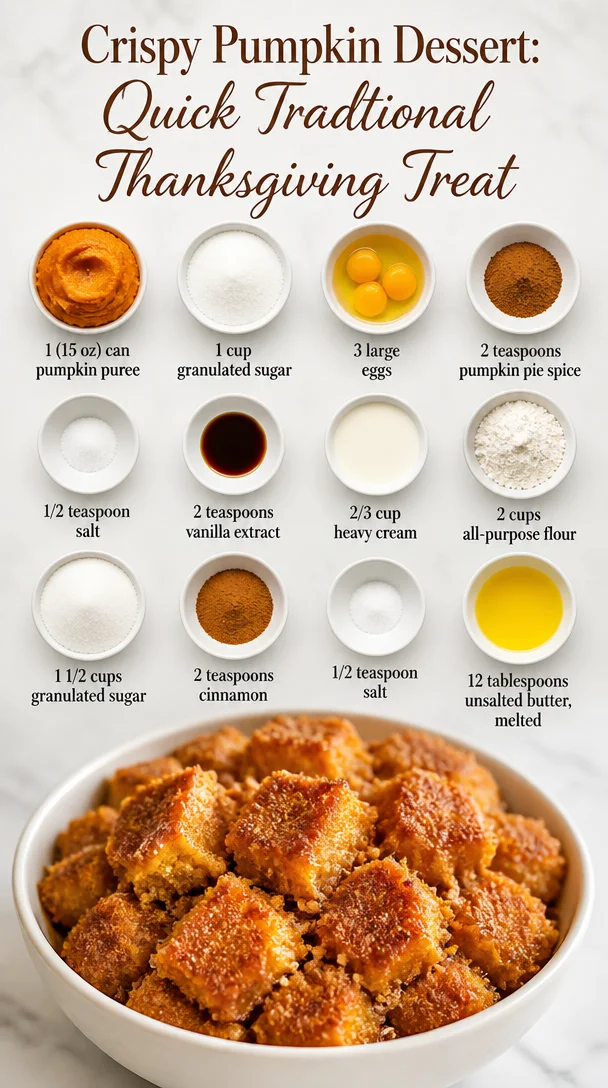
1 (15 oz) can pumpkin puree
Tip: If you’re feeling adventurous, homemade pumpkin puree will elevate this dish even further! Just roast and blend a sugar pumpkin. -
1 cup granulated sugar
Substitution: Feel free to use brown sugar for a deeper flavor profile. -
3 large eggs
Chef Insight: Eggs help bind the filling. For an egg-free version, you can use flax eggs (1 tablespoon ground flaxseed mixed with 2.5 tablespoons water per egg, let sit to thicken). -
2 teaspoons pumpkin pie spice
Substitution: Don’t have pumpkin pie spice? Mix 1 teaspoon cinnamon, 1/2 teaspoon nutmeg, and 1/2 teaspoon ginger. -
1/2 teaspoon salt
Chef Insight: Salt enriches the overall flavor of the dessert. -
2 teaspoons vanilla extract
Substitution: Use pure vanilla for the best flavor; imitation won’t yield the same aromatic quality. -
2/3 cup heavy cream
Chef Insight: Heavy cream gives richness. Feel free to opt for a plant-based cream if you’re dairy-free. -
2 cups all-purpose flour
Substitution: You can use gluten-free flour if necessary, just check the blend to ensure it has binding properties. -
1 1/2 cups granulated sugar (for the crisp topping)
Tip: Try using coconut sugar for a subtle caramel flavor. -
2 teaspoons cinnamon
Chef Insight: The extra dose of cinnamon in the topping will have your kitchen smelling like autumn! -
1/2 teaspoon salt (for the crisp topping)
-
12 tablespoons unsalted butter, melted
Substitution: For a healthier alternative, use coconut oil!
Cooking Instructions
Now for the part we all love—cooking! Follow these steps for your Pumpkin Crisp. Ready? Let’s get our hands dirty!
-
Preheat the Oven
Preheat your oven to 350°F (175°C). A preheated oven ensures even baking and that glorious golden crust! -
Prep the Filling
In a large mixing bowl, whisk together your pumpkin puree, granulated sugar, eggs, pumpkin pie spice, salt, vanilla extract, and heavy cream. Make sure to mix until the filling is silky smooth—no one likes a lumpy pumpkin dessert. If you’re up for it, taste a spoonful; it’s pure bliss! -
Transfer to Baking Dish
Pour your luscious filling into a greased 9×13-inch baking dish. This is where all the magic happens, so don’t skimp on the preparation! -
Make the Crisp Topping
In another bowl, combine the flour, sugar, cinnamon, and salt for the topping. Whisk to combine and ensure there are no lumps. Then, pour the melted butter in and mix until you achieve a crumbly texture. This will create that delightful crunch on top! -
Layer the Topping
Evenly sprinkle your crisp topping over the pumpkin filling. Don’t worry if it looks a little uneven; it will distribute beautifully as it bakes! -
Bake to Perfection
Place your dish in the oven and bake for 40 to 45 minutes. You want the filling to be set and the topping to be a beautiful golden brown. The aroma wafting through your kitchen? That’s your cue to get excited! -
Cool & Serve
Once out of the oven, allow your Pumpkin Crisp to cool for about 10-15 minutes before digging in. I know, it’s tough to wait, but trust me, it’s worth letting it rest a bit.
Serving Suggestions
I love serving my Pumpkin Crisp warm, straight from the oven, maybe with a scoop of vanilla ice cream melting atop the crisp topping. Alternatively, you could dollop on some whipped cream for an extra indulgent treat. Consider styling your plates with a sprinkle of cinnamon and a tiny slice of pumpkin on the side—who wouldn’t be mesmerized by that festive presentation?
Recipe Variations
Feeling adventurous? Here are a few fantastic twists you can take on this Pumpkin Crisp:
- Nutty Addition: Toss in some chopped pecans or walnuts into the crisp topping for added crunch and flavor.
- Dried Fruit: Add a handful of dried cranberries or raisins into the filling for a surprise burst of sweetness.
- Chocolate Swirl: Drizzle melted chocolate over the filling before using the topping to create a decadent, rich flavor that pairs surprisingly well with pumpkin.
- Spiced Up: Replace half of the cinnamon with chai spice for an exotic twist.
- Dairy-Free Delight: Swap out the heavy cream for coconut cream and the butter for coconut oil to cater to a dairy-free crowd!
Chef’s Notes
Over the years, I’ve seen this Pumpkin Crisp evolve from a family holiday staple to a bustling potluck favorite. The best part? Each time I make it, I discover a new little trick or tweak that makes it even better. Last Thanksgiving, in a rush, I accidentally swapped sugar with maple syrup—oh my, was that a game changer! The natural sweetness paired perfectly with the pumpkin—that’s the beauty of cooking; it’s an ever-evolving journey.
FAQs and Troubleshooting
-
Why is my pumpkin filling runny?
Ensure you’re using actual pumpkin puree (not pumpkin pie filling) which has a thicker consistency. If it still seems too runny, it may need more time in the oven. -
Can I make this ahead of time?
Absolutely! You can prepare the filling and topping separately a day in advance, then assemble and bake right before serving. -
My topping didn’t crisp up. What went wrong?
Make sure your butter is melted, and you generously spread the topping over the filling. If the topping is too thick and compacted, it may not crisp properly in the oven. -
How do I store leftovers?
Keep any leftovers tightly covered in the fridge for up to 4 days. Enjoy them cold, or pop them in the microwave for a delightful warm treat!
Nutritional Info
While I believe in enjoying dessert without guilt, here’s a quick nutritional glimpse for a serving of Pumpkin Crisp (approx. 1/12 of the recipe):
- Calories: ~350
- Protein: ~4g
- Carbohydrates: ~52g
- Fat: ~15g
- Fiber: ~2g
- Sugar: ~25g
Now that we’ve dived into this delightful recipe, I can’t wait for you to enjoy the magic of Pumpkin Crisp this Thanksgiving! Get ready to dig in; your loved ones are going to be requesting this dish for every holiday! Grab your apron, and let’s get cooking, foodies! 🍂🎃
PrintThe Ultimate Pumpkin Crisp
A delightful pumpkin dessert with a slightly spiced filling and a buttery, crunchy crisp, perfect for Thanksgiving.
- Prep Time: 15 minutes
- Cook Time: 45 minutes
- Total Time: 60 minutes
- Yield: 12 servings 1x
- Category: Dessert
- Method: Baking
- Cuisine: American
- Diet: Vegetarian
Ingredients
- 1 (15 oz) can pumpkin puree
- 1 cup granulated sugar
- 3 large eggs
- 2 teaspoons pumpkin pie spice
- 1/2 teaspoon salt
- 2 teaspoons vanilla extract
- 2/3 cup heavy cream
- 2 cups all-purpose flour
- 1 1/2 cups granulated sugar (for the crisp topping)
- 2 teaspoons cinnamon
- 1/2 teaspoon salt (for the crisp topping)
- 12 tablespoons unsalted butter, melted
Instructions
- Preheat your oven to 350°F (175°C).
- Whisk together pumpkin puree, granulated sugar, eggs, pumpkin pie spice, salt, vanilla extract, and heavy cream in a large mixing bowl until smooth.
- Pour the filling into a greased 9×13-inch baking dish.
- Combine the flour, sugar, cinnamon, and salt for the topping in another bowl. Whisk to combine and then add melted butter, mixing until crumbly.
- Sprinkle the crisp topping evenly over the pumpkin filling.
- Bake for 40 to 45 minutes, until the filling is set and the topping is golden brown.
- Cool for 10-15 minutes before serving.
Notes
Serve warm with vanilla ice cream or whipped cream for an indulgent treat.
Nutrition
- Serving Size: 1 serving
- Calories: 350
- Sugar: 25g
- Sodium: 150mg
- Fat: 15g
- Saturated Fat: 8g
- Unsaturated Fat: 4g
- Trans Fat: 0g
- Carbohydrates: 52g
- Fiber: 2g
- Protein: 4g
- Cholesterol: 90mg
Keywords: pumpkin dessert, Thanksgiving dessert, Pumpkin Crisp