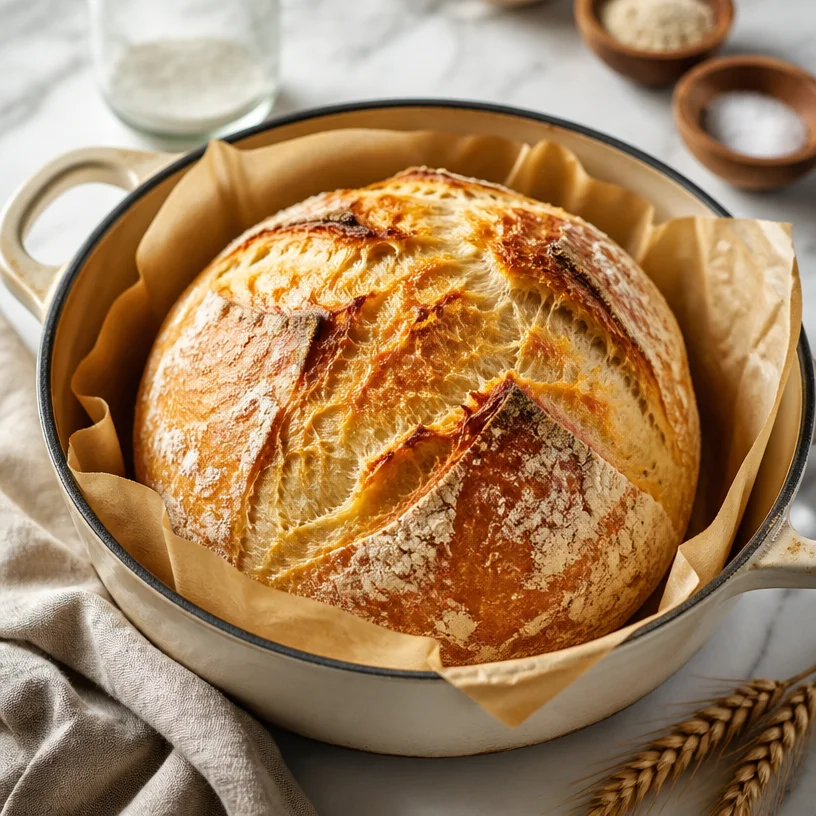
Dutch Oven Bread: Your New Kitchen Best Friend
Ah, the intoxicating aroma of freshly baked bread wafting through your home—there’s truly nothing like it! Whether you’re a seasoned pro in the kitchen or a total novice just opting to break free from store-bought loaves, baking bread at home with a Dutch oven is a game-changer. This method gives you a crusty exterior with a soft, chewy inside, making every bite a delightful experience.
Making Dutch oven bread not only fills your kitchen with warmth but also allows you to create a perfect centerpiece for any meal. Imagine pairing a golden-brown loaf with creamy butter and a sprinkle of sea salt, or even crafting beautiful sandwiches with your favorite fillings. The best part? You don’t need to be a culinary whiz to achieve that bakery-level loaf! I’m here to guide you through the process, sharing tips from my kitchen and memories that will make this experience even sweeter.
Now, let’s roll up our sleeves and dive into the delicious world of Dutch oven bread. I guarantee that after your first baking adventure, you’ll be hooked! So grab your apron, and let’s make some magic happen.
A Slice of Nostalgia
Growing up, bread was the centerpiece of every family meal. My mom had a way of making the simplest gatherings feel special just by serving warm, homemade bread. I remember her whisking together the ingredients with a flurry of enthusiasm, patiently waiting for the dough to rise as we played in the living room. When the bread finally emerged from the oven, it was like nothing else—golden, crusty, and calling out to be torn apart and slathered with butter.
One particular memory stands out: the holiday season when we decided to bake bread as a family tradition. The lively kitchen filled with laughter and flour-flying fun. My younger brother may have been more interested in eating the raw dough than actually helping, but every mishap just meant another funny story added to our family lore. That bread became a symbol of togetherness and love, something I’ve cherished and carried into my adult life.
Now, each time I bake a loaf of Dutch oven bread, I’m reminded of those joyful days. It’s not just about crafting a delicious treat; it’s about creating an experience and inviting warmth into your home. Let’s take that joyful spirit into our kitchens and whip up another batch of delicious memories together!
Ingredients
Here’s what you’ll need, among the must-haves for your adventure in baking:
- Bread Flour: This gives you that wonderful chewy texture! You can substitute with all-purpose flour, but you won’t get quite the same elasticity. For gluten-free options, look for a 1:1 gluten-free bread flour blend.
- Yeast: Active dry yeast or instant yeast works great here! If you’re using active dry yeast, remember to dissolve it in warm water first. If you can’t find either, a sourdough starter can be used for a tangy twist!
- Water: Basic, yet essential! Use filtered warm water (about 110°F) to activate the yeast best. If you’ve got high mineral-content water, it might affect the yeast’s performance, so distilled or bottled water works well too.
- Salt: Not just for flavor, salt regulates yeast activity. Feel free to swap with sea salt if you prefer that flavor profile or use kosher salt in a pinch.
Step-by-Step Instructions
Let’s get that Dutch oven prepped and that bread dough risen! Follow these detailed steps, and add a little bit of your flair along the way.
-
Mixing the Dough
In a large mixing bowl, combine 3 cups of bread flour, 2 teaspoons of yeast, and 1.5 teaspoons of salt. Mix these dry ingredients together until evenly combined. This is your foundation, and getting it properly mixed ensures consistent flavor throughout the loaf. -
Adding Water
Slowly add 1.5 cups of warm water to the dry ingredients. Mix it together using a spatula or your hands until it forms a shaggy dough. You don’t need to knead it yet; we’re just bringing it to life! Don’t hesitate to add a little extra flour or water if needed, but aim for a sticky, cohesive dough. -
First Rise
Cover the bowl with plastic wrap or a damp kitchen towel, and let it rest at room temperature for about 12 to 18 hours. This long, slow rise develops flavor, and trust me, the wait is worth it! If you’re working on a time crunch, 1–2 hours will suffice, but you’ll sacrifice some depth of flavor. -
Shaping the Dough
Once it has risen and has doubled in size, turn it out onto a floured surface. With floured hands, stretch and fold the dough gently into a round shape. -
Second Rise
Place the shaped dough seam-side down in a bowl lined with parchment paper or a well-floured cotton towel. Cover it loosely and let it rise for an additional 30 minutes to an hour. This is where you can give it a little more room to expand! -
Preheat the Dutch Oven
About 30 minutes before the dough is fully risen, place your Dutch oven (with its lid) in the oven and preheat to 450°F (230°C). This will create a steamy environment for your bread as it bakes, giving it that perfectly crispy crust. -
Baking the Bread
Once preheated, carefully remove the Dutch oven and take off the lid. Gently lift your dough using the parchment paper or by flipping it over into the pot directly. Now’s the time for that golden crust! Cover and bake for 30 minutes. Then, remove the lid and bake for an additional 15–20 minutes until the loaf is golden brown. -
Cool and Enjoy
Let the loaf cool on a wire rack for at least 30 minutes before slicing. This is the hardest part, I know! Letting it cool ensures that the crumb structure settles. As it’s cooling, you can relish the smell wafting through your home—a true testament to your efforts!
Serving Suggestions
Once your loaf has cooled (if you can resist!), slice it thickly for sandwiches, serve it alongside a warm bowl of soup, or simply enjoy it fresh from the counter with a knob of butter or your favorite spread. For an extra touch, drizzle some olive oil and balsamic vinegar on a plate for dipping—heaven!
Recipe Variations
Feeling adventurous? Here are a few twists to make this basic bread uniquely yours:
- Herbed Bread: Before mixing the dough, add dried herbs like rosemary, thyme, or oregano to infuse a beautiful scent and flavor.
- Garlic and Cheese: Toss minced garlic and shredded cheese into the dough for an ooey-gooey treat!
- Seeded Crust: Before baking, sprinkle sesame or poppy seeds on top for extra crunch and flavor.
- Whole Wheat Bread: Substitute half the bread flour with whole wheat flour for a heartier loaf with more fiber.
- Add-ins: Dried fruits, nuts, or olives can be mixed into the dough during your first rise for delicious surprises in every bite.
Chef’s Notes
This bread recipe has been a staple in my home, evolving over years of experimentation. I vividly remember the first time I used a Dutch oven—a little skeptical, thinking, “Will this really work?” But it did! The crust turned out perfect, and the joy of pulling that steaming loaf out of the pot was unrivaled. Since then, I’ve tried various tweaks, experimenting with flavors and textures, but I always return to that beautiful, simple base. There’s so much joy in bread-making—it really teaches patience and the power of a little love in the kitchen.
FAQs and Troubleshooting
1. My bread didn’t rise, what went wrong?
This typically happens due to inactive yeast. Always check the expiration date on your yeast, and if using active dry yeast, make sure the water is warm but not hot (around 110°F) for activation.
2. How do I know when my bread is done?
Tap the bottom of the loaf lightly; if it sounds hollow, it’s ready. You can also use a thermometer—the internal temperature should reach around 190°F for proper baking.
3. Why does my crust look burnt?
It can sometimes occur due to the high heat of the Dutch oven. Manage your oven temperature and keep an eye on the bread during the last 10 minutes of baking.
4. Can I make this bread ahead of time?
Absolutely! You can prepare the dough and let it rise the night before. Just pop it in the fridge to slow down the fermentation, and then follow the normal process the next day for freshly baked bread without the wait.
Nutritional Info (optional)
While I believe in enjoying bread as part of a balanced diet, here’s a rough estimate for one slice of this bread based on a standard serving (considering approximately 16 slices in a loaf):
- Calories: ~120
- Carbohydrates: ~24g
- Protein: ~4g
- Fat: ~0.5g
- Fiber: ~1g
Feel free to adjust based on specific brands or variations you might use!
I hope you enjoyed this journey into the world of Dutch oven bread. From the tantalizing aroma to the first warm slice, the whole experience is a delightful one! Remember, the best recipes come from the heart, so put on some good music, have fun, and let your kitchen share its delightful flavors. Happy baking!
PrintDutch Oven Bread
A simple and rewarding recipe for baking crusty Dutch oven bread with a soft, chewy inside.
- Prep Time: 10 minutes
- Cook Time: 45 minutes
- Total Time: 18 hours 55 minutes
- Yield: 16 servings 1x
- Category: Baking
- Method: Baking
- Cuisine: American
- Diet: Vegetarian
Ingredients
- 3 cups bread flour
- 2 teaspoons yeast
- 1.5 teaspoons salt
- 1.5 cups warm water
Instructions
- Combine 3 cups of bread flour, 2 teaspoons of yeast, and 1.5 teaspoons of salt in a large mixing bowl.
- Slowly add 1.5 cups of warm water to the dry ingredients and mix until a shaggy dough forms.
- Cover the bowl with plastic wrap and let it rest at room temperature for 12 to 18 hours.
- Turn the risen dough onto a floured surface and shape it into a round.
- Place the shaped dough seam-side down in a bowl lined with parchment paper and let it rise for 30 minutes to an hour.
- Preheat your Dutch oven to 450°F (230°C) for about 30 minutes.
- Bake the dough in the preheated Dutch oven for 30 minutes covered, then remove the lid and bake for an additional 15 to 20 minutes.
- Cool on a wire rack for at least 30 minutes before slicing.
Notes
For variations, consider adding herbs, garlic, cheese, or seeds to customize your bread.
Nutrition
- Serving Size: 1 slice
- Calories: 120
- Sugar: 0g
- Sodium: 400mg
- Fat: 0.5g
- Saturated Fat: 0g
- Unsaturated Fat: 0g
- Trans Fat: 0g
- Carbohydrates: 24g
- Fiber: 1g
- Protein: 4g
- Cholesterol: 0mg
Keywords: bread, Dutch oven, baking, homemade bread, crusty bread