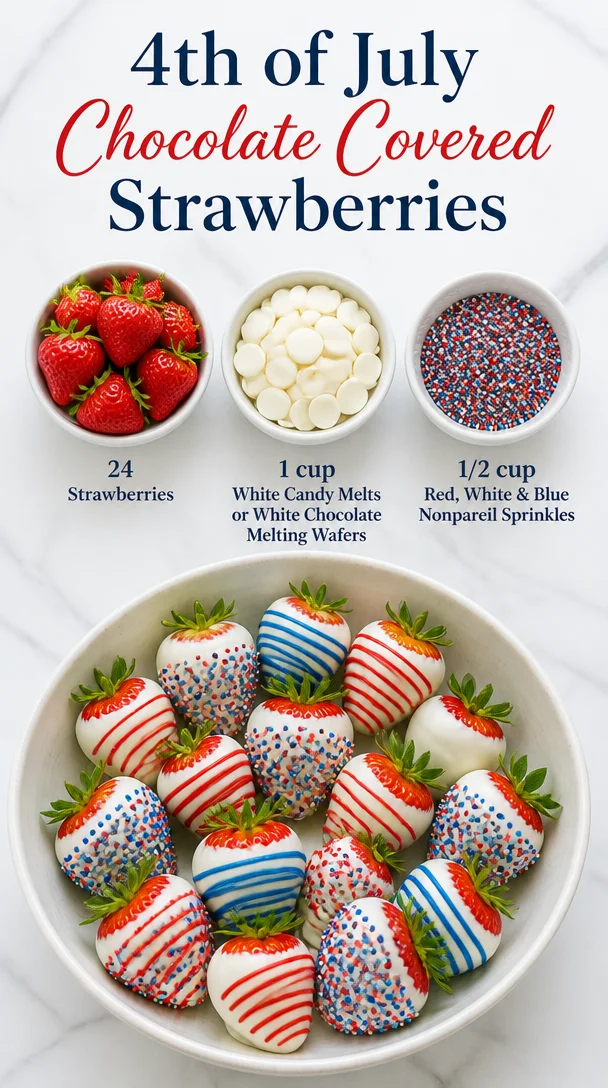
Festive 4th of July Chocolate Covered Strawberries
Introduction
Hey there, fellow food lovers! It’s Clara here, and today we’re diving into a sweet treat that’s not just delicious but also brings a burst of color to your festive celebrations. With the 4th of July just around the corner, what better way to celebrate than by whipping up some dazzling Chocolate Covered Strawberries? These beauties are perfect for potlucks, family gatherings, or just treating yourself while watching the fireworks.
Now, let’s be real: what’s better than a juicy, ripe strawberry coated in luscious chocolate? Add a sprinkle of patriotism with red, white, and blue nonpareils, and you’ve got yourself a showstopper! These strawberries are not only a feast for the taste buds but a visual treat as well. They scream summer and celebrate the vibrant spirit of Independence Day!
I know you might be thinking that chocolate-dipping can be a bit daunting, but fear not! I promise this is one of the simplest and most rewarding things you can do in the kitchen. Whether you’re a seasoned chef or just starting out, these strawberries will have you feeling like a culinary superstar. So, let’s roll up our sleeves, grab an apron, and get ready to make some mouthwatering memories!
Personal Story
I still vividly remember the first time I made chocolate covered strawberries. It was a warm July afternoon, and my family was preparing for our annual 4th of July BBQ. My mom, the queen of festive recipes, decided to teach me how to create these decadent treats. I was probably around 10 years old, with chocolate smeared all over my hands and face, but I was absolutely enchanted.
I remember melting the chocolate while my mom brought out all sorts of toppings—nuts, sprinkles, and even a splash of sea salt for that savory twist. We spent hours dipping strawberries, laughing over how some turned out perfectly while others looked, well, not so perfect!
Those chocolate-covered creations became a staple at our family gatherings, and every year they reminded me of those special moments spent together. Now, every time I whip up a batch, I think about that lovely afternoon filled with laughter, the rich scent of melting chocolate, and of course, the joy of sharing something delicious with family and friends. That’s the magic of cooking—it’s not just about the food; it’s about the moments we create along the way!
Ingredients
To make these fabulous Chocolate Covered Strawberries, you’ll need a handful of simple ingredients. Here’s what you’ll need:
-
24 Strawberries: Fresh, ripe strawberries are the star of this dish! Choose ones that are bright red and firm. For an extra burst of flavor, opt for organic strawberries if you can find them.
-
1 cup White Candy Melts or White Chocolate Melting Wafers: These are perfect for melting and coating your strawberries. If you want a richer flavor, you can use good-quality white chocolate, just be sure to chop it into small pieces for easy melting.
-
1/2 cup Red, White, and Blue Nonpareil Sprinkles: These fun toppings are what bring the festive spirit! If you want to get creative, you can use other sprinkles, like stars or even crushed graham crackers for a different texture.
Chef Insight: Feel free to personalize your sprinkles! You can mix colors or use themed sprinkles that match your celebration.
Step-by-Step Instructions
Step 1: Prepare Your Station
Start by cleaning your strawberries thoroughly. Rinse them under cool water and gently pat them dry with a paper towel. It’s crucial that they’re completely dry before dipping, as water can cause the chocolate to seize up.
Step 2: Melt the Chocolate
Next, let’s melt those candy melts. You can either use a microwave or a double boiler:
-
Microwave Method: Place the candy melts in a microwave-safe bowl. Heat them in 30-second intervals, stirring in between, until melted and smooth. This usually takes 1-2 minutes.
-
Double Boiler Method: Fill a saucepan with water and bring it to a simmer. Place a heatproof bowl on top, ensuring it doesn’t touch the water. Add the candy melts to this bowl and stir until they’re fully melted.
Chef Tip: If your chocolate is too thick, you can add a little coconut oil to thin it out. Just a teaspoon will do wonders!
Step 3: Dip the Strawberries
Now comes the fun part! Grab a strawberry by the green stem and dip it into the melted chocolate, ensuring it’s coated evenly. Let any excess chocolate drip back into the bowl.
- Pro Hack: You can twirl the strawberry while pulling it out to create a smooth coating.
Step 4: Add the Sprinkles
Before the chocolate sets, dip the bottom of the coated strawberry into the bowl of sprinkles. Give it a gentle shake to eliminate any excess stick. This step is essential because you want those vibrant colors to stick!
Step 5: Set and Chill
Place the dipped strawberries on a parchment-lined baking sheet. Once they are all dipped and sprinkled, pop them in the refrigerator for about 30 minutes or until the chocolate is set.
Chef Insight: You can also let the strawberries sit at room temperature for a while if you prefer a softer chocolate coating—totally your call!
Serving Suggestions
To serve, arrange the strawberries on a beautiful platter or keep it festive with a themed serving dish. You can also place them in individual cupcake liners for a cute presentation. They look lovely as a centerpiece or alongside other festive treats at your gathering. And trust me, they’re bound to disappear fast!
Recipe Variations
Want to take your chocolate-covered strawberries to the next level? Here are a few creative twists you might enjoy:
-
Dark Chocolate Coating: Swap the white candy melts for dark chocolate or milk chocolate for a rich flavor profile.
-
Flavored Chocolate: Infuse your melted chocolate with a drop of peppermint, orange, or almond extract for a unique twist!
-
Nutty Topping: Add chopped almonds, walnuts, or hazelnuts to your strawberry for a lovely crunchy texture.
-
Coconut Flakes: Roll the dipped strawberries in unsweetened shredded coconut for a tropical touch.
-
Drizzled Chocolate: Once the strawberries are set, drizzle a contrasting color of melted chocolate on top for a beautiful finish.
Chef’s Notes
The beauty of chocolate-covered strawberries is that they’re so forgiving! I once had a little mishap where instead of melting the chocolate, I accidentally burnt it. Instead of discarding it, I added a splash of heavy cream and whisked it into a delightful chocolate ganache—talk about a happy accident!
Over the years, I’ve experimented with all kinds of toppings and flavors, but I always come back to the classic. There’s something timeless about these strawberries that brings back those fond childhood memories and creates new ones every year at our family gatherings.
FAQs and Troubleshooting
1. Why did my chocolate seize?
If your chocolate seizes, it’s likely due to water coming into contact with it. Ensure all your utensils and strawberries are completely dry. If this happens, just add a teaspoon of coconut oil or vegetable shortening to the chocolate, stirring until smooth.
2. How do I store leftover chocolate-covered strawberries?
Keep them in an airtight container in the fridge. They’ll be good for about 2-3 days, but trust me, they won’t last that long!
3. Can I use fresh strawberries that have been frozen?
While you can technically coat frozen strawberries, they can release moisture when thawed, which may not yield the best results. Fresh is always preferred for a crisp bite!
4. What if my strawberries start to sweat after dipping?
Humidity can cause sweating when you take them out of the fridge. If this happens, simply allow them to sit at room temperature for a bit before serving. The condensation will settle, and they’ll look lovely again.
Nutritional Info
While I focus more on flavor and enjoyment, I know some of you might be interested in the nutritional aspects. Each strawberry (without heavy added toppings) typically contains about 4-5 calories. With the chocolate and sprinkles, you might be looking at around 40-50 calories per piece. Not bad for a festive treat!
So there you have it, my friends—a joyous journey into creating your own vibrant 4th of July Chocolate Covered Strawberries. I hope you’ll try making these sweet gems and share them with those you love. Cooking is all about creating moments, and I can’t wait for you to experience the joy they bring. Grab your strawberries, invite a friend over, and let’s get dipping! Happy Independence Day! 🎉🍓
PrintFestive 4th of July Chocolate Covered Strawberries
Deliciously vibrant chocolate covered strawberries, perfect for celebrating Independence Day!
- Prep Time: 15 minutes
- Cook Time: 5 minutes
- Total Time: 20 minutes
- Yield: 12 servings 1x
- Category: Dessert
- Method: No-Cook
- Cuisine: American
- Diet: Vegetarian
Ingredients
- 24 Strawberries, fresh and ripe
- 1 cup White Candy Melts or White Chocolate Melting Wafers
- 1/2 cup Red, White, and Blue Nonpareil Sprinkles
Instructions
- Prepare your strawberries by rinsing them under cool water and patting them dry.
- Melt the candy melts using either a microwave in 30-second intervals or a double boiler until smooth.
- Dip each strawberry into the melted chocolate, ensuring an even coat.
- Add sprinkles before the chocolate sets, dipping the bottom of the strawberry into the sprinkles.
- Set the dipped strawberries on a parchment-lined baking sheet and chill in the refrigerator for about 30 minutes.
Notes
Feel free to customize your sprinkles or use dark chocolate for a different flavor profile.
Nutrition
- Serving Size: 1 serving
- Calories: 45
- Sugar: 5g
- Sodium: 25mg
- Fat: 2g
- Saturated Fat: 1g
- Unsaturated Fat: 1g
- Trans Fat: 0g
- Carbohydrates: 7g
- Fiber: 1g
- Protein: 0g
- Cholesterol: 0mg
Keywords: Chocolate Covered Strawberries, 4th of July, Dessert, Festive Treats