Easy Black Forest Trifle: A Decadent No-Bake Dessert
Hello, lovely food lovers! It’s Clara, and today, I’m thrilled to dive into one of my all-time favorite desserts: the Easy Black Forest Trifle. Picture this: layers of rich chocolatey goodness, fluffy cream, and tart cherry filling all beautifully presented in a trifle bowl. It’s the kind of dessert that doesn’t just taste heavenly but also makes you feel like a rockstar when you serve it.
But here’s the best part—you don’t even need to turn on the oven! Yep, you heard that right. With a few simple ingredients and a bit of assembly, you can create a show-stopping dessert that looks and tastes like it took hours to prepare. Whether you’re hosting a gathering, celebrating a special occasion, or just craving something sweet, this Easy Black Forest Trifle is your go-to recipe.
I remember the first time I made a Black Forest Trifle. It was for my best friend’s birthday back in college. We were trying to impress our friends with something fun (and edible!). We whipped up layers with reckless abandon and watched as our creation transformed into a delicious masterpiece. Everyone was raving about it, and it quickly became a staple for us. Now, every time I make it, I’m transported back to those carefree days, sharing laughs and sweet treats with friends.
So, grab your apron, and let’s make magic in the kitchen with this Easy Black Forest Trifle!
Personal Story
The inspiration for my Easy Black Forest Trifle came from a cherished memory of baking with my grandma in her cozy kitchen. She had a knack for transforming traditional recipes into something magical, and Black Forest Cake was one of her signature delights. I remember excitedly rushing home from school, the scent of chocolate wafting through the air as I entered her home.
“Let’s make a chocolate trifle today,” she said one afternoon as we dug into her pantry. I was ecstatic! We layered rich chocolate cake, sweet cherries, and whipped cream in a giant glass bowl. Watching that beautiful dish come together was like a work of art in progress, and the anticipation reached its peak when we finally dug in. The moment that luscious blend of flavors hit my taste buds? Pure bliss!
Every bite echoed with love and laughter, and as I created this no-bake version of a classic, I couldn’t help but smile thinking of those moments. It’s a dessert that brings family and friends together, a feast for the senses that creates new memories while celebrating the old ones.
Ingredients
Before we dive into the exciting world of layering, let’s gather our ingredients. Here’s what you’ll need for this mouthwatering Easy Black Forest Trifle:
-
16 oz chocolate pound cake or 9×13 pan of brownies, cut into 1-inch cubes
Use store-bought or homemade chocolate pound cake. Brownies also work wonders if you’re looking for a fudgier experience! You can even use chocolate sponge cake for a lighter texture. -
2 cans (21 oz each) cherry pie filling
This is the star of the show, bringing that tart-sweet flavor. You can substitute with fresh cherries if they’re in season—just ensure to pit and slice them, and add a little sugar for sweetness. -
3 cups heavy cream, cold
Heavy cream is key for a rich and velvety whipped topping! Make sure it’s cold for easier whipping—fat content will help you achieve those dreamy peaks. -
1 cup powdered sugar
Sweetening the whipped cream helps balance the tart cherries. Feel free to adjust based on your sweetness preference; you can also use alternative sweeteners like coconut sugar if you’re feeling adventurous. -
2 teaspoons vanilla extract
A dash of vanilla adds depth to the whipped cream. Pure vanilla extract is always best, but imitation works too if you’re in a pinch! -
1/4 cup Kirsch or rum (optional)
This adds an adult twist! If you prefer not to use alcohol, feel free to omit it or swap with a splash of cherry juice. -
Chocolate shavings or curls, for garnish
These add elegance—you can make your own by using a vegetable peeler on a chocolate bar or buy them pre-made. -
Fresh cherries, for garnish (optional)
These not only look stunning but also add a lovely fresh bite! Plus, who doesn’t love a beautiful cherry on top?
Step-by-Step Instructions
Now that we have our ingredients ready, let’s get to the fun part—assembling our trifle! Follow these step-by-step instructions, taking note of my little chef hacks along the way.
-
Whip the Cream
Start by pouring the chilled heavy cream into a large mixing bowl. Using an electric mixer, beat the cream on medium speed until it starts to thicken. Gradually add in the powdered sugar and vanilla extract. Whip on high speed until soft peaks form. You want a smooth and creamy consistency—don’t overbeat, or you’ll end up with butter instead of fluff! -
Prepare the Chocolate Cake
If you’re using a loaf of chocolate pound cake, slice it into 1-inch cubes. For a brownie layer, cut a 9×13 pan of brownies into cubes. Use a serrated knife for a clean cut. This is your base layer, and it needs to be luscious and delicious. If you wish, you can lightly brush the cubes with Kirsch or rum for extra flavor (optional, but oh-so-good!). -
Get Layering!
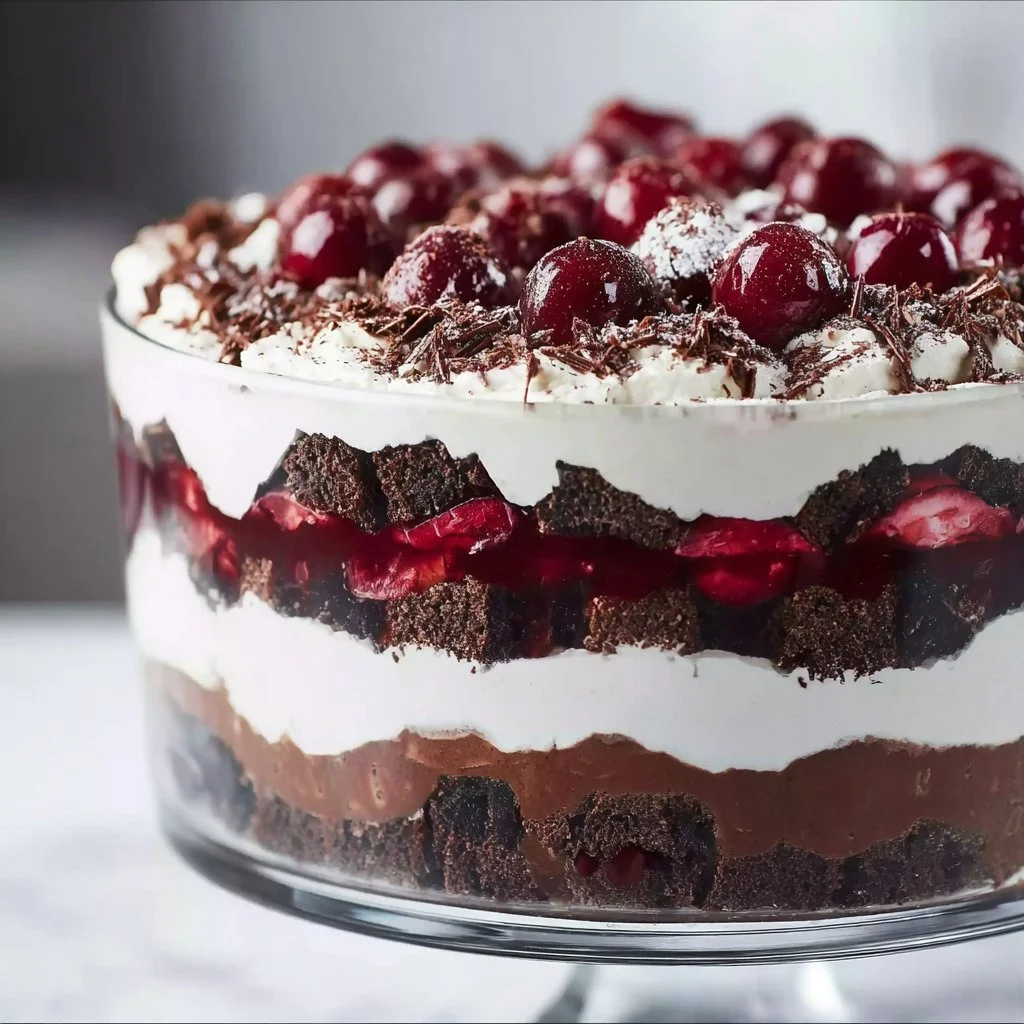
Grab a trifle bowl (or any large glass bowl if you don’t have one) for that beautiful presentation! Start with a layer of the chocolate cake or brownie cubes at the bottom. Use about half of your cake. Then, spoon half of the cherry pie filling over the cake layer, making sure to spread it evenly. -
Add Whipped Cream
Now for the creamy goodness! Spoon half of your whipped cream mixture over the cherry layer, spreading it gently to cover everything. It should be a nice and thick layer. Repeat the process with another layer of cake, cherry filling, and whipped cream. -
Finish It Off
For the final touch, top the trifle with any remaining whipped cream. Make it look pretty—swirl it with a spatula or the back of a spoon for some texture. Finally, sprinkle the chocolate shavings or curls on top and add fresh cherries if you’re using them. -
Chill Time
Cover the trifle with plastic wrap and let it chill in the fridge for at least 2 hours. This allows the flavors to meld beautifully and makes for easier serving when it’s time to dig in!
And just like that, you’ve created a stunning trifle that’s sure to delight everyone. Who knew dessert could be this simple while looking so elegant?
Serving Suggestions
When it comes time to serve your Easy Black Forest Trifle, it’s all about presentation. Use a large spoon to scoop out generous portions, showcasing those beautiful layers. Serve in individual cups or bowls for a more personalized touch, and don’t shy away from adding a few more chocolate shavings or a cherry on top as garnishes. Enjoy this delightful treat chilled and watch it disappear!
Recipe Variations
Since cooking is all about creativity, don’t hesitate to mix things up! Here are some fun variations to inspire your culinary adventure with the Black Forest Trifle:
-
Berry Blast: Swap out the cherry filling for a mixture of seasonal berries like strawberries, blueberries, and raspberries for a fresh summery twist.
-
Nutty Delight: Add crushed nuts like almonds or hazelnuts between layers for a delightful crunch! Just be sure to check if any guests have nut allergies.
-
Cheesecake Layer: Replace some of the whipped cream with your favorite no-bake cheesecake mixture for a richer flavor profile.
-
Chocolate Mint: Stir in a few drops of peppermint extract into the whipped cream for a refreshing minty chocolate taste—perfect for the holidays!
-
Vegan Version: Use a dairy-free chocolate cake and substitute the heavy cream with coconut cream for a delicious vegan alternative!
Chef’s Notes
As with any good recipe, the Easy Black Forest Trifle has evolved over time. Initially, I only made it during special occasions—birthdays, holiday desserts, you name it! But the more I made it, the clearer it became that this dessert brings smiles no matter the season.
One time, I decided to make it for a last-minute neighborhood gathering. I didn’t have cherry pie filling, so I used mixed fruit pie filling instead. While it was a hit, the cherry version still holds a super special place in my heart. Plus, you can’t go wrong with a classic!
So whether you stick with the traditional cherry or try something fun, just know it’s all about the joy of creating sweet memories in the kitchen. And don’t forget—the more messy, the more fun!
FAQs and Troubleshooting
1. Can I use fresh cherries instead of canned pie filling?
Absolutely! Just ensure to pit and slice them. Add a bit of sugar to taste, and toss them with a little cornstarch for added thickness if desired.
2. Why isn’t my whipped cream thickening?
Make sure your heavy cream is super cold! Also, don’t forget, using an electric mixer will whip it faster than whisking by hand. Just keep an eye on it for the perfect peaks!
3. Can I prepare this trifle a day in advance?
Yes! Preparing it a day in advance allows the flavors to meld, making it extra delicious. Just cover it well so it doesn’t absorb any odors from the refrigerator.
4. What if my whipped cream deflates?
If your whipped cream collapses, it might have been overbeaten. You can try re-whipping it by adding a bit more cold cream to regain some structure.
Nutritional Info
While I don’t typically include strict nutritional info as we enjoy the process of creating delicious memories, feel free to calculate calories based on your specific ingredients. Just a heads-up—this trifle is definitely a treat for the taste buds, so enjoy it in moderation!
And there you have it—your delicious, no-bake Easy Black Forest Trifle! I hope this recipe brings just as much joy to your kitchen as it does to mine. Happy cooking, and remember to share those tasty moments with loved ones. Here’s to layers of flavor and memories, one scoop at a time! 🌟
PrintEasy Black Forest Trifle
A decadent no-bake dessert featuring layers of rich chocolate cake, fluffy cream, and tart cherry filling.
- Prep Time: 15 minutes
- Cook Time: 0 minutes
- Total Time: 120 minutes
- Yield: 8 servings 1x
- Category: Dessert
- Method: No-Bake
- Cuisine: German
- Diet: Vegetarian
Ingredients
- 16 oz chocolate pound cake or 9×13 pan of brownies, cut into 1-inch cubes
- 2 cans (21 oz each) cherry pie filling
- 3 cups heavy cream, cold
- 1 cup powdered sugar
- 2 teaspoons vanilla extract
- 1/4 cup Kirsch or rum (optional)
- Chocolate shavings or curls, for garnish
- Fresh cherries, for garnish (optional)
Instructions
- Whip the cream by pouring the chilled heavy cream into a large mixing bowl. Using an electric mixer, beat the cream on medium speed until it starts to thicken. Gradually add in the powdered sugar and vanilla extract. Whip on high speed until soft peaks form.
- Prepare the chocolate cake by slicing it into 1-inch cubes. For a brownie layer, cut a 9×13 pan of brownies into cubes. Optionally brush the cubes with Kirsch or rum for extra flavor.
- Get layering by starting with a layer of chocolate cake or brownie cubes at the bottom of a trifle bowl. Spoon half of the cherry pie filling over the cake layer.
- Add half of the whipped cream mixture over the cherry layer, spreading it gently to cover everything. Repeat the layers with the remaining ingredients.
- Finish it off by topping the trifle with any remaining whipped cream, swirling it for texture, and sprinkle with chocolate shavings and fresh cherries if using.
- Chill the trifle in the fridge for at least 2 hours before serving.
Notes
This trifle can be made a day in advance for more developed flavors. Feel free to use fresh cherries or different fruit fillings as variations.
Nutrition
- Serving Size: 1 serving
- Calories: 450
- Sugar: 35g
- Sodium: 150mg
- Fat: 25g
- Saturated Fat: 15g
- Unsaturated Fat: 8g
- Trans Fat: 0g
- Carbohydrates: 45g
- Fiber: 2g
- Protein: 5g
- Cholesterol: 70mg
Keywords: Black Forest, trifle, no-bake dessert, chocolate dessert, cherry dessert