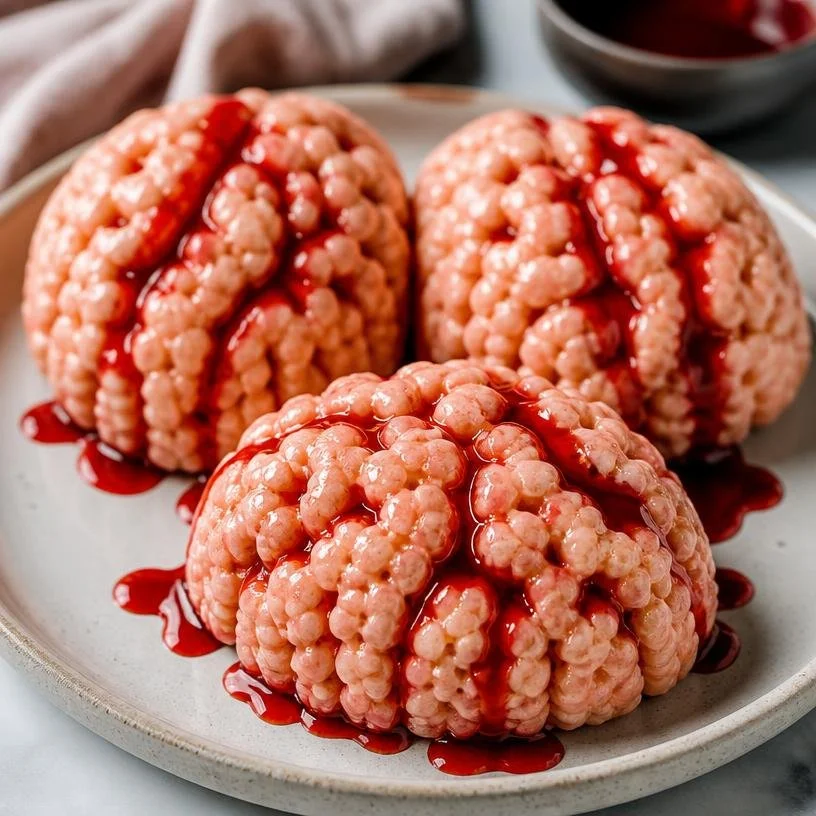
Spooky Delicious: How to Make Halloween Brain Rice Krispies Treats
Welcome, my culinary friends! As the leaves turn and the air gets a little crisper, it’s time to embrace one of my all-time favorite holidays—Halloween! There’s a magic in the air as we prepare for ghoulish gatherings, spooky costumes, and of course, the joy of creating treats that are as fun to make as they are to eat. One delight that never fails to bring a smile (or perhaps a delightful shiver) to the table is my Halloween Brain Rice Krispies Treats. These treats aren’t just a feast for your taste buds; they’re a playful, slightly spooky, and absolutely delicious way to celebrate the season!
Picture this: a tray of gooey, marshmallowy goodness molded to resemble brains, vividly colored with a splash of red food coloring, and served with a drizzle of "blood" made from corn syrup. Yep, it sounds crazy, but trust me, this dish is a guaranteed hit at any Halloween party. Kids will adore them, and even adults will find it hard to resist the playful presentation! So, grab your apron, and let’s dive into the delightful chaos of making these creepy treats together.
A Personal Story: Spooky Memories in the Kitchen
Let me take you back to a Halloween many years ago when I was just a budding little chef in my family’s cozy kitchen. My mom always transformed our kitchen into a mini haunted house, complete with spooky decorations and the best Halloween-themed snacks. One year, she decided to experiment with Rice Krispies Treats, but not just any old version—themed ones! I remember her unrolling the wax paper and creating those gooey, marshmallow-laden squares that we couldn’t resist sneaking bites from.
In the midst of the Halloween chaos, she surprised us with the idea of turning those treats into brain shapes! Using a little food coloring and some creative mold action, we had the best time crafting little "brains" and giggling at our creations. The delight in her eyes as we pulled off those treats always fills my heart with warmth to this day. This is why I cherish sharing this recipe with you all—it’s a simple reminder of how food can create lasting memories and laughter among loved ones.
Ingredients
Let’s get started with the essentials! Here’s what you’ll need to whip up these brainy delights:
-
3 tablespoons butter
Butter is the magic ingredient that brings richness to the marshmallows. If you want a healthier option, you can substitute with coconut oil for a dairy-free version! -
1 package (10 oz., about 40) JET-PUFFED Marshmallows, OR 6 cups JET-PUFFED Miniature Marshmallows
These are the stars of the show! The marshmallows blend perfectly with the Rice Krispies. If you’re feeling adventurous, you could try using flavored marshmallows for a twist. -
6 cups Rice Krispies cereal
This cereal gives our treats that satisfying crunch! You can swap in brown rice cereal for a gluten-free version if necessary. -
Red food coloring
This is what makes our treats look eerily delightful. A few drops will create that perfect shade of "brain." Alternatively, beet juice can be used for a natural color option. -
Corn syrup (for fake blood)
This will give you that spooky, oozy "blood" effect for drizzling. If you prefer to skip corn syrup, you can make a quick homemade syrup with sugar and water!
Step-by-Step Instructions
Ready to unleash your creativity in the kitchen? Here we go!
-
Melt the Butter
Begin by melting the butter in a large saucepan over medium-low heat. Keep stirring until it’s completely melted—this will be the base for our marshmallow goodness. Tip: Use a non-stick pan for easier cleaning later! -
Add Marshmallows
Once the butter is melted, add the marshmallows. Stir continuously, allowing the marshmallows to melt evenly. You want a smooth, gooey mix! This can take about 5-7 minutes. Pro tip: Don’t rush this step; marshmallows need gentle heat to melt properly. -
Stir in Food Coloring
Once your marshmallow mixture is gooey and delightful, it’s time to add your red food coloring! Start with a few drops, stir vigorously, and watch as the mixture transforms into a brainy shade. Don’t be afraid to get a little bold with the color here! -
Add Rice Krispies
Remove the mixture from heat and immediately stir in the 6 cups of Rice Krispies cereal. Working quickly helps to keep everything evenly coated in that marshmallowy bliss. Grab a spatula or a sturdy wooden spoon for this sturdy task! -
Shape the Brains
Now comes the fun part! To shape your mixture like brains, you’ll need a brain-shaped mold (easily found in stores or online) or even a muffin tin can work for smaller portions. Spray the insides with a non-stick spray to prevent sticking, then pack the mixture firmly into your molds. This is where you can get creative! -
Let Them Set
Allow your molded treats to cool and set. This usually takes about 30 minutes. You can pop them in the fridge if you want to speed up the cooling process. (And if you’re like me, you’ll sneak bites while they cool!) -
Drizzle with Fake Blood
While your treats are setting, make the fake blood by simply drizzling some corn syrup into a small bowl. Use a spoon to drizzle it over the cooled treats; the result will be gloriously spooky! This is where you can unleash your evil giggle.
Serving Suggestions
To present your spooky brain treats, arrange them on a platter lined with eerie black parchment paper. You can embellish the sides with gummy worms or decorative candy eyeballs to add that extra flair. Prepare for oohs and aahs when you unveil this showstopper at your Halloween gathering!
Recipe Variations
Here are a few creative twists to try with your Rice Krispies brains:
-
Creepy Color Swirls
Instead of just red, add a mix of food coloring for a marbled effect—think purple or green! This can create some truly stunning “brains.” -
Coat with Chocolate
Drizzle melted chocolate on top of your brain shapes for added richness and a playful twist on flavor! -
Add Nuts
If you enjoy a little crunch, throw in a cup of chopped nuts or seeds into the mix for texture. -
Vegan Version
Substitute traditional marshmallows with vegan marshmallows and use coconut oil instead of butter for a guilt-free treat! -
Rice Krispie Monsters
Use different shapes to create other spooky treats, like monster heads or pumpkin-shaped sliders! Get creative with your molds!
Chef’s Notes
Creating Halloween Brain Rice Krispies Treats has become something of a tradition for me over the years. Each time, I add a little twist or a personal story into the mix, and it reminds me of how cooking is about more than just the food—it’s about sharing smiles and creating memories. The great thing is, these treats offer an open canvas for creativity. You can switch up colors, toppings, and shapes according to the vibe of your spooky celebration.
Oh, and a funny kitchen story: One year, I decided to add a sprinkle of ghostly white chocolate and lost track of time. When I turned around, my mischievous cat had decided to have a mini taste-testing session! I guess my treats really are for everyone—even the furry friends!
FAQs and Troubleshooting
Q: The treats didn’t hold their shape?
A: You may not have packed them tightly enough into your molds, or they might not have cooled down long enough. Make sure to press firmly into the molds and allow adequate cooling time.
Q: Can I make these ahead of time?
A: Absolutely! They can be made a day in advance; just store them in an airtight container to keep them fresh.
Q: How do I get my brains to look smooth?
A: Make sure to spray your mold with cooking spray, and pack the mixture in firmly for a smooth surface.
Q: What’s a good way to ensure the treats don’t stick?
A: Besides using a non-stick spray on your mold, you could also lightly butter your hands and form them by hand if you’re going the mold-less route!
Nutritional Info
These treats are meant for indulgence, so be sure to enjoy them in moderation! A standard serving could be calculated around 150 calories per piece, but specifics will depend on serving size and any variations you include.
And there you have it: a spook-tacular recipe for Halloween Brain Rice Krispies Treats that’s bound to impress your little ghosts and goblins. Remember, cooking is about the stories you create along the way, so gather your loved ones and let the laughter and memories flow while you whip up these delightful treats. Happy Halloween, everyone!
PrintHalloween Brain Rice Krispies Treats
A spooky and fun twist on traditional Rice Krispies Treats, shaped like brains and perfect for Halloween gatherings.
- Prep Time: 15 minutes
- Cook Time: 10 minutes
- Total Time: 45 minutes
- Yield: 12 servings 1x
- Category: Dessert
- Method: No-Bake
- Cuisine: American
- Diet: Vegetarian
Ingredients
- 3 tablespoons butter
- 1 package (10 oz., about 40) JET-PUFFED Marshmallows, OR 6 cups JET-PUFFED Miniature Marshmallows
- 6 cups Rice Krispies cereal
- Red food coloring
- Corn syrup (for fake blood)
Instructions
- Melt the butter in a large saucepan over medium-low heat.
- Add the marshmallows and stir continuously until melted.
- Stir in the red food coloring once melted.
- Add the Rice Krispies cereal and mix quickly.
- Shape the mixture in a brain-shaped mold or muffin tin.
- Let the treats cool and set for about 30 minutes.
- Drizzle with corn syrup to create fake blood.
Notes
Allow the molded treats to cool properly for best shape retention. Can be made a day in advance.
Nutrition
- Serving Size: 1 serving
- Calories: 150
- Sugar: 20g
- Sodium: 120mg
- Fat: 4g
- Saturated Fat: 2g
- Unsaturated Fat: 2g
- Trans Fat: 0g
- Carbohydrates: 30g
- Fiber: 0g
- Protein: 1g
- Cholesterol: 10mg
Keywords: Halloween, Rice Krispies, treats, spooky dessert, party food