
Key Lime Pie Rice Krispie Treats: A Sweet Twist on a Classic Favorite
Hello, fellow food lovers! If you’re anything like me, you adore desserts that pack a punch—with a twist, of course! Today, I’m thrilled to share a recipe that will have everyone asking for your secret: Key Lime Pie Rice Krispie Treats. Picture this: the familiar chewiness of a classic Rice Krispie treat combined with the bright, zesty flavor of key lime pie. It’s a combination that’s not only delicious but also incredibly fun to make.
Introduction
Growing up in a family where dessert was a staple at every gathering, I learned that it was more than just sugar and spice—it was about the memories we made around the table. At every family barbecue, my aunt would whip up her famed key lime pie, its creamy filling perfectly balanced with that tangy zest. It was always the star of the show, and I can’t tell you how many times I’ve fought for the last slice!
But as much as I love a traditional key lime pie, my adventurous spirit in the kitchen has led me to create something even more fun: Key Lime Pie Rice Krispie Treats. This recipe not only transforms the classic into a chewy, no-bake delight but also captures the essence of summer with its bright flavors. So, let’s roll up our sleeves, and I’ll share the ins and outs of creating this delightful treat that’s perfect for any occasion—be it a picnic, a summer party, or just because you want something sweet.
Personal Story
I still vividly remember the summer of my high school graduation. The whole family gathered at my aunt’s house to celebrate, and, of course, she was tasked with bringing her famous key lime pie. As the sun glistened over our backyard, I devoured slice after slice, relishing the sweet and tart combination while listening to stories from my relatives. That summer was filled with laughter, joy, and an unforgettable sweetness that I wanted to rekindle in my own kitchen.
When I began developing recipes, the memory of that key lime pie stuck with me. Every time I think about it, I can almost smell that buttery graham cracker crust and taste the creamy filling bursting with lime flavor. Now, I wanted to transform that experience into a fun, interactive dessert that would make people gather and share their own stories. That’s how these Key Lime Pie Rice Krispie Treats were born!
Ingredients
Let’s dig into the ingredients you’ll need to whip up these scrumptious treats. Each component contributes to that signature key-lime flavor we all adore!
-
3 tbsp butter
The foundation of many sweet confections, butter adds richness and helps achieve that creamy texture. If you need a dairy-free alternative, consider using coconut oil—but the flavor might shift slightly! -
1 (10 oz) package marshmallows (or 4 cups mini marshmallows)
Marshmallows are the magic ingredient that binds everything together! If you want to cut back on sugar, feel free to look for reduced-sugar marshmallows. -
5 cups Rice Krispies cereal
This classic cereal provides the crunch factor, and it also soaks up all that delicious melty goodness. You can swap it for any puffed cereal if you’re feeling adventurous—check out puffed brown rice or corn puffs for a healthier take. -
1 cup graham crackers, crushed
Here’s where that key lime pie flavor really starts to shine! The graham cracker crumb base mirrors the crust of a traditional pie. For a gluten-free option, you can use crushed gluten-free cookies. -
1 whole lime (zest and juice)
Fresh lime juice is essential for that bright, tangy flavor. If you don’t have a fresh lime, bottled juice will work in a pinch, but fresh is always best for maximum zestiness! -
1 cup white chocolate chips
To add a touch of sweetness and creaminess, white chocolate chips are the cherry on top. If you’re not a fan of white chocolate, feel free to switch it for semi-sweet or dark chocolate!
Step-by-Step Instructions
Let’s get cooking! Here’s how to create these delightful Key Lime Pie Rice Krispie Treats step by step. I’ve sprinkled in some tips as we go along, so keep an eye out!
-
Prepare Your Pan: Start by greasing a 9×13-inch baking dish with butter or non-stick spray. This will help ensure that your treats don’t stick once they’re set. You could also line the pan with parchment paper for an easier removal—an excellent little trick!
-
Melt the Butter: In a large saucepan over low heat, melt the butter until it’s completely liquid. Make sure not to let it brown; we want it just melted for a silky consistency while keeping that rich flavor.
-
Add the Marshmallows: Once the butter is melted, add in the marshmallows. Stir continuously until they are fully melted and combined with the butter. This is where the magic happens! A little chef hack—if you’re struggling to melt the marshmallows evenly, you can add a pinch of salt to help them break down more easily.
-
Incorporate the Lime: Once the marshmallows are smooth, take your grated lime zest and juice, and stir them into the mixture. The aroma will be heavenly! This brightens the marshmallow mixture and gives your treats that zesty kick. Pro tip: Use a microplane for zesting; it works wonders and prevents large pieces of zest from sneaking into your treats.
-
Mix in the Cereal and Crushed Graham Crackers: Remove the mixture from heat and gradually add in the Rice Krispies and crushed graham crackers. Stir gently until all the ingredients are well coated, being careful not to crush the cereal too much. This preserves that beloved crunch!
-
Add the White Chocolate Chips: Before the mixture cools too much, fold in the white chocolate chips. They should melt slightly and create pockets of creamy sweetness throughout your treats.
-
Spread and Cool: Transfer the mixture into your prepared pan and spread it out evenly using a spatula. For a smoother finish, you can lightly coat the spatula with butter to prevent sticking. Press it down firmly but gently—don’t squish too hard, or you’ll lose that delightful texture!
-
Set and Slice: Let your treats cool at room temperature for about an hour until they are set. Once they’ve cooled, cut them into squares (or rectangles if you’re feeling fancy!) and get ready to serve.
Serving Suggestions
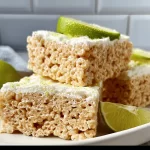
You can serve these Key Lime Pie Rice Krispie Treats as is, or elevate their presentation! Place them on a colorful platter, and drizzle a little extra white chocolate on top for a beautiful finish. You can even garnish with a slice of lime or a sprinkle of extra graham cracker crumbs for that authentic key lime pie feel. You really can’t go wrong!
Recipe Variations
Get creative! Here are a few tasty twists you can try with this base recipe:
-
Choco-Lime: Swap out the white chocolate for semi-sweet chocolate chips for a darker flavor. The combination of tangy lime and rich chocolate is sure to wow your palate!
-
Coconut Craze: Add a cup of shredded coconut to the mix for a tropical flair. It pairs so well with the lime and brings an extra layer of texture.
-
Fruit Frenzy: Consider adding diced strawberries or blueberries to the mixture. Their sweetness will beautifully complement the zesty lime!
-
Nutty Delight: Incorporate some crushed almonds or pecans. The nutty crunch adds a delightful depth to each bite!
-
Vegan Version: Use vegan marshmallows and coconut oil to whip up a plant-based version that everyone can enjoy!
Chef’s Notes
These Key Lime Pie Rice Krispie Treats bring joy and nostalgia, much like summer afternoons spent in my aunt’s kitchen. Over time, the recipe has evolved to reflect not only my love for key lime pie but also my desire to create sweets that foster togetherness. The beauty of this recipe is its versatility; it serves as a canvas for whatever flavor adventure you want to embark on! I still remember my first attempt at these treats—let’s just say they didn’t look quite as pretty as they tasted, but that didn’t stop anyone from devouring them! Embracing those hilarious moments in the kitchen makes every occasion so much sweeter.
FAQs and Troubleshooting
1. Why are my Rice Krispie treats hard?
If your treats end up hard, that usually means that they’ve been overcooked or overmixed. You want to melt the butter and marshmallows on low heat until just melted. More mixing tends to compress them.
2. Can I use regular marshmallows instead of mini ones?
Absolutely! If you prefer regular marshmallows, just make sure to use the same weight. The melting process will be the same, just ensure they’re fully melted for the best texture.
3. How do I store leftover treats?
Store them in an airtight container at room temperature for up to 3 days. If they last longer than that… well, I’d be surprised!
4. Can I freeze these treats?
Yes! Freeze them in an airtight container. Just remember to separate layers with parchment paper to keep them from sticking together. They should last about a month in the freezer.
Nutritional Info
While I haven’t crunched the numbers in detail, these treats are packed with the essence of fun and flavor. For those tracking nutritional information, this recipe is a treat, best enjoyed in moderation!
So, there you have it—a delectable recipe for Key Lime Pie Rice Krispie Treats that’s rooted in joyous memories and the simple pleasure of cooking. I hope you find as much joy in making—and sharing—these treats as I do. Happy cooking, and let’s keep the flavor adventures going! 🌟
PrintKey Lime Pie Rice Krispie Treats
A delightful twist on a classic dessert, merging the chewy texture of Rice Krispie treats with the refreshing flavor of key lime pie.
- Prep Time: 15 minutes
- Cook Time: 10 minutes
- Total Time: 25 minutes
- Yield: 12 servings 1x
- Category: Dessert
- Method: No-Bake
- Cuisine: American
- Diet: Vegetarian
Ingredients
- 3 tbsp butter
- 1 (10 oz) package marshmallows (or 4 cups mini marshmallows)
- 5 cups Rice Krispies cereal
- 1 cup graham crackers, crushed
- 1 whole lime (zest and juice)
- 1 cup white chocolate chips
Instructions
- Prepare your pan: Start by greasing a 9×13-inch baking dish with butter or non-stick spray.
- Melt the butter: In a large saucepan over low heat, melt the butter until it’s completely liquid.
- Add the marshmallows: Once the butter is melted, add in the marshmallows and stir continuously until fully melted.
- Incorporate the lime: Once melted, stir in the lime zest and juice.
- Mix in the cereal and crushed graham crackers: Gradually add in the Rice Krispies and crushed graham crackers, stirring gently.
- Add the white chocolate chips: Fold in the white chocolate chips before the mixture cools too much.
- Spread and cool: Transfer the mixture into your prepared pan and spread it evenly.
- Set and slice: Let your treats cool at room temperature for about an hour.
Notes
For a gluten-free option, use crushed gluten-free cookies instead of graham crackers. These treats can also be stored in an airtight container at room temperature for up to 3 days.
Nutrition
- Serving Size: 1 treat
- Calories: 230
- Sugar: 12g
- Sodium: 50mg
- Fat: 10g
- Saturated Fat: 6g
- Unsaturated Fat: 4g
- Trans Fat: 0g
- Carbohydrates: 30g
- Fiber: 1g
- Protein: 2g
- Cholesterol: 10mg
Keywords: key lime, Rice Krispie treats, dessert, no-bake, summer