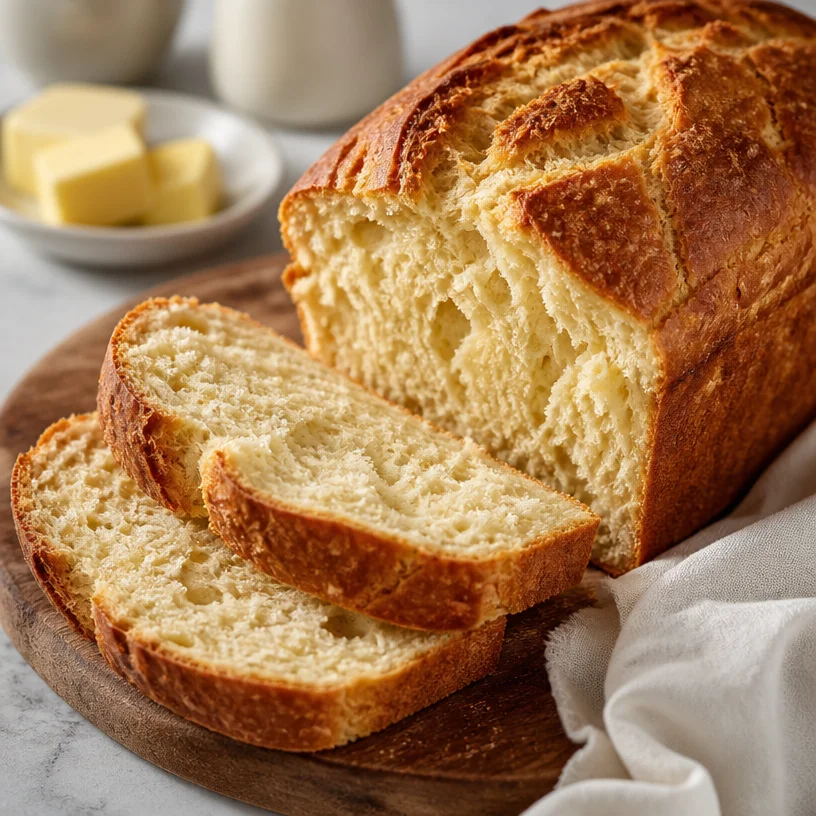
The Ultimate Guide to Buttermilk Bread: A Recipe That Brings Joy
Hello, dear friends! Welcome back to Flavors by Clara. Today, we’re diving deep into the world of homemade Buttermilk Bread—a recipe that not only fills your kitchen with an inviting aroma but also warms your heart. Whether you’re slathering it with butter, using it for an epic sandwich, or just tearing off a piece to enjoy with a cup of tea, this bread is sure to become a favorite in your home.
Buttermilk bread is one of those delicious, fluffy loaves that whisper comfort. It’s versatile, easy to make, and uses just a handful of ingredients. Whether you’re a seasoned baker or just starting your culinary journey, I bet you’ll find joy in every step of making this beautiful loaf! I promise, by the end of this post, you’ll be inspired to get your hands doughy and bake your way to happiness.
A Memorable Slice of Life
Before we jump into the recipe, let me share a little nostalgic memory. Growing up, my grandmother had this magical way of transforming simple ingredients into something extraordinary—like the time she taught me how to make buttermilk bread. I still remember the smell wafting through her cozy kitchen as we mixed the ingredients. The clinking of measuring cups and the rhythmic kneading always felt like music. As she kneaded the dough, she shared stories of her youth and how she learned to bake from her mother.
The anticipation built as we waited for that dough to rise, a symphony of patience and excitement. When it finally came out of the oven, golden-brown and perfect, we couldn’t resist tearing off pieces right away, hot and slathered in butter. That moment, with my grandmother’s laughter and the warmth of fresh bread, is one I cherish deeply. It’s amazing how cooking methods can stretch beyond generations, creating bonds that last a lifetime. I hope this recipe can turn into a cherished memory for you too!
What You’ll Need: Ingredients for Buttermilk Bread
Let’s gather our ingredients! Here’s what you’ll need for your very own delicious Buttermilk Bread:
-
Buttermilk
Buttermilk gives this bread its distinctive tang and moisture. If you don’t have any buttermilk on hand, simply mix 1 cup of milk with 1 tablespoon of vinegar or lemon juice. Let it sit for about 5-10 minutes, and voilà! You have a quick and easy substitute. -
All-purpose flour
The backbone of our bread! All-purpose flour provides structure and strength. If you’re looking to mix things up, you can swap out part of it for whole wheat flour for a heartier texture and flavor. -
Unsalted butter
Butter adds richness and depth of flavor to the bread. Unsalted is preferred, so you can control the saltiness of the final product. If you’re looking for a dairy-free option, you can use a plant-based butter substitute, which works wonderfully too! -
Sugar
Just a touch of sugar enhances the flavor without making the bread sweet. If you’re avoiding sugar, feel free to replace it with honey or maple syrup, keeping in mind that liquid sweeteners may affect the dough’s consistency. -
Salt
Essential for flavor, salt balances the sweetness from the sugar and enhances the overall taste of the bread. If you’re on a low-sodium diet, you can decrease the amount used, but don’t skip it entirely! -
Yeast
This little miracle worker helps our bread rise and gives it that delicious airy quality. If using active dry yeast, make sure to dissolve it in warm water before adding it to the dough, or opt for instant yeast to save some time!
Step-by-Step Instructions: Mastering Buttermilk Bread
Let’s get to the fun part—making our Buttermilk Bread! Follow these steps for a loaf that is sure to impress:
-
Prep your workspace
Start by clearing your kitchen counter or workspace and gathering all your ingredients. For this kind of baking, cleanliness is key! You’ll want a large mixing bowl, a whisk, a rubber spatula, and a 9×5-inch loaf pan. -
Mix the dry ingredients
In a large mixing bowl, combine 4 cups of all-purpose flour, 1 tablespoon of sugar, and 1 teaspoon of salt. Whisk it together until it’s well mixed. The goal here is to evenly distribute the salt and sugar throughout the flour! -
Prepare the yeast
If you’re using active dry yeast, dissolve 2 teaspoons of it in 1 cup of warm buttermilk. Allow it to sit for about 5-10 minutes until frothy. This process “wakes up” the yeast, ensuring a nice rise! If you’re using instant yeast, go ahead and add it directly to your dry ingredients. -
Combine wet and dry
Once your yeast is ready (if applicable), create a well in the center of your dry ingredients and pour in the yeast mixture, plus 1/4 cup of melted unsalted butter. Stir the mixture with a rubber spatula until a shaggy dough forms—it doesn’t have to be perfect! -
Knead the dough
Turn the dough out onto a lightly floured surface and knead it for 6-8 minutes, until it’s smooth and elastic. If the dough is too sticky, sprinkle in a little more flour—but be careful not to overdo it! You want a soft dough that feels tacky but not overly sticky. -
First rise
Place the dough in a greased bowl, cover it with a clean kitchen towel or plastic wrap, and let it rise in a warm spot for about an hour or until it doubles in size. This is often referred to as the "first rise." Feel free to do a little happy dance while you wait—it makes for an extra joyful kitchen! -
Shape the loaf
Once your dough has risen beautifully, punch it down gently to release the air, then turn it out onto your floured surface again. Shape it into a loaf by flattening it into a rectangle and rolling it tightly, tucking the ends as you go. -
Second rise
Place your shaped loaf into a greased loaf pan, cover it again, and let it rest for another 30 minutes to 1 hour to rise a bit more. This second rise is crucial for achieving a lovely, airy texture. -
Preheat your oven
While your loaf rises for the second time, go ahead and preheat your oven to 375°F (190°C). -
Bake the bread
Once the dough has risen, pop it in the oven and bake for 30-35 minutes, or until it’s golden brown on top and sounds hollow when tapped. If you have a kitchen thermometer, you’re aiming for an internal temperature of around 190°F (88°C). -
Cool the bread
Once baked, remove the bread from the oven and let it cool in the pan for about 5 minutes before transferring it to a wire rack to cool completely. This cooling process allows the steam to escape, which prevents a soggy crust!
Serving Suggestions
So, your bread has cooled, and it’s time for the best part—enjoying it! I love slicing it thick, then lavishly spreading (or slathering, if you’re feeling generous) with butter. You could also serve it with a variety of toppings like avocado, homemade jam, or even a savory herb spread. It’s gorgeous for breakfast, whether toasted or fresh, but it also shines at dinner alongside some hearty soup or salad.
Recipe Variations
Feeling adventurous? Here are a few twists you can play around with:
-
Herb-Infused Buttermilk Bread: Add a tablespoon or two of dried herbs (think rosemary or thyme) into the dough for an aromatic touch.
-
Garlic & Cheese Swirls: Knead in roasted garlic and shredded cheese (like cheddar or parmesan) before the first rise for a savory take!
-
Whole Wheat Buttermilk Bread: Substitute 1-2 cups of all-purpose flour with whole wheat flour for a more robust flavor and texture.
-
Sweet Cinnamon Buttermilk Bread: Mix in 1 tablespoon of cinnamon and 1/4 cup of brown sugar for a hint of sweetness—perfect for breakfast!
-
Dried Fruit Delight: Toss in some chopped dried fruits such as cranberries or apricots during the mixing phase for a fruity twist!
Chef’s Notes
Buttermilk bread is such a versatile recipe, and over the years, I’ve discovered a few little tips and tricks. One of my fondest kitchen memories is of making bread with my kids. They loved seeing the dough rise and were enthralled by the science behind it. Baking this bread has turned into a family tradition—sometimes we even shape it into fun forms for holidays!
Always remember: the dough might be a little different each time, depending on your kitchen’s humidity and your ingredient measurements. Don’t be afraid to get your hands messy and adjust along the way; that’s part of the fun!
FAQs and Troubleshooting
-
Why didn’t my bread rise?
If your bread didn’t rise, it could be due to expired yeast or not letting the dough sit in a warm enough spot. Make sure your yeast is fresh and activated properly before mixing in. -
My bread turned out too dense. What happened?
A dense loaf might result from too much flour—always measure your flour accurately. Or perhaps the dough wasn’t kneaded enough to develop gluten. Remember, gluten is what makes your bread fluffy! -
Can I freeze this bread?
Absolutely! Buttermilk bread freezes beautifully. Make sure to wrap it tightly in plastic wrap and then in aluminum foil. When you want to enjoy it, thaw it at room temperature, or pop slices in the toaster. -
How can I tell when my bread is done?
An excellent indicator is the golden-brown crust and the hollow sound when you tap the bottom. You can also check the internal temperature with a thermometer—it should be around 190°F (88°C).
Nutritional Info
While enjoying our homemade buttermilk bread, it’s always useful to know a bit about what’s in it! A single slice (about 1 ounce) typically contains around 80-90 calories, with approximately 2 grams of protein and 3 grams of fat, depending on the exact ingredients used.
And there you have it! Your very own homemade Buttermilk Bread that’s sure to warm hearts and fill tummies. I can’t wait to hear how yours turns out. Remember, cooking is all about experimenting and enjoying the process. So, grab your apron, roll up your sleeves, and let’s make some bread magic together! Happy baking, my friend!
PrintButtermilk Bread
A delightful and fluffy buttermilk bread that’s perfect for sandwiches or enjoying with butter and jam.
- Prep Time: 15 minutes
- Cook Time: 30 minutes
- Total Time: 45 minutes
- Yield: 12 servings 1x
- Category: Bread
- Method: Baking
- Cuisine: American
- Diet: Vegetarian
Ingredients
- 4 cups all-purpose flour
- 1 tablespoon sugar
- 1 teaspoon salt
- 2 teaspoons active dry yeast (or instant yeast)
- 1 cup warm buttermilk (or milk with vinegar/lemon juice)
- 1/4 cup unsalted butter, melted
Instructions
- Prep your workspace by gathering all your ingredients and tools.
- Mix the dry ingredients in a large bowl.
- Prepare the yeast by dissolving it in warm buttermilk.
- Combine the wet and dry ingredients, mixing until a shaggy dough forms.
- Knead the dough on a floured surface for 6-8 minutes until smooth.
- First rise: Place the dough in a greased bowl and cover. Let it rise until doubled in size, about 1 hour.
- Shape the loaf by rolling the dough into a rectangle and rolling tightly.
- Second rise: Place the loaf in a greased pan and let it rise for 30 minutes to 1 hour.
- Preheat your oven to 375°F (190°C).
- Bake the bread for 30-35 minutes until golden brown.
- Cool the bread in the pan for 5 minutes before transferring it to a wire rack.
Notes
This bread freezes well. Wrap tightly in plastic wrap for storage.
Nutrition
- Serving Size: 1 slice
- Calories: 90
- Sugar: 1g
- Sodium: 150mg
- Fat: 4g
- Saturated Fat: 2g
- Unsaturated Fat: 2g
- Trans Fat: 0g
- Carbohydrates: 15g
- Fiber: 0g
- Protein: 2g
- Cholesterol: 10mg
Keywords: buttermilk bread, homemade bread, baking recipes