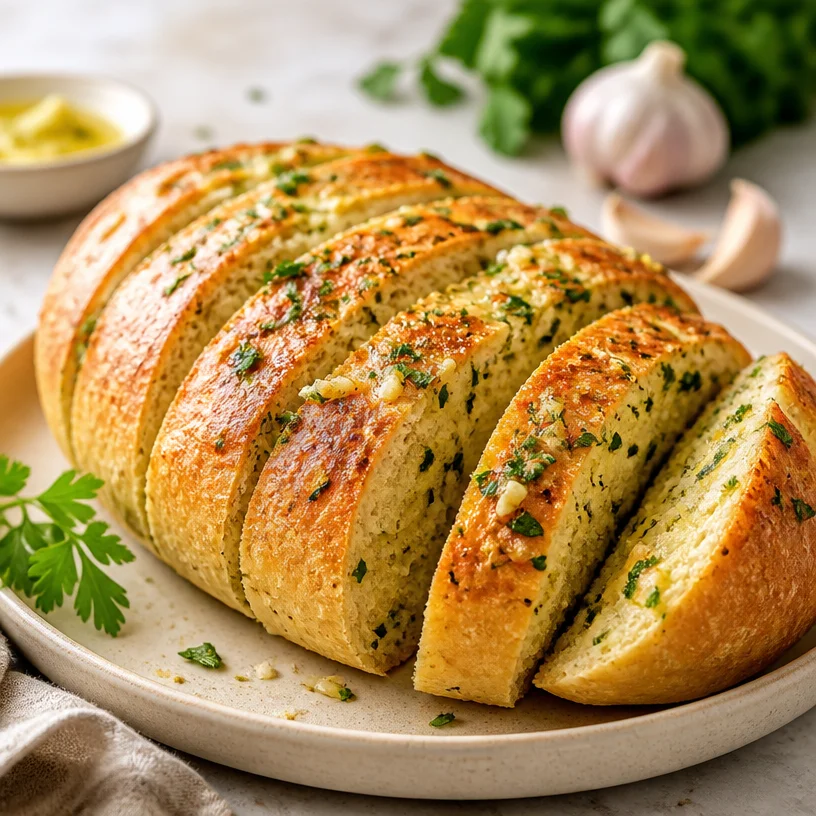
The Garlic Herb Bread That Will Steal Your Heart
Welcome, fellow food lovers! Today, we’re diving into one of my absolute favorites: Garlic Herb Bread. There’s just something about the combination of warm, buttery bread and the enticing aroma of garlic and herbs that feels like a warm hug. Whether you’re serving it up at a family dinner, a fancy gathering, or just because you want to treat yourself, this bread is sure to win hearts and taste buds alike.
I can still remember the first time I learned how to make garlic bread. I was a young cook, eagerly absorbing everything I could in my grandmother’s bustling kitchen. The moment I crushed those garlic cloves and combined them with melted butter, I felt like a little magician conjuring a potion. My grandmother would always say, “Good food is made with love—and a little bit of garlic!” Those words have stuck with me, and now I share that love through my recipes.
In my journey as a recipe developer, I’ve had the chance to tweak and play around with traditional recipes, and today, I’m excited to share my twist on this classic favorite. Get that apron on, and let’s whip up some Garlic Herb Bread that’s simple, scrumptious, and everything it should be.
A Slice of Memory
Every time I make Garlic Herb Bread, I’m taken back to my childhood, standing in my grandmother’s warm and fragrant kitchen. The inviting scent of bubbling marinara would fill the air, mingling beautifully with the garlic as it toasted ever so slightly in the oven. I remember sneaking a piece before dinner, unable to resist that golden-brown crust. My grandmother would chuckle, “Just wait until it’s fully baked, Clara! It’ll be worth it!” And she was right.
Every bite was a moment of joy, sharing stories and laughter with my family gathered around the dinner table. It’s those magic moments that shaped my passion for cooking. Now, I strive to recreate that sense of nostalgia and togetherness in my own kitchen, hoping to pass it along through my recipes. So come along, let’s make our bread, celebrate the memories, and create new ones!
Ingredients
Grab your favorite mixing bowl because we’re about to gather some delightful ingredients for our Garlic Herb Bread. Each one plays a vital role in achieving that delectable flavor.
-
Flour: The backbone of bread! All-purpose flour works best, but you can replace up to half with whole wheat flour for a nuttier flavor and extra fiber.
-
Garlic: The star of this dish! Fresh garlic cloves give the best flavor, but you can use garlic powder in a pinch—just remember, 1/8 teaspoon of powder equals one clove.
-
Parsley: This bright herb adds freshness and color. If you don’t have parsley, fresh basil is a wonderful substitute, or you can even use dried herbs (but the flavor won’t be as vibrant).
-
Oregano: A classic Mediterranean herb, oregano works beautifully in this recipe. Feel free to switch it up with Italian seasoning or herbes de Provence for a fun twist.
-
Butter: The secret weapon for that irresistible aroma and richness! You can use unsalted butter for better control of the salt content, or substitute olive oil for a vegan option.
-
Yeast: This is what makes our bread rise and gives it that signature fluffy texture. Instant yeast is my go-to because it’s super user-friendly. If you only have active dry yeast, just let it activate in warm water with a pinch of sugar for about 5-10 minutes before incorporating it.
Step-by-Step Instructions
Now that we have our ingredients ready, let’s roll up our sleeves and get started! Here’s a simple step-by-step guide:
1. Prepare the Flour Mixture
In a large mixing bowl, combine 3 cups of all-purpose flour, 2 teaspoons of dried oregano, and a pinch of salt to taste. Stir together and create a well in the center. This is where the fun begins!
2. Activate the Yeast
In a separate bowl, combine 1 tablespoon of instant yeast with 1 cup of warm water (about 110°F/43°C) and 1 teaspoon of sugar. Let it sit for about 5-10 minutes until frothy. This step is crucial for fluffy bread! If your mixture doesn’t froth up, your yeast might be expired—don’t worry, just grab some fresh yeast!
3. Mix It Together
Pour the yeasty mixture into the well in the flour. Add 1/4 cup of melted butter and stir everything together until it forms a sticky dough. Don’t be alarmed at the stickiness; that’s a sign you’re on the right track!
4. Knead the Dough
Transfer your dough to a floured surface and knead it for about 5-7 minutes. You’re looking for that perfect smooth and elastic texture. If the dough is too sticky, dust a little more flour as needed. A quick tip: if you can stretch it without tearing, you’ve nailed it!
5. First Rise
Place your kneaded dough back into a lightly oiled bowl, cover it with a clean kitchen towel, and let it rise in a warm area for about 1 hour or until it doubles in size. Pro tip: your oven on the lowest setting for a few minutes can create a great warm environment for rising!
6. Prepare the Garlic Butter
While your dough rises, mix 1/2 cup of melted butter, 5 cloves of minced garlic, and 2 tablespoons of freshly chopped parsley in a bowl. This garlic butter will be your secret weapon for flavor in every bite.
7. Shape the Bread
Once your dough has risen, punch it down (a little therapeutic, right?!). Turn it out onto a floured surface and roll it into a rectangle about 1 inch thick. Brush your garlic butter generously over the entire surface.
8. Form Loaves
Roll the dough tightly from the long side to form a log. Cut the log into 2-3 equal parts, depending on how large you want your loaves. Place them in a greased baking dish (a 9×5 inch loaf pan works great) or on a baking sheet.
9. Second Rise
Let your loaves rise again for about 30-40 minutes. Cover them loosely with a towel while you preheat your oven to 375°F (190°C).
10. Bake
Once your oven is hot and the bread has puffed up beautifully, place it in the oven and bake for 25-30 minutes. You want that golden-brown crust that’s calling your name!
11. Brush with More Garlic Butter
When your bread is nearly done baking, take it out and brush on more of that heavenly garlic butter. Pop it back in for another 5-10 minutes to soak the flavors in.
12. Cool and Serve
Once finished, let your bread cool slightly before slicing. And there you have it—an irresistible Garlic Herb Bread that will have everyone at the table clamoring for more!
Serving Suggestions
To serve, slice your bread thick and arrange it on a beautiful wooden board or a rustic serving platter. A sprig of parsley on top for garnish adds a lovely pop of color. Pair it with a warm bowl of marinara sauce for dipping or even a light salad for a lovely lunch accompaniment. This bread is also fabulous alongside pasta dishes or just on its own, slathered with a little extra butter!
Recipe Variations
Feeling adventurous? Here are a few ideas to mix things up with your Garlic Herb Bread:
-
Cheesy Delight: Sprinkle some shredded mozzarella or Parmesan cheese before rolling the dough for a cheesy explosion!
-
Spicy Kick: Add red pepper flakes to your garlic butter for a little heat—everyone loves a spicy twist!
-
Herb Medley: Swap parsley and oregano for your favorite herbs like thyme, rosemary, or even dill for a unique flavor profile.
-
Sweet Touch: Create a sweet variation by adding a touch of honey or cinnamon (and use a bit less garlic).
-
Gluten-Free Option: Use a gluten-free flour blend to make this delicious bread gluten-free. Just keep in mind that consistency may vary!
Chef’s Notes
I’ve been perfecting my Garlic Herb Bread recipe over the years, and I can say that the best ingredient is love (and a generous dollop of garlic, of course!). Some of my most memorable kitchen disasters happened while experimenting with rising times, and let’s just say—stale bread isn’t as cute as it sounds!
Kneading might seem a little daunting, but think of it as an arm workout too. And when it comes to savoring your creation—don’t rush! Your kitchen smells divine, take a moment to appreciate that before diving in.
FAQs and Troubleshooting
Q: My bread didn’t rise! What went wrong?
A: There are a couple of things to check: ensure your yeast is fresh, and the water you use isn’t too hot (it can kill the yeast) or too cold (it won’t activate).
Q: Can I make this ahead of time?
A: Absolutely! After shaping the loaves, you can refrigerate them overnight (just tightly cover). Let them come to room temperature before the second rise.
Q: Is there a vegan way to make this?
A: Yes! Swap butter for a plant-based alternative and use almond milk or any non-dairy milk instead of regular milk. The rest of the ingredients are typically vegan.
Q: How can I store the leftovers?
A: Wrap your Garlic Herb Bread in foil or plastic wrap and keep it in a cool, dry place for up to three days. You can also freeze slices for longer storage!
And there you have it! We’ve traveled together through the wonderful world of Garlic Herb Bread. Remember, whether you’re cooking for loved ones or just for yourself, embrace the process and enjoy every delicious bite. Until next time, keep those flavors bold and the laughter loud! Happy baking!
PrintGarlic Herb Bread
A delightful twist on classic garlic bread featuring warm, buttery flavors and fresh herbs, sure to win hearts and taste buds alike.
- Prep Time: 15 minutes
- Cook Time: 30 minutes
- Total Time: 45 minutes
- Yield: 2-3 loaves 1x
- Category: Bread
- Method: Baking
- Cuisine: Italian
- Diet: Vegetarian
Ingredients
- 3 cups all-purpose flour
- 2 teaspoons dried oregano
- 1 pinch salt
- 1 tablespoon instant yeast
- 1 cup warm water (about 110°F/43°C)
- 1 teaspoon sugar
- 1/4 cup melted butter
- 5 cloves fresh garlic, minced
- 2 tablespoons fresh parsley, chopped
- Extra melted butter for brushing
Instructions
- Prepare the flour mixture by combining flour, oregano, and salt in a bowl.
- Activate the yeast in a separate bowl with warm water and sugar.
- Pour the yeasty mixture into the flour well, add melted butter, and stir until sticky dough forms.
- Knead the dough on a floured surface for 5-7 minutes until smooth and elastic.
- Place the dough in a lightly oiled bowl, cover, and let it rise for 1 hour.
- Mix garlic and parsley into melted butter to prepare garlic butter.
- Shape the dough into a rectangle and brush with garlic butter.
- Roll the dough tightly and cut into 2-3 equal parts.
- Let the loaves rise again for 30-40 minutes.
- Bake in a preheated oven at 375°F (190°C) for 25-30 minutes.
- Brush the bread with garlic butter and bake for an additional 5-10 minutes.
- Cool slightly before slicing and serving.
Notes
Serve with marinara sauce for dipping or as a side with pasta dishes. It can be made gluten-free using a gluten-free flour blend.
Nutrition
- Serving Size: 1 slice
- Calories: 200
- Sugar: 1g
- Sodium: 300mg
- Fat: 9g
- Saturated Fat: 5g
- Unsaturated Fat: 3g
- Trans Fat: 0g
- Carbohydrates: 24g
- Fiber: 1g
- Protein: 5g
- Cholesterol: 20mg
Keywords: garlic bread, herb bread, easy garlic bread, baking, cozy recipes