Heavenly Chocolate Cheesecake Trifle: A Decadent Delight
When we think of desserts that bring people together, nothing quite captures the essence of celebration like a magnificent trifle. With its layers of flavor, texture, and color, a trifle is more than just a dessert; it’s a stunning centerpiece that invites everyone to dig right in. Today, I’m thrilled to guide you through making my Heavenly Chocolate Cheesecake Trifle—a treat so addictive, it’ll have you returning for seconds (maybe even thirds)!
If you’re like me—always finding joy in whipping up something sweet—you’ll fall head over heels for this trifle. It combines light, airy whipped topping with rich chocolate cake and creamy cheesecake filling. Seriously, it feels like a hug in dessert form! So buckle up, friend; we’re about to embark on a chocolatey adventure full of flavor, fun, and the absolute joy of sharing good food.
A Sweet Memory
Ah, chocolate! The mere mention of it takes me back to my childhood kitchen, where my grandmother and I would spend endless afternoons baking together. Chocolate cheesecake was her specialty, and whenever a special occasion arose—birthdays, holidays, or simply “just because”—she’d whip up her magic.
One day, I remember her teaching me how to fold whipped cream into the cream cheese batter. “Fold, don’t stir, Clara!” she insisted, her twinkling eyes twinkling with mischief and wisdom. The way she taught me to feel the ingredients—how to appreciate their textures—made an indelible impact on my cooking style.
We’d layer the cool, creamy cheesecake filling with her famous chocolate cake, then top it with whipped cream and chocolate sauce. And just like that, the trifle became a family tradition. Each bite would transport you to a chocolate paradise! So here I am, sharing a special twist on that cherished memory with all of you. Let’s make a trifle that’s not only a tribute to heartfelt memories but also a delightful experience for your taste buds!
Ingredients
To create your Heavenly Chocolate Cheesecake Trifle, you’ll need the following ingredients:
-
1 package chocolate cake (baked and crumbled)
Use your favorite chocolate cake recipe or good-quality store-bought for ease. If you’re looking to cut calories, opt for a lighter chocolate sponge. -
1 package cream cheese (softened, 8 oz)
Make sure your cream cheese is at room temperature for easy blending. Neufchâtel cheese can serve as a lower-fat substitute without sacrificing flavor. -
1 cup powdered sugar
This adds the sweetness needed for the cream cheese filling. If you prefer, coconut sugar can work as a healthier alternative. -
1 teaspoon vanilla extract
Never underestimate the power of pure vanilla extract! It elevates the flavor, while vanilla bean paste makes for an exciting twist. -
1 container whipped topping (Cool Whip, thawed, 8 oz)
For a homemade version, simply whip up heavy cream with a touch of sugar until soft peaks form. -
2 cups chocolate pudding
You can use store-bought or homemade chocolate pudding—either way, it’s a layer of decadence! For a healthier twist, chia seed pudding mixed with cocoa powder can do wonders. -
1 cup chocolate sauce or ganache
This drizzle adds a luscious touch! Feel free to make your own ganache by melting chocolate with heavy cream or grab your favorite bottled version. -
Chocolate truffles or chocolate balls (for garnish)
These delightful morsels add elegance to your trifle. Maybe you made them at home, or perhaps you’ve picked some up from your favorite chocolatier. -
Chocolate shavings (for garnish)
Use a vegetable peeler to shave chunks off a chocolate bar for a rustic touch. Dark chocolate adds a gourmet finish, while white chocolate shavings create a striking contrast!
Step-by-Step Instructions
Step 1: Prepare Your Chocolate Cake!
Start by baking your chocolate cake according to your recipe or package instructions. Once it’s cooled completely, crumble it into bite-sized pieces. This step not only gets your delicious chocolate cake ready but also fills your kitchen with an irresistible aroma.
Chef Tip: If you have leftover cake, pop it in the freezer! It’s a fantastic way to have cake ready whenever you crave something sweet!
Step 2: Whip Up the Cheesecake Filling
In a large mixing bowl, combine the softened cream cheese and powdered sugar. Mix them together using an electric mixer on medium speed until your mixture is smooth and creamy. Add in the vanilla extract and give it another spin until fully incorporated.
Next, gently fold in the whipped topping until you see soft, billowy clouds of cheesecake filling forming. This step is crucial—as it keeps your filling light and airy, making it a delightful contrast to the chocolate cake.
Chef Insight: Be gentle during this folding stage. You want the mixture to remain fluffy as it makes your trifle so much more enjoyable!
Step 3: Assemble the Trifle
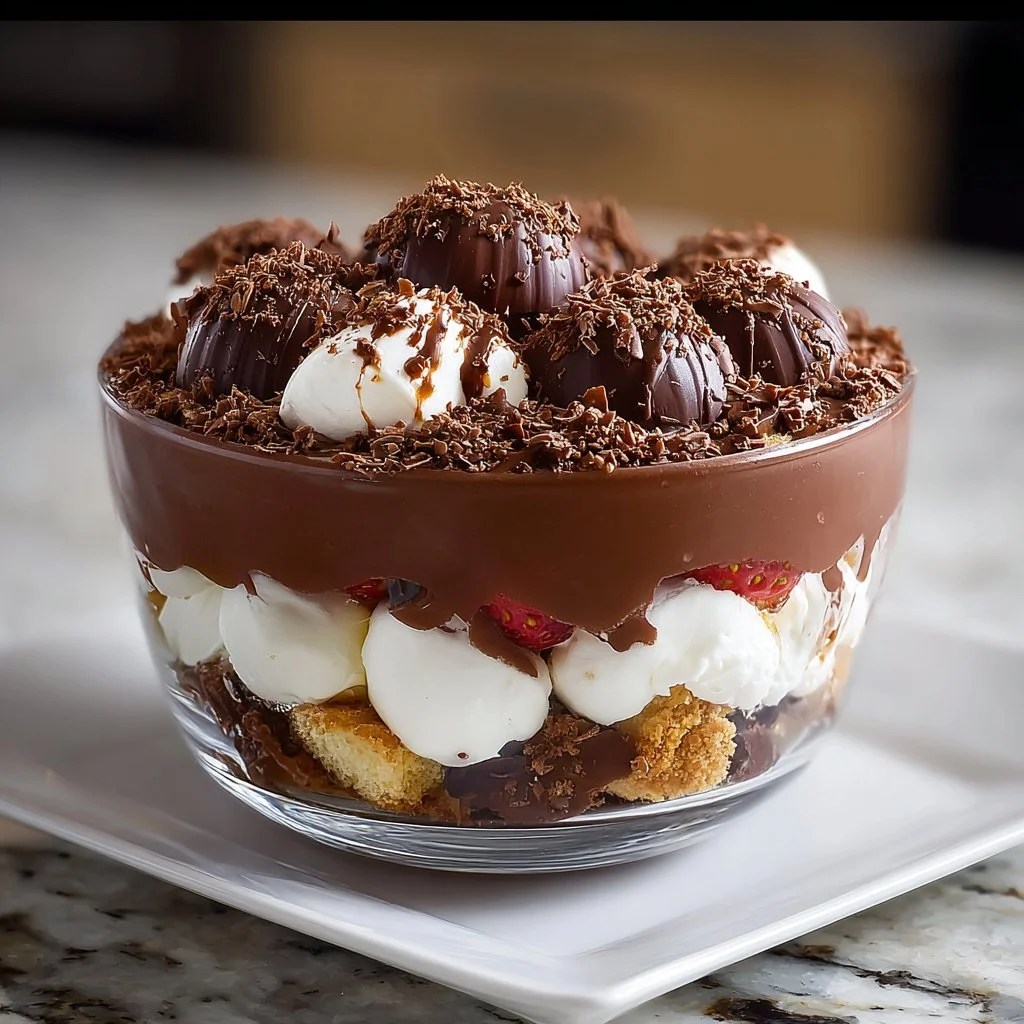
Now that your chocolate cake and cheesecake filling are ready, it’s time for the fun part—layering! Grab your favorite trifle dish or a large glass bowl. Begin with a layer of chocolate cake crumbs at the bottom.
Next, spoon a layer of your creamy cheesecake filling over the cake, followed by a generous layer of chocolate pudding. Drizzle a bit of chocolate sauce or ganache on top. Repeat these layers—cake, cheesecake filling, pudding, and sauce—until all of your ingredients are used up. Aim for at least three layers to make your trifle visually appealing.
Step 4: Add Finishing Touches
Once you’ve reached the top of your dish, it’s time for a little garnish! Top it off with a generous dollop of whipped topping and sprinkle with chocolate shavings. Finally, add your chocolate truffles or chocolate balls as a glamorous finishing touch!
Step 5: Chill and Serve
Cover your trifle with plastic wrap and let it chill in the refrigerator for at least two hours (or overnight if you can contain your excitement!). This step allows all those luscious layers to meld beautifully together.
Serving Tip: When ready to serve, scoop portions into dessert glasses for an elegant presentation. Trust me, your guests will be wowed!
Recipe Variations
-
Berry Bliss Trifle: Swap out some cake layers for mixed berries. This fruity twist adds freshness and balances the chocolate richness.
-
Nutty Delight: Layer in some chopped nuts (like pecans or hazelnuts) for a delightful crunch in between layers.
-
Mint Madness: Add a layer of mint chocolate pudding or incorporate crushed peppermint candies for a refreshing kick.
-
Gluten-Free Option: Use a gluten-free chocolate cake mix or quinoa flour-based cake for a gluten-free delight.
-
Vegan Version: Substitute with vegan cream cheese, coconut whipped cream, and a plant-based chocolate cake for a dairy-free delight.
Chef’s Notes
This trifle is my go-to for potlucks and family gatherings, and it’s come a long way since my grandmother’s traditional cheesecake. Over the years, I’ve embraced creativity in the kitchen, tweaking the recipe to include elements that make it iconic for my family and friends.
Like the time I added a dash of espresso powder to the cake batter—now that’s a game-changer! One playful baking session, my niece accidentally spilled sprinkles on top, and much to my surprise, it became an instant favorite among her friends. Kitchen mishaps often lead to new favorites, so don’t be afraid to get creative as you make this trifle!
FAQs and Troubleshooting
Q: Can I use a different flavor of cake?
Absolutely! While chocolate is divine, this recipe works well with vanilla or even a red velvet cake for a fun twist.
Q: How can I avoid the cheesecake filling from being lumpy?
Ensure your cream cheese is thoroughly softened before mixing. This way, it blends seamlessly with the powdered sugar and vanilla.
Q: How long can I store leftovers?
If you have leftover trifle (which, let’s be honest, is rare), you can keep it in the fridge for up to 3 days. Just cover it tightly with plastic wrap.
Q: Can I assemble this trifle ahead of time?
Yes! You can prepare the layers ahead and assemble them the day of your event. Just remember to give it some chill time in the refrigerator before serving!
Nutritional Info (Optional)
While I’m all about enjoyment in moderation, here’s a quick glance at the nutritional facts per serving (based on estimated portions):
- Calories: 350
- Total Fat: 18g
- Saturated Fat: 10g
- Sugars: 28g
- Protein: 5g
Remember, indulgence can fit into a balanced lifestyle!
So there you have it—the Heavenly Chocolate Cheesecake Trifle is not just a dessert but a way to celebrate life’s little moments! If you try this recipe, I’d love to hear your thoughts. Feel free to share variations or any kitchen mishaps you encounter along the way—I’m always here to inspire and share the love of good food. Now, grab your apron, and let’s create something amazing together!
PrintHeavenly Chocolate Cheesecake Trifle
A decadent dessert featuring layers of rich chocolate cake, creamy cheesecake filling, and airy whipped topping, all beautifully arranged in a trifle dish.
- Prep Time: 30 minutes
- Cook Time: 30 minutes
- Total Time: 60 minutes
- Yield: 8 servings 1x
- Category: Dessert
- Method: Layering
- Cuisine: American
- Diet: Vegetarian
Ingredients
- 1 package chocolate cake (baked and crumbled)
- 1 package cream cheese (softened, 8 oz)
- 1 cup powdered sugar
- 1 teaspoon vanilla extract
- 1 container whipped topping (Cool Whip, thawed, 8 oz)
- 2 cups chocolate pudding
- 1 cup chocolate sauce or ganache
- Chocolate truffles or chocolate balls (for garnish)
- Chocolate shavings (for garnish)
Instructions
- Prepare Your Chocolate Cake! Start by baking your chocolate cake according to your recipe or package instructions. Once it’s cooled completely, crumble it into bite-sized pieces.
- Whip Up the Cheesecake Filling In a large mixing bowl, combine the softened cream cheese and powdered sugar. Mix them together using an electric mixer on medium speed until your mixture is smooth and creamy. Add in the vanilla extract and give it another spin until fully incorporated. Gently fold in the whipped topping until you see soft, billowy clouds of cheesecake filling forming.
- Assemble the Trifle Grab your favorite trifle dish or a large glass bowl. Begin with a layer of chocolate cake crumbs at the bottom. Spoon a layer of your creamy cheesecake filling over the cake, followed by a generous layer of chocolate pudding. Drizzle a bit of chocolate sauce or ganache on top. Repeat these layers until all of your ingredients are used up.
- Add Finishing Touches Once you’ve reached the top of your dish, top it off with a generous dollop of whipped topping and sprinkle with chocolate shavings. Finally, add your chocolate truffles or chocolate balls as a glamorous finishing touch!
- Chill and Serve Cover your trifle with plastic wrap and let it chill in the refrigerator for at least two hours (or overnight). When ready to serve, scoop portions into dessert glasses.
Notes
Feel free to get creative with variations like adding mixed berries or nuts between layers.
Nutrition
- Serving Size: 1 serving
- Calories: 350
- Sugar: 28g
- Sodium: 300mg
- Fat: 18g
- Saturated Fat: 10g
- Unsaturated Fat: 6g
- Trans Fat: 0g
- Carbohydrates: 40g
- Fiber: 2g
- Protein: 5g
- Cholesterol: 30mg
Keywords: chocolate, cheesecake, trifle, dessert, celebration