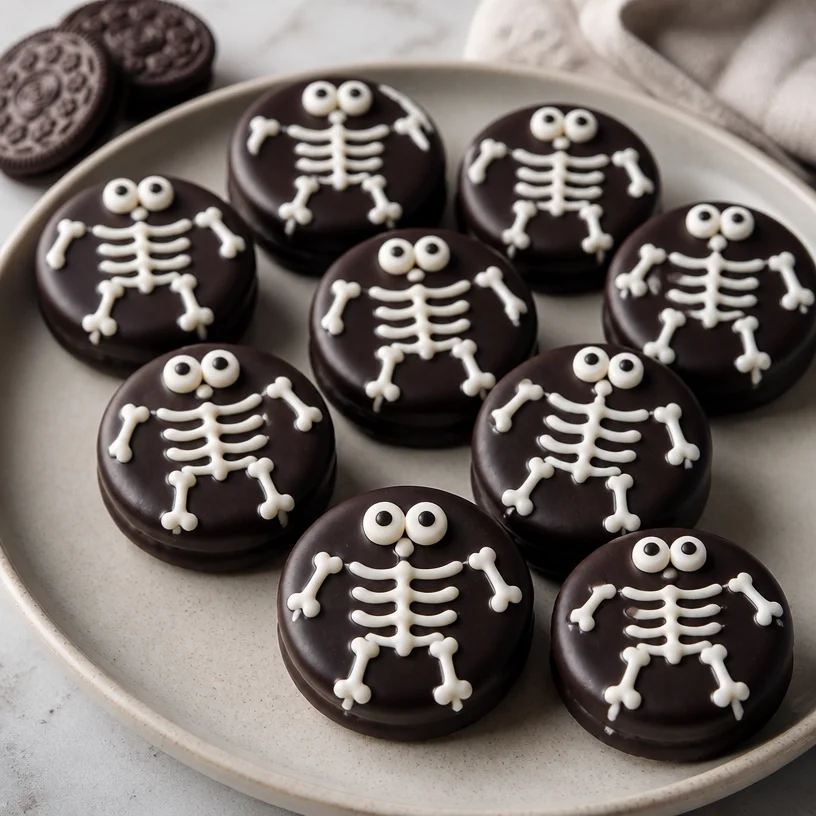
Spooky Skeleton Oreos: A Fun and Frightening Treat!
The air is crisp, the leaves are changing, and there’s a little bit of mischief in the air. That can only mean one thing: it’s Halloween season! I absolutely adore this time of year, not only for the cozy sweaters and pumpkin-spiced everything, but especially for the spooky treats that fill our kitchens. Today, I’m excited to share a delightfully eerie dessert that’s as tasty as it is visually captivating—Spooky Skeleton Oreos!
These Halloween-inspired goodies are perfect for parties, classroom treats, or just a fun project with the kiddos. With their playful skull designs, they’ll be a hit among kids and adults alike. Plus, they’re incredibly simple to make, requiring just a handful of ingredients while being open to your creative flair. If you’re ready to bring some fun into your kitchen, grab your apron, and let’s step into this spooky baking adventure!
A Memorable Halloween
When I think back on the times I spent in the kitchen during Halloween, a flood of memories rushes back to me. One year, I decided I wanted to host a Halloween party that would go down in history as the “spookiest bash.” I spent days preparing, making everything from creepy cocktails to ghoulish desserts.
The star of the show? A plate filled with chocolate-dipped Oreos that I transformed into skeletons. I remember gathering around the kitchen island with my friends, laughing and decorating the cookies as the sun began to set. The moment my friend Jodie added oversized candy eyes to one of the skeletons—only for it to look remarkably like a character from our favorite horror movie—was priceless. That night was filled with laughter, memories, and plenty of treats, and it reminded me just how special it is to create festive moments with food.
These Spooky Skeleton Oreos are a nod to that unforgettable evening and an invitation to craft your own delicious memories this Halloween.
Ingredients
To make these cute and creepy Spooky Skeleton Oreos, you’ll need the following ingredients:
-
Oreo Cookies
The star ingredient! Classic chocolate or golden Oreos work perfectly. Feel free to swap for any sandwich cookies you love, but remember that the cream filling helps to hold the design! -
Chocolate (White and/or Dark)
This is your dipping chocolate. Use high-quality melting chocolate for the best coating—dark chocolate offers a rich flavor, while white chocolate provides a striking contrast. If you don’t have chocolate bars, candy melts are a great alternative. -
Black Icing
A must-have for detailing. You can easily find black icing in tubes at your local store. If you want to make your own, combine powdered sugar with a tiny bit of water and black food coloring. -
Candy Eyes
These add character to your skeletons! Get creative and consider different sizes or colors. If you can’t find candy eyes, you could use chocolate chips or even small marshmallows!
Step-by-Step Instructions
Let’s dive into the fun part! Here’s how you can bring your Spooky Skeleton Oreos to life:
-
Melt the Chocolate
Start by breaking your chocolate into pieces and placing it in a microwave-safe bowl. Microwave in 30-second increments, stirring in between, until the chocolate is fully melted and smooth. Be careful not to overheat—chocolate can seize if it gets too hot! -
Dip the Oreos
Next, grab your Oreos! Dip each one halfway into the melted chocolate, letting the excess drip off. You can use a fork to make this easier. Place the dipped Oreos on a parchment-lined baking sheet, allowing them to set slightly (about 5 minutes) before moving on to the next step. -
Create the Skeleton Face
Once the chocolate begins to harden, it’s time to get creative! Using the black icing, pipe a skull design onto the white-dipped side of the cookie. Think simple skull shapes with two empty eye sockets and a toothy grin—let your inner artist shine! -
Add Candy Eyes
To make your skeletons come to life, gently press the candy eyes into the icing while it’s still wet. This will help them stick! You can position them crossed-eyed for comic effect or evenly spaced for a classic look. -
Finish Up
Repeat this process with all your Oreos. Once finished, let them fully set for about 30 minutes in the fridge, so the icing and chocolate harden properly.
And voilà! You now have a platter filled with adorable Spooky Skeleton Oreos, ready to impress.
Serving Suggestions
When it comes time to serve your creations, consider presenting them on a spooky-themed platter or placing them in a cauldron for an eye-catching centerpiece. To add a little extra flair, sprinkle some candy corn or edible glitter around the display. Trust me, your guests will be wowed by both the festive presentation and the delicious treat!
Recipe Variations
Want to mix things up? Here are a few creative twists you can try with your Spooky Skeleton Oreos:
- Pumpkin Spice Oreos: Use pumpkin spice-flavored Oreo cookies for a fall-inspired twist!
- Colored Chocolate: Try using colored melting chocolate to create a vibrant assortment of skeletons. Think bright purple or green for a whimsical touch.
- Dipped in Nuts or Sprinkles: After dipping in chocolate, roll the cookies in chopped nuts or Halloween-themed sprinkles for a crunchy texture.
- Non-Dairy Version: Use dairy-free chocolate and vegan Oreos to make this recipe suitable for vegan diets.
- Ghostly Variations: Instead of skeleton faces, try dipping them all in white chocolate and create ghost faces with black icing for variety!
Chef’s Notes
This recipe has evolved over time as I discovered more ways to personalize it! Initially, I stuck strictly to traditional skeleton designs, but as I gained confidence, I started introducing funky elements like googly eyes and different colored chocolate. It reminded me that cooking, much like life, is all about experimenting and having fun! Plus, I’ve had my fair share of hilarious kitchen mishaps—like the time I accidentally grabbed salt instead of sugar while baking. Talk about shocking results! Always remember, even the “oops” moments can lead to delicious discoveries.
FAQs and Troubleshooting
1. My chocolate seized up! What did I do wrong?
Chocolate can seize if it comes into contact with water or if it gets too hot. Be sure to dry your bowl and utensils completely, and stick to short microwave bursts while stirring frequently.
2. How do I keep my icing from running?
Make sure your melted chocolate isn’t too warm when you add the icing. Allow the chocolate to cool slightly before decorating. Additionally, using icing in a tube can help you control the flow better.
3. Can I prepare these in advance?
Absolutely! Spooky Skeleton Oreos can be made a few days ahead of time. Just store them in an airtight container in the refrigerator to keep them fresh.
4. What if I don’t have candy eyes?
No problem! You can substitute with mini chocolate chips, M&Ms, or even dab chocolate icing for eyes if you’re in a pinch.
Nutritional Info
While I won’t dive into precise nutritional values for these treats (it’s Halloween, after all!), keep in mind that each Spooky Skeleton Oreo is a balance of delight and indulgence. They’re a sweet treat—perfect for sharing and savoring responsibly!
Thank you for joining me in bringing these Spooky Skeleton Oreos to life! I can’t wait to hear your kitchen stories and see how your creations turn out. Remember, the key to a great dish is not just in the ingredients but in the joy of making it and sharing it with those you love. Happy Halloween! 🍬👻
PrintSpooky Skeleton Oreos

A fun and frightfully delicious treat perfect for Halloween parties and gatherings.
- Prep Time: 15 minutes
- Cook Time: 5 minutes
- Total Time: 20 minutes
- Yield: 24 servings
- Category: Dessert
- Method: Dipping
- Cuisine: American
- Diet: Vegetarian
Ingredients
- Oreo Cookies (chocolate or golden)
- Chocolate (white and/or dark)
- Black Icing
- Candy Eyes
Instructions
- Melt the chocolate by breaking it into pieces and microwaving in 30-second increments, stirring until smooth.
- Dip each Oreo halfway into the melted chocolate and place on a parchment-lined baking sheet.
- Create a skull design on the white-dipped side of the cookie with black icing.
- Add candy eyes into the icing while it’s still wet to secure them.
- Finish all cookies and let set in the fridge for about 30 minutes to harden.
Notes
Store the finished cookies in an airtight container in the refrigerator. They can be prepared a few days in advance.
Nutrition
- Serving Size: 1 cookie
- Calories: 150
- Sugar: 10g
- Sodium: 100mg
- Fat: 7g
- Saturated Fat: 4g
- Unsaturated Fat: 2g
- Trans Fat: 0g
- Carbohydrates: 22g
- Fiber: 1g
- Protein: 1g
- Cholesterol: 0mg
Keywords: Halloween, Desserts, Treats, Oreos, Party Snacks, Fun Food