Pumpkin Dirt Cups: A Fun and Delicious Treat for All Seasons
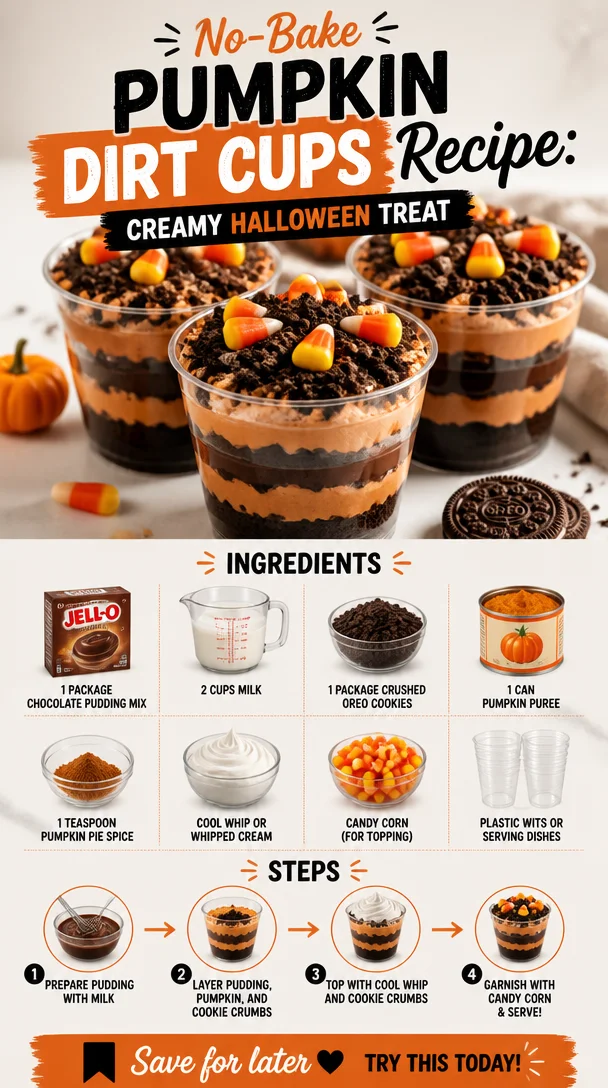
Fall is in the air, and that means it’s time to cozy up in the kitchen and whip up some delightful treats! One of my absolute favorites is the Pumpkin Dirt Cup, a whimsical dessert that’s not just perfect for Halloween but delightful any time of year. Imagine layers of velvety chocolate pudding mingled with rich pumpkin puree, topped off with a crispy layer of crushed Oreos and finished with playful candy corn. It’s a dessert that brings comfort and smiles, combining the beloved flavors of fall with the nostalgia of childhood treats.
Growing up, I have fond memories of making layered desserts with my family. There was always something magical about watching those colorful layers come together. They felt like little masterpieces, transforming simple ingredients into a stunning dessert. When I created the Pumpkin Dirt Cup, I wanted to capture that same joy—both in taste and the fun, hand-on approach that makes baking and cooking so special. Plus, who doesn’t love dessert cups that look like they belong in a Halloween party but taste like a warm hug?
So, whether you’re entertaining guests, celebrating the season, or simply treating yourself to a little indulgence, join me in making these amazing Pumpkin Dirt Cups. With just a few simple ingredients, you’ll create a dessert that not only tastes fantastic but brings a bit of playful nostalgia to your table. Ready to get started? Let’s dive into the deliciousness that awaits!
Personal Story
One of my earliest kitchen memories involves a big family gathering during the fall. My aunt, a creative and enthusiastic cook, decided we would all make dirt cups together. Her kitchen was overflowing with laughter and chocolate as we took turns layering pudding, crushed cookies, and gummy worms. It soon turned into a sweet battle of who could create the best dirt cup! Those moments, surrounded by family and giggles, stuck with me as a reminder of how food can be a vehicle for creating cherished memories.
As I grew older and began developing my own recipes, the dirt cup concept evolved into the Pumpkin Dirt Cup—a playful nod to my childhood while embracing the irresistible flavors of fall. Each time I make it, it takes me back to those delightful moments in my aunt’s kitchen. I hope to share that same joy with you through this recipe. Let’s keep that spirit alive as we make a delicious treat together!
Ingredients
Here’s what you’ll need to create your Pumpkin Dirt Cups:
-
1 package chocolate pudding mix (3.4 oz)
This classic pudding mix brings a rich, chocolatey flavor to the dessert. If you’re feeling adventurous, you can also use homemade chocolate pudding! -
2 cups milk
Whole milk provides the richest flavor, but you can swap in almond, soy, or oat milk if you prefer a dairy-free option. Just keep an eye on the thickness of the pudding. -
1 package crushed Oreo cookies (about 15 cookies)
These crunchy gems give the dessert its “dirt” layer and add a delightful texture. If you want to get creative, you can use other chocolate sandwich cookies or even graham crackers! -
1 can pumpkin puree (15 oz)
Pure pumpkin is the star of the show here! It adds moisture, flavor, and that gorgeous autumn color to the dish. If you can’t find canned pumpkin, you can make your own by roasting pie pumpkins and pureeing the flesh. -
1 teaspoon pumpkin pie spice
This warm blend of spices (usually cinnamon, nutmeg, and ginger) brings that quintessential fall flavor to the filling. If you don’t have it on hand, a mix of cinnamon and nutmeg will work beautifully! -
Cool Whip or whipped cream
Topping your dessert with whipped cream makes it extra indulgent! You can use store-bought or make your own for an even fresher taste. -
Candy corn (for topping)
The perfect festive garnish! If you’re not a fan of candy corn, consider using chocolate chips or mini marshmallows for a delightful twist. -
Plastic cups or serving dishes
Use any cups that suit your style! Clear cups let the layers shine, but feel free to be inventive with whatever you have on hand.
Step-by-Step Instructions
Now that we have our ingredients laid out, let’s get cooking! Follow these easy steps to create your Pumpkin Dirt Cups:
-
Prepare the Pudding: In a mixing bowl, combine the chocolate pudding mix and milk. Whisk vigorously for about 2 minutes until smooth and thickened. Tip: If you want an even creamier texture, allow the pudding to chill in the refrigerator for about 5 minutes before layering. The cold helps it firm up beautifully!
-
Mix the Pumpkin Base: In another bowl, stir together the pumpkin puree and pumpkin pie spice until fully combined. Then, fold in a cup of whipped cream until smooth. This will lighten the pumpkin mixture, creating a delightful contrast with the richer chocolate layer. Here’s a little chef hack: a dash of vanilla extract in the pumpkin mixture can elevate the flavor even more!
-
Crush the Oreos: Place your Oreos in a zip-top bag and crush them into fine crumbs using a rolling pin or your hands. It’s a fun way to release some energy! Just be careful not to make them too powdery; you want some crunchy bits for texture.
-
Layer It Up: Grab your plastic cups or serving dishes. Start with a layer of chocolate pudding at the bottom, filling the cups about halfway. Follow with a layer of the pumpkin mixture, and then a generous sprinkle of crushed Oreos. Repeat until you reach the top of your cups, finishing with a layer of whipped cream.
-
Top with Candy Corn: For a festive finishing touch, add a handful of candy corn on top of each cup. This not only looks adorable but adds a sweet crunch that pairs perfectly with the creaminess below.
-
Chill and Serve: Place the cups in the refrigerator for at least 30 minutes to let the flavors meld and the pudding set. Plus, this chilling time allows the dessert to come together seamlessly. When you’re ready to serve, bring them out, and watch everyone’s faces light up with excitement!
Serving Suggestions
To serve your Pumpkin Dirt Cups, arrange them on a decorative platter for a beautiful presentation. If you’re hosting a party, consider placing them alongside other fall-themed treats for a fun dessert table. You can also personalize each cup by writing names or little notes on DIY labels for your guests!
Recipe Variations
Looking to mix things up? Here are a few creative ideas to customize your Pumpkin Dirt Cups:
- Peanut Butter Twist: Swirl in some creamy peanut butter into the pumpkin mixture for a deliciously nutty flavor profile.
- Spiced Vanilla Layer: Swap the chocolate pudding for vanilla or butterscotch pudding for a different flavor contrast.
- Nutty Crunch: Add chopped nuts (like pecans or walnuts) to the crushed Oreo layer for an extra crunch.
- Dairy-Free Option: Use coconut whipped cream and dairy-free chocolate pudding mix to make the dessert completely dairy-free.
Chef’s Notes
As I reflect on my journey with this recipe, I’m reminded of how adaptable and forgiving it can be. I once forgot to add the sugar to the pumpkin mixture, but the dessert still turned out magical, proving that sometimes little mishaps can lead to unexpected delights in the kitchen. Over the years, this recipe has become a staple in my household. I even took it to a family gathering, where it garnered rave reviews and became the talk of the dessert table!
FAQs and Troubleshooting
Q: Can I make these in advance?
A: Absolutely! You can prepare the layers a day ahead. Just keep the cups covered in the refrigerator. The flavors deepen overnight, making them even more delicious!
Q: What if I don’t have pumpkin pie spice?
A: No worries! A mix of cinnamon and nutmeg works perfectly, or even just cinnamon will still bring warmth to the dish.
Q: How can I avoid a grainy pudding texture?
A: Make sure you whisk the pudding mixture thoroughly and let it set in the fridge for a proper duration. If you notice any lumps forming, a quick spin in a blender can help smooth it out!
Q: Can I use fresh pumpkin instead of canned?
A: Absolutely! Just make sure to cook and puree the pumpkin until smooth. Remember to remove as much moisture as possible to keep the filling from becoming too watery.
Nutritional Info (Optional)
While I love celebrating food without stressing over calories, I understand some may want to keep track. A serving of Pumpkin Dirt Cups generally offers a delightful balance of indulgence, with chocolate, pumpkin, and cream bringing together a delightful treat!
So, there you have it—a step-by-step recipe for delicious Pumpkin Dirt Cups that are bound to bring joy to your table. From personal stories to kitchen tips, I hope this inspires you to get creative and indulge in flavor. Grab your apron, gather some loved ones, and let’s enjoy the delicious moments together!
PrintPumpkin Dirt Cups
Layers of chocolate pudding, pumpkin puree, and crushed Oreos create a whimsical dessert perfect for any season.
- Prep Time: 15 minutes
- Cook Time: 0 minutes
- Total Time: 45 minutes
- Yield: 4 servings 1x
- Category: Dessert
- Method: No-Cook
- Cuisine: American
- Diet: Vegetarian
Ingredients
- 1 package chocolate pudding mix (3.4 oz)
- 2 cups milk
- 1 package crushed Oreo cookies (about 15 cookies)
- 1 can pumpkin puree (15 oz)
- 1 teaspoon pumpkin pie spice
- Cool Whip or whipped cream
- Candy corn (for topping)
- Plastic cups or serving dishes
Instructions
- Prepare the pudding: In a mixing bowl, combine the chocolate pudding mix and milk. Whisk vigorously for about 2 minutes until smooth and thickened.
- Mix the pumpkin base: In another bowl, stir together the pumpkin puree and pumpkin pie spice until fully combined. Then, fold in a cup of whipped cream until smooth.
- Crush the Oreos: Place your Oreos in a zip-top bag and crush them into fine crumbs using a rolling pin or your hands.
- Layer it up: Grab your plastic cups or serving dishes. Start with a layer of chocolate pudding at the bottom, followed by a layer of the pumpkin mixture, and then a sprinkle of crushed Oreos. Repeat until you reach the top.
- Top with candy corn: Add a handful of candy corn on top of each cup.
- Chill and serve: Place the cups in the refrigerator for at least 30 minutes to let the flavors meld and the pudding set.
Notes
For a dairy-free option, use almond, soy, or oat milk with dairy-free chocolate pudding mix and coconut whipped cream.
Nutrition
- Serving Size: 1 serving
- Calories: 320
- Sugar: 25g
- Sodium: 210mg
- Fat: 15g
- Saturated Fat: 7g
- Unsaturated Fat: 8g
- Trans Fat: 0g
- Carbohydrates: 44g
- Fiber: 2g
- Protein: 5g
- Cholesterol: 20mg
Keywords: pumpkin, dessert, Halloween, chocolate, pudding