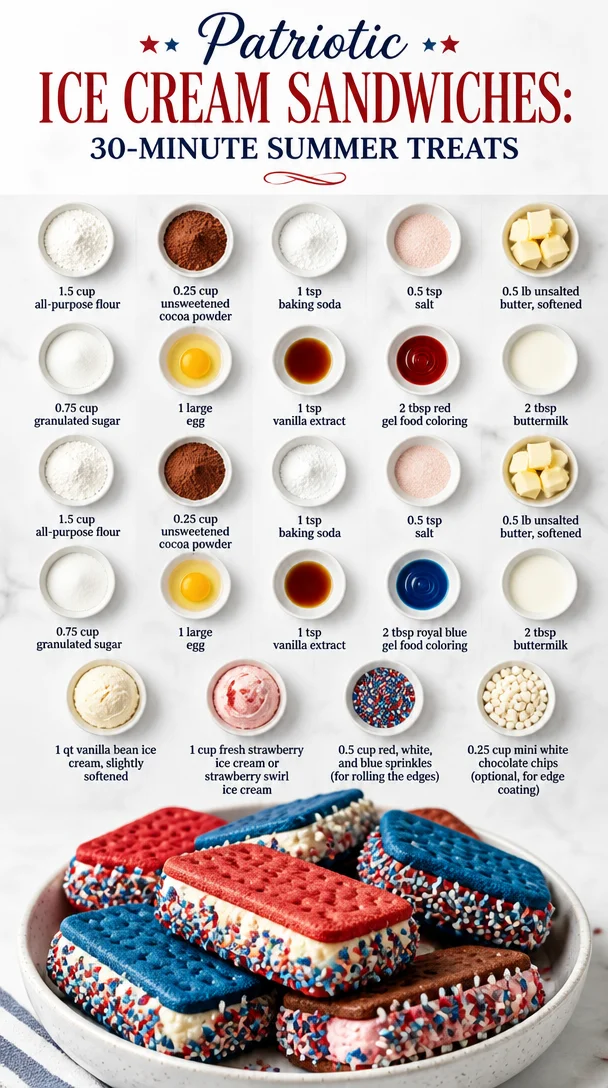
Patriotic Ice Cream Sandwiches: A Delicious Celebration of Flavor and Fun!
When it comes to celebrating our great nation, nothing brings people together quite like a glorious summer backyard BBQ—or, in my case, a fun-filled, ice cream-fueled family gathering. Today, I’m thrilled to share one of my all-time favorite desserts: Patriotic Ice Cream Sandwiches! Picture this: two vibrant, homemade cookies, frosted with creamy vanilla bean ice cream, and rolled in a rainbow of red, white, and blue sprinkles. They’re not just a dessert; they’re an invitation to celebrate!
These ice cream sandwiches are super easy to put together and always steal the show. Whether you’re grilling with family, setting off fireworks, or just enjoying the sunny weather, these treats are perfect for adding a pop of color—and flavor—to your festivities. Plus, who can resist the joy of homemade desserts? I know I can’t!
A Sweet Memory
I’ll never forget the first time I made ice cream sandwiches. It was the Fourth of July, and I was set on impressing my cousins who were visiting from out of town. We gathered in my kitchen, surrounded by what felt like a million sprinkles and a sea of chocolate chip cookies. My Great Aunt June, an absolute whiz in the kitchen, casually strolled in, rolling up her sleeves. “Let’s make them fun and colorful!” she said with a twinkle in her eye. Under her expert guidance, laughter filled the air as we baked, tasted, and crafted these delicious treats. That day forged not just a memorable dessert, but a cherished family tradition that spans generations. We always find a reason to whip up a batch of ice cream sandwiches, and they’re universally loved by kids and adults alike. Now, it’s your turn to create magical memories in the kitchen with these patriotic delights!
Ingredients
Here’s what you’ll need to whip up these delicious Patriotic Ice Cream Sandwiches—get ready for some colorful fun!
-
1.5 cup all-purpose flour
All-purpose flour is a versatile ingredient that acts as the backbone of our cookies. If you’re looking to experiment, you can substitute it with a gluten-free flour blend or whole wheat flour for a heartier cookie. -
0.25 cup unsweetened cocoa powder
This adds a rich chocolate flavor to one half of our cookie base. Feel free to swap it out for more flour if you’re looking for plain vanilla cookies. Trust me; they’ll still be amazing! -
1 tsp baking soda
This ingredient helps our cookies rise and keeps them chewy. Be sure it’s fresh! Old baking soda can lead to flat cookies. If you don’t have any, use baking powder instead but reduce the amount to half. -
0.5 tsp salt
Salt enhances the cookies’ sweetness, balancing the flavors beautifully. You can use sea salt or kosher salt; just skip it if you’re on a low-sodium diet. -
0.5 lb unsalted butter, softened
Butter gives our cookies their rich flavor and tenderness. You can use margarine or a dairy-free butter alternative in a pinch, but your cookies may not taste as decadent. -
0.75 cup granulated sugar
Granulated sugar adds sweetness and contributes to the cookie’s chewy texture. If you’re cutting back on sugar, use coconut sugar for a natural option that has a lower glycemic index. -
1 large egg
Eggs add moisture and help bind the cookie ingredients together. For a vegan version, try using a flax egg or applesauce instead! -
1 tsp vanilla extract
Pure vanilla extract amplifies the cookie’s flavor. You can swap it with almond extract for a twist! -
2 tbsp red gel food coloring
This vibrant color makes our cookie base pop! If you want a natural alternative, try beet juice, though the texture might change a bit. -
2 tbsp buttermilk
Buttermilk helps provide moisture and tanginess to the batter. If you’re out of it, mix a tablespoon of white vinegar with a cup of milk and let it sit for a few minutes. -
1.5 cup all-purpose flour (second half)
Same as before! This helps create our second cookie base, so we use it again. Double-check how many cookies you’d like to make, so there’s no wastage! -
0.25 cup unsweetened cocoa powder (second half)
Once again, for the chocolatey side! You got this! -
1 quart vanilla bean ice cream, slightly softened
This is the star of the show! Use high-quality ice cream for the best flavor. If you’re dairy-free, opt for coconut or almond milk ice cream. -
1 cup fresh strawberry or strawberry swirl ice cream
This gives our sandwiches a tasty fruit flavor and a beautiful color contrast. You could even use raspberry or blueberry ice cream if you prefer! -
0.5 cup red, white, and blue sprinkles (for rolling the edges)
These sprinkles are not just festive but add a delightful crunch too! If you want to make them cleaner, skip the sprinkles—nobody’s judging! -
0.25 cup mini white chocolate chips (optional, for edge coating)
These are a fab option if you want to get creative! They add richness and sweetness. You can swap them for dairy-free chocolate chips or omit them completely.
Step-by-Step Instructions
Now that we’ve gathered our ingredients, it’s time to bring these delicious Patriotic Ice Cream Sandwiches to life!
Step 1: Preheat Your Oven
Preheat your oven to 350°F (175°C). This ensures a perfect baking temperature for those cookies!
Step 2: Make the Cookie Dough
In a large mixing bowl, combine 1.5 cups all-purpose flour, 0.25 cup unsweetened cocoa powder, 1 tsp baking soda, and 0.5 tsp salt. Whisk them together until they are well mixed. You can totally do this with a spatula, but I like using a whisk for better aeration!
Step 3: Cream the Butter and Sugar
In another bowl, cream together 0.5 lb softened unsalted butter and 0.75 cup granulated sugar until the mixture is light and fluffy. This aeration step is crucial for airy cookies. Don’t rush it—allowing this to properly mix makes such a difference!
Step 4: Add Egg and Vanilla
Beat in 1 large egg and 1 tsp vanilla extract to the butter-sugar mixture. Mix until everything is fully incorporated, and you have a smooth creamy texture. Oh, that sweet vanilla aroma is simply divine!
Step 5: Divide the Dough
Now it’s time to separate the dough into two! Divide the batter in half. In one half, add 2 tbsp of red gel food coloring and 2 tbsp buttermilk. In the other half, do the same but with 2 tbsp of royal blue gel food coloring. Mix fully and watch those colors come alive! Make sure to scrape the sides of your bowls for all the goodness!
Step 6: Form the Cookies
Using a cookie scoop or tablespoon, drop spoonfuls of each colored dough onto a parchment-lined baking sheet, spacing them about 2 inches apart. Go wild with your creativity while forming them – scoop them into stars or any other shape, if you’re feeling adventurous!
Step 7: Bake the Cookies
Place your baking sheets in the oven and bake for about 10-12 minutes, or until the cookies are set but still soft in the center. Let them cool on the baking sheet for 5 minutes before transferring them to a wire rack. Savor the heavenly aroma wafting through your kitchen!
Step 8: Assemble the Ice Cream Sandwiches
Once cooled, place a scoop of 1 quart vanilla bean ice cream onto the bottom side of one colored cookie. Top with another cookie, bottom side down, and press together gently. Repeat until all cookies are used up! If you want a thicker ice cream filling, be generous with your scoops!
Step 9: Roll the Edges
If you’re adding the fun sprinkles or mini white chocolate chips, gently roll the edges of the ice cream sandwiches in 0.5 cup red, white, and blue sprinkles or 0.25 cup mini white chocolate chips. It adds a nice crunch and that festive touch you’re aiming for!
Step 10: Freeze Until Firm
Place your assembled ice cream sandwiches into the freezer for at least 2 hours to let the ice cream firm up. This waiting game is tough, but trust me, you’ll be rewarded!
Serving Suggestions
Plating these Patriotic Ice Cream Sandwiches is all about keeping things festive and fun! Arrange them on a colorful platter, maybe with some berries and whipped cream to really make the dish pop. Serve them alongside flag-inspired fruit skewers or a refreshing lemonade for a full summer bash vibe. Don’t forget to have plenty of napkins handy because things can get a bit messy!
Recipe Variations
- Brownie Cookies: Instead of regular cookies, switch to chocolate brownie cookie dough for a fudgier treat.
- Nutty Crunch: Add chopped nuts like pecans or almonds into the cookie batter for a delightful crunch!
- Fruit-Flavored Ice Cream: Experiment with different ice cream flavors! How about mango or lemon sorbet for a tropical twist?
- Healthier Option: Use whole wheat flour and coconut sugar to give a healthier makeover to this classic recipe.
- Dairy-Free: Opt for vegan butter and almond milk ice cream for a dairy-free treat that everyone can enjoy!
Chef’s Notes
As a recipe developer, my cooking is all about evolution! Over the years, I’ve experimented with these Patriotic Ice Cream Sandwiches, adding flavors and colors that resonate with different themes or celebrations. The one thing that hasn’t changed is how much joy these delicious treats bring. Whether it’s a birthday party, a holiday gathering, or just a weekend BBQ—the smiles they create are timeless. One of the funniest memories I have is of my dog, Max, who once snagged an entire plate off the counter and paraded it around. We were all laughing too hard to be mad! Ice cream sandwiches bring happiness, joy, and unforgettable moments—so make sure to enjoy every step of the way!
FAQs and Troubleshooting
1. My cookies turned out hard! What happened?
Cookies can turn out hard due to overbaking. Make sure to check them at the 10-minute mark and remove them even if they seem a little soft—they’ll firm up as they cool.
2. Why did my ice cream melt too quickly?
If your ice cream is too soft before assembly, you might end up with a gooey mess. Ensure it’s slightly softened but still firm enough to hold shape. Give your ice cream some time in the freezer before assembling the sandwiches!
3. How can I get vibrant colors in my cookies?
Always use gel food coloring instead of liquid food coloring to achieve those bright, eye-catching colors! The gel maintains the dough consistency while delivering stunning hues.
4. Can I freeze these ice cream sandwiches for later?
Absolutely! They freeze beautifully! Wrap each sandwich in plastic wrap or aluminum foil and store them in an airtight container. They’ll last a couple of weeks in the freezer, but I promise they won’t last that long once you try them!
Nutritional Info
While these treats are designed for enjoyment rather than strict health tracking, each serving typically contains around:
- Calories: 250
- Protein: 3g
- Carbohydrates: 30g
- Sugars: 15g
- Fats: 12g
Remember, substitutions can change those numbers, so adjust according to your ingredients and preferences.
And there you have it, folks! An epic recipe for Patriotic Ice Cream Sandwiches that bursts with flavor and is sure to become a beloved addition to your summer celebrations. Grab your apron, gather your loved ones, and let’s create some delicious memories together! Enjoy every bite, and don’t forget to go back for seconds—or thirds, because you know what? No judgment here! Happy baking!
PrintPatriotic Ice Cream Sandwiches
Celebrate with vibrant homemade cookies filled with creamy vanilla bean ice cream and festive red, white, and blue sprinkles.
- Prep Time: 30 minutes
- Cook Time: 12 minutes
- Total Time: 120 minutes
- Yield: 12 servings 1x
- Category: Dessert
- Method: Baking
- Cuisine: American
- Diet: Vegetarian
Ingredients
- 1.5 cups all-purpose flour
- 0.25 cup unsweetened cocoa powder
- 1 tsp baking soda
- 0.5 tsp salt
- 0.5 lb unsalted butter, softened
- 0.75 cup granulated sugar
- 1 large egg
- 1 tsp vanilla extract
- 2 tbsp red gel food coloring
- 2 tbsp buttermilk
- 1.5 cups all-purpose flour (second half)
- 0.25 cup unsweetened cocoa powder (second half)
- 1 quart vanilla bean ice cream, slightly softened
- 1 cup fresh strawberry or strawberry swirl ice cream
- 0.5 cup red, white, and blue sprinkles (for rolling the edges)
- 0.25 cup mini white chocolate chips (optional, for edge coating)
Instructions
- Preheat your oven to 350°F (175°C).
- Combine 1.5 cups all-purpose flour, 0.25 cup cocoa powder, 1 tsp baking soda, and 0.5 tsp salt in a bowl.
- Cream together 0.5 lb softened unsalted butter and 0.75 cup granulated sugar until light and fluffy.
- Beat in 1 large egg and 1 tsp vanilla extract until smooth.
- Divide the dough in half, adding red gel food coloring and buttermilk to one half, and blue food coloring and buttermilk to the other half.
- Drop spoonfuls of each colored dough onto a parchment-lined baking sheet, spacing them apart.
- Bake for 10-12 minutes, or until cookies are set but soft in the center.
- Cool on the baking sheet for 5 minutes before transferring to a wire rack.
- Assemble the ice cream sandwiches by placing a scoop of ice cream between two cookies.
- Roll the edges in sprinkles or mini chocolate chips if desired.
- Freeze for at least 2 hours until firm.
Notes
These sandwiches can be frozen for later enjoyment—just wrap each sandwich in plastic wrap.
Nutrition
- Serving Size: 1 sandwich
- Calories: 250
- Sugar: 15g
- Sodium: 200mg
- Fat: 12g
- Saturated Fat: 7g
- Unsaturated Fat: 5g
- Trans Fat: 0g
- Carbohydrates: 30g
- Fiber: 2g
- Protein: 3g
- Cholesterol: 30mg
Keywords: ice cream sandwiches, summer dessert, patriotic dessert, homemade cookies, festive treats