The Art of Homemade Dill Pickle Relish: A Flavorful Journey
Hello, fellow food lovers! Today, I’m thrilled to dive into a recipe that embodies nostalgia and joy all in one jar—Dill Pickle Relish! This vibrant condiment isn’t just for slathering on sandwiches or throwing on burgers; it’s a flavorful staple that can elevate any dish into something special. So roll up those sleeves and let’s make something amazing together!
A Little Taste of Memory
Growing up, my grandmother’s kitchen was a magical place. Its walls were filled with the aroma of spices and summer vegetables, tempting us to discover the secrets behind her cherished recipes. One particular summer, the cucumbers from her garden were bursting at the seams. Watching her transform this humble vegetable into gleaming jars of dill pickle relish was pure enchantment. The clinking of jars, the crisp snap of cucumbers, and her stories about the "magic" of pickling danced in the air.
That summer, I was determined to learn. The thrill of making something from scratch and the anticipation of tasting it was unparalleled. Years later, as I stole time in my own kitchen, the longing for that sweet, tangy, and refreshing dill pickle relish remained. Now, I’m excited to share that joy and flavor-packed journey with you!
Ingredients
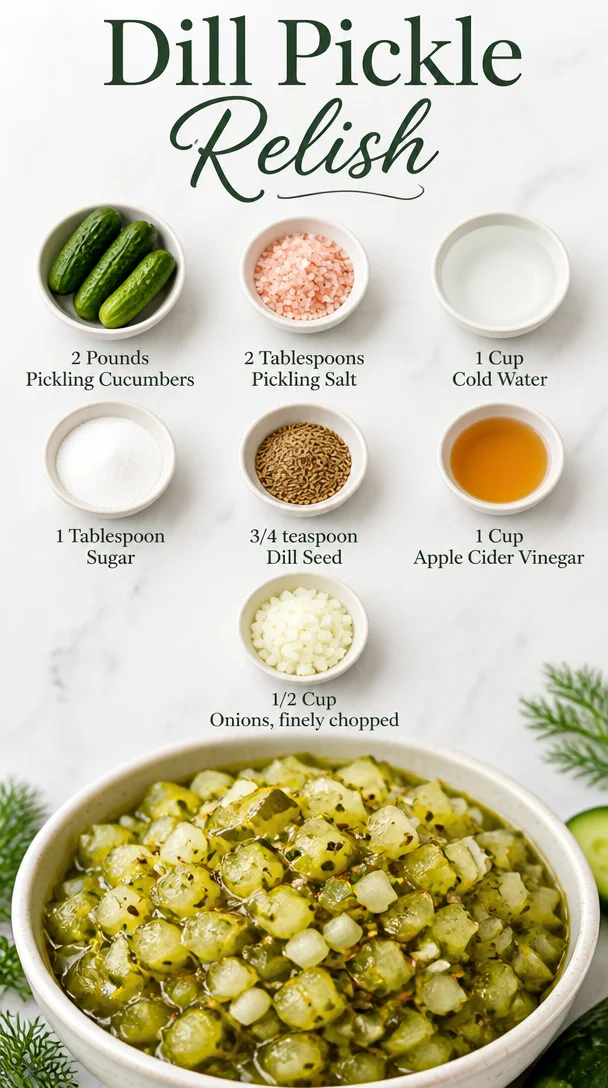
Gather your ingredients. This recipe is straightforward, using few items that pack a punch in flavor. Here’s what you need to create this delightful dill pickle relish:
-
2 Pounds Pickling Cucumbers
The stars of the show! Select firm, fresh cucumbers for the best crunch. If you’re in a pinch, English cucumbers can work; just keep in mind they have thinner skin. -
2 Tablespoons Pickling Salt
This helps to draw moisture from the cucumbers while flavoring them beautifully. If you can’t find pickling salt, kosher salt is a great substitute—just be aware it can make the relish a bit saltier since it’s not as fine. -
1 Cup Cold Water
Used to help dissolve our pickling salt. Cool, refreshing, and essential for the brine process! -
1 Tablespoon Sugar
A touch of sweetness that balances the acidity. Feel free to swap this with honey or agave syrup for a more natural alternative. -
3/4 teaspoon Dill Seed
The quintessential herb for that classic dill flavor! You can also use fresh dill weed if you prefer, but you may want to add a little more since the flavor is milder. -
1 Cup Apple Cider Vinegar
This gives our relish that characteristic tang. If you’re not a fan of apple cider vinegar, white vinegar can substitute with a just slightly sharper taste. -
1/2 Cup Onions, finely chopped
This adds a lovely bite and complexity. Sweet onions are great if you prefer a milder flavor, or you could opt for red onions for a splash of color.
Step-by-Step Instructions
Now let’s get our pickle magic on! Follow these steps closely, and you’ll have colorful jars of dill pickle relish waiting for you.
-
Prepare the Cucumbers
Start by washing your pickling cucumbers thoroughly. Slice off the ends and cut them into quarters lengthwise, then slice them into small pieces. The size is up to you, but remember: smaller pieces will yield a finer relish! -
Brine the Cucumbers
In a large bowl, combine your chopped cucumbers with pickling salt and cold water. Stir until the salt dissolves. Cover the bowl with a clean towel and let it sit for about 1–2 hours. This step is essential for drawing out excess moisture and crunch from the cucumbers.Chef’s Tip: If you’re short on time, just let the cucumbers sit for at least 30 minutes, though longer yields a more intense flavor!
-
Drain and Rinse
After your cucumbers have sat, drain them in a colander and rinse under cold water to wash off excess salt. This also helps to crisp them up! Be so kind as to give them a gentle squeeze to remove any remaining moisture. -
Mix the Relish Ingredients
In a medium saucepan, mix the drained cucumbers, sugar, dill seed, apple cider vinegar, and finely chopped onions. Give it a good stir and place over medium heat. Bring the mixture to a gentle boil, allowing the sugar to dissolve and the flavors to meld.Chef’s Insight: Don’t let it boil too vigorously; we want a compatible mixture rather than mushy cucumbers!
-
Cook It Down
Allow the mixture to simmer for about 10-15 minutes. The goal is to soften the onions while keeping those cucumbers nice and crunchy. Stir occasionally to promote even cooking. -
Jar It Up
Prepare jars for canning! Sterilize glass jars and lids in boiling water to ensure no unwanted bacteria hang out. Using a ladle and a funnel, pour your hot relish into each jar, leaving about 1/2 inch of headspace at the top.Pro Tip: Wipe the rims of the jars with a clean cloth to ensure a good seal!
-
Seal and Store
Place the lids on the jars and twist them until they’re snug but not overly tight. Process the jars in a hot water bath (boiling water covering the jars for about 10 minutes). Allow them to cool completely before storing them in a cool, dark place.
Serving Suggestions
Once your dill pickle relish is ready, the world’s your oyster—or should I say, your burger! Serve it as a glorious topping on grilled hot dogs, burgers, or chicken sandwiches. It’s also fabulous stirred into potato salad, slathered on a hearty sandwich, or even tossed with cream cheese for an unexpected veggie dip! Your taste buds will thank you!
Recipe Variations
Now that you’ve mastered the classic dill pickle relish, let’s mix things up a bit:
-
Sweet and Spicy: Add a few chopped jalapeños or crushed red pepper flakes for a kick.
-
Mustard Dill Relish: Include a tablespoon of mustard seeds for an additional tang and complexity.
-
Herbed Delight: Toss in some fresh herbs like basil or cilantro for a fresh twist.
-
Zesty Citrus: A splash of lemon or lime juice can brighten up the flavor profile!
Chef’s Notes
I love this recipe because it’s adaptable to whatever you have on hand! The joy of creating the perfect blend of sweet and tart flavors has continued to evolve in my kitchen. This dill pickle relish has become a family favorite and a go-to gift during the holidays—who wouldn’t love a homemade treat? Don’t be surprised if friends start asking for your secret recipe!
FAQs and Troubleshooting
1. My relish is too salty!
If your relish comes out too salty, next time reduce the amount of pickling salt or ensure you rinse your cucumbers thoroughly after brining.
2. Can I increase the batch size?
Absolutely! Just ensure to maintain the same ratio of ingredients. You can double or even triple the recipe, but you may need to process it in batches depending on your equipment.
3. How long does the relish last?
When properly sealed and stored, your dill pickle relish will last about a year in a cool, dark pantry. Once opened, keep it refrigerated and consume it within a couple of months.
4. What if my relish doesn’t set?
If your relish seems too runny, return it to a pot and simmer it longer to reduce the liquid. A few minutes can really make a difference!
Nutritional Info
While specific nutritional info might vary depending on brands and specific ingredients used, a tablespoon serving generally averages out to around 10 calories, with low fat and, of course, plenty of flavor!
Now you’re armed with everything you need to create a delicious batch of homemade dill pickle relish! Whether it’s a summer barbecue or a cozy winter meal, this recipe brings flavor, joy, and a touch of nostalgia to your kitchen. So grab your apron, embrace the mess, and let your culinary adventure begin! Happy cooking!
PrintHomemade Dill Pickle Relish
A delightful and tangy dill pickle relish that is perfect for topping your favorite dishes or adding to sandwiches.
- Prep Time: 30 minutes
- Cook Time: 15 minutes
- Total Time: 45 minutes
- Yield: 6 servings 1x
- Category: Condiment
- Method: Canning
- Cuisine: American
- Diet: Vegetarian
Ingredients
- 2 Pounds Pickling Cucumbers
- 2 Tablespoons Pickling Salt
- 1 Cup Cold Water
- 1 Tablespoon Sugar
- 3/4 teaspoon Dill Seed
- 1 Cup Apple Cider Vinegar
- 1/2 Cup Onions, finely chopped
Instructions
- Prepare the Cucumbers: Wash the cucumbers thoroughly, slice off the ends, and cut them into quarters then into small pieces.
- Brine the Cucumbers: Combine chopped cucumbers with pickling salt and cold water in a large bowl. Stir until salt dissolves and let it sit for 1-2 hours.
- Drain and Rinse: Drain cucumbers in a colander and rinse under cold water; gently squeeze to remove remaining moisture.
- Mix the Relish Ingredients: In a medium saucepan, mix drained cucumbers, sugar, dill seed, apple cider vinegar, and finely chopped onions, then heat over medium, bringing to a gentle boil.
- Cook It Down: Allow the mixture to simmer for about 10-15 minutes, stirring occasionally.
- Jar It Up: Sterilize glass jars, pour hot relish into jars leaving 1/2 inch headspace.
- Seal and Store: Place lids snugly on the jars, process in a hot water bath for about 10 minutes, then cool completely before storage.
Notes
This relish can be enjoyed for about a year when properly sealed and stored in a cool, dark place. Customize with additional spices or ingredients for a personal touch.
Nutrition
- Serving Size: 1 tablespoon
- Calories: 10
- Sugar: 1g
- Sodium: 180mg
- Fat: 0g
- Saturated Fat: 0g
- Unsaturated Fat: 0g
- Trans Fat: 0g
- Carbohydrates: 2g
- Fiber: 0g
- Protein: 0g
- Cholesterol: 0mg
Keywords: pickle relish, dill relish, homemade relish, canning, condiments