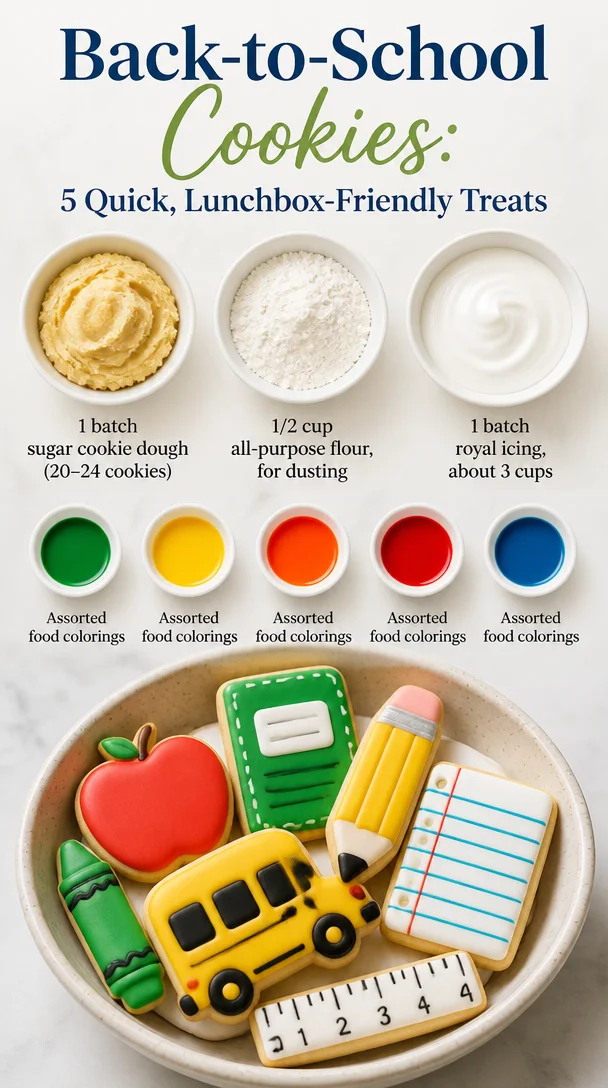
Back to School Cookies: Sweet Treats for the New School Year
As summer fades and there’s a crispness to the air, it signals a return to a busy routine—a time of fresh beginnings and exciting challenges. With kids heading back to school, there’s no better way to embrace this new chapter than with a batch of homemade Back to School Cookies! These delightful little treats are not just cookies; they’re mini celebrations of new supplies, new friendships, and all the possibilities that a new school year brings.
When I think of Back to School Cookies, it brings back fond memories of my childhood. I still remember the way the kitchen would light up with laughter and chatter as my siblings and I gathered around the counter with my mom, eagerly awaiting our afternoon baking session. The smell of freshly baked cookies filled the house, mingling with the anticipation of a new grade and new teachers. We would carefully decorate each cookie with colorful royal icing, showing off our artistry in all its messy glory. Those cookies not only satisfied our sweet tooth but also became a canvas for our creativity.
Today, I’m excited to share an easy, fun cookie recipe that not only evokes nostalgia but also brings joy and laughter into your kitchen. With these Back to School Cookies, you can gather your little chefs and create memorable moments together. So, roll up your sleeves, grab those aprons, and let’s dive into cookie magic!
Ingredients
Before we get baking, let’s gather our ingredients! Each one plays a special role in crafting these delightful cookies.
-
1 batch sugar cookie dough (for 20-24 cookies): This is the heart of the recipe! A good sugar cookie dough is sweet, buttery, and holds its shape beautifully when baked.
-
1/2 cup all-purpose flour (for dusting): This is your secret weapon to prevent stickiness. Dust your rolling surface to keep things moving smoothly!
-
1 batch royal icing (about 3 cups): This icing is perfect for decorating. It dries hard, providing a solid base for your designs and a delicious crunch.
-
Assorted food colorings: Unleash your creativity with vibrant colors! Each color can represent a different theme or character. Remember, your cookie creations can be as colorful as your imagination!
Step-by-Step Instructions
Let’s get started on creating these scrumptious cookies!
1. Make the Sugar Cookie Dough:
- If you’re using store-bought dough, skip this step. Otherwise, in a large mixing bowl, combine butter and sugar until creamy. I suggest softening your butter to room temperature for that perfect creamy texture—trust me, your cookies will thank you. Next, add in your egg and vanilla extract, blending until smooth. Finally, gradually incorporate your flour and a pinch of salt. Don’t be afraid to get in there with your hands; sometimes, that’s the best tool you have!
2. Chill the Dough:
- Once your dough is ready, form it into a disk, wrap it in plastic wrap, and refrigerate for at least 1 hour. Chilling is key—it helps the cookies maintain their shape while baking and makes rolling out so much easier.
3. Preheat Your Oven:
- About 10 minutes before you take the dough out of the fridge, preheat your oven to 350°F (175°C). I love the aroma that fills the kitchen when cookies are baking. It’s like a warm hug!
4. Roll Out the Dough:
- Lightly flour your countertop and your rolling pin. When your dough is firm and ready, roll it out to about 1/4 inch thick. If the dough is sticking, add a bit more flour. Don’t worry about imperfections; they add character!
5. Cut Out Cookies:
- Using cookie cutters (like letters, school supplies, or your kids’ favorite shapes), cut out cookies and place them on a baking sheet lined with parchment paper. Give them a little space to spread, usually about an inch apart.
6. Bake the Cookies:
- Pop them in the oven for about 8-10 minutes, or until the edges are lightly golden. The centers may look slightly undercooked, but that’s ideal! They’ll firm up as they cool.
7. Cool and Prepare Royal Icing:
- Let the cookies cool completely. While they’re chilling, prepare your royal icing. You can whip this up quickly with powdered sugar, egg whites (or meringue powder), and a splash of water. Mix until it reaches the right consistency—smooth but not too runny.
8. Color Your Icing:
- Divide the icing into bowls and mix in your food colorings. You can play around with colors to make your cookies pop! Remember to keep one bowl of white for outlines and details.
9. Decorate Your Cookies:
- Grab your piping bags (or ziplock bags with the corner cut off). Start by outlining your cookies with the thicker consistency icing, allowing it to dry before filling in with the thinner icing. Let your creativity run wild – sprinkles, edible glitter, or just simple patterns can make each cookie special!
10. Let It All Dry:
- Once decorated, let your cookies sit at room temperature until the icing hardens. Patience is key here; the result will be well worth the wait!
Serving Suggestions
These Back to School Cookies are perfect for school lunches, after-school snacks, or even as a treat for a back-to-school gathering! Stack them high on a colorful platter, add a few sprigs of fresh mint for a pop of color, or place each cookie in its own little bag with a ribbon for a cute treat to share with friends.
Recipe Variations
-
Chocolate Sugar Cookies: Swap out 1/3 of the flour for cocoa powder for a chocolaty twist that chocolate lovers will adore.
-
Spiced Sugar Cookies: Add a tablespoon of cinnamon and nutmeg for a warm, cozy flavor that pairs perfectly with fall.
-
Gluten-Free Option: Use a 1-to-1 gluten-free flour blend in place of the all-purpose flour for a deliciously gluten-free treat.
-
Vegan Icing: Substitute egg whites with aquafaba (the liquid from canned chickpeas) to create a vegan-friendly royal icing!
Chef’s Notes
Oh, the memories that come rushing back every time I whip up these cookies! I remember one year, I got a little too creative with the royal icing and ended up with a cookie that looked like a rainbow explosion. My mom laughed it off, saying it was “art.” It turned into a family tradition to decorate cookies in the most abstract ways possible. Over the years, I’ve refined the technique, but I encourage you to embrace the chaos in the kitchen—there’s beauty in imperfection!
FAQs and Troubleshooting
Q: My cookies spread too much during baking. What went wrong?
A: This often means the dough wasn’t chilled long enough, or your butter was too soft. Ensure your dough is adequately chilled before rolling it out, and even chill again after cutting out the shapes.
Q: Why would my royal icing not harden?
A: If the icing is too thin, it may take longer to set. Make sure to achieve a good piping consistency. If in doubt, test a small portion on a cookie!
Q: Can I freeze these cookies?
A: Yes, absolutely! Once they’re fully cooled, you can freeze them in an airtight container. Just allow them to thaw at room temperature before decorating.
Q: How can I make the icing vibrant and not dull?
A: Gel food colorings are your best friend here—they deliver a vibrant punch without altering the icing’s consistency too much. Just add a little at a time until you get your desired shade!
Nutritional Info
While I aimed for a fun and indulgent treat, it’s always good to know what you’re munching on! Each cookie (without decorations) typically contains about 120 calories, 6g fat, 15g carbs, and 1g protein. But let’s be real; these are made for joy, not strict diets!
So there you have it—a complete guide to baking Back to School Cookies! With each batch, you’re not just creating treats but memories that will last a lifetime. Happy baking!
PrintBack to School Cookies
Delightful homemade cookies perfect for celebrating back-to-school season, featuring colorful royal icing and an easy sugar cookie dough recipe.
- Prep Time: 15 minutes
- Cook Time: 10 minutes
- Total Time: 1 hour 25 minutes
- Yield: 24 cookies 1x
- Category: Dessert
- Method: Baking
- Cuisine: American
- Diet: Vegetarian
Ingredients
- 1 batch sugar cookie dough (for 20–24 cookies)
- 1/2 cup all-purpose flour (for dusting)
- 1 batch royal icing (about 3 cups)
- Assorted food colorings
Instructions
- Make the Sugar Cookie Dough: If using store-bought dough, skip this step. Otherwise, in a large mixing bowl, combine butter and sugar until creamy, then add egg and vanilla extract, blending until smooth. Gradually incorporate flour and a pinch of salt.
- Chill the Dough: Form the dough into a disk, wrap in plastic wrap, and refrigerate for at least 1 hour.
- Preheat Your Oven: About 10 minutes before removing the dough, preheat your oven to 350°F (175°C).
- Roll Out the Dough: Lightly flour your countertop and rolling pin. Roll the chilled dough to about 1/4 inch thick.
- Cut Out Cookies: Use cookie cutters to cut out shapes and place on a baking sheet lined with parchment paper.
- Bake the Cookies: Bake for 8-10 minutes, until edges are lightly golden.
- Cool and Prepare Royal Icing: Allow cookies to cool completely and prepare royal icing with powdered sugar, egg whites (or meringue powder), and water.
- Color Your Icing: Divide icing and mix in food colorings as desired.
- Decorate Your Cookies: Outline cookies with thicker consistency icing and fill in with thinner icing.
- Let It All Dry: Allow cookies to sit at room temperature until the icing hardens.
Notes
These cookies are perfect for school lunches or as treats for gatherings. You can freeze them once cooled for later enjoyment.
Nutrition
- Serving Size: 1 cookie
- Calories: 120
- Sugar: 10g
- Sodium: 50mg
- Fat: 6g
- Saturated Fat: 3g
- Unsaturated Fat: 2g
- Trans Fat: 0g
- Carbohydrates: 15g
- Fiber: 0g
- Protein: 1g
- Cholesterol: 15mg
Keywords: back to school, cookies, baking, kids, royal icing